When we are talking about secure authentication mechanism the old fashion – “user name and password” is not relevant and out of the security scope when planning and creating a secured design.
The following article describes how to configure ISA 2004 Server PPTP VPN based EAP Authentication without the need of ISA 2004 Server to be a Member in the Domain.
In this article I choose the Aladdin eToken smart card but you can choose which smartcard you fill comfortable with.
This scenario is very simple:
- The VPN client opens a PPTP session to the ISA Server and presents a user certificate contained on the Smartcard
- The ISA firewall forwards the request to the IAS Server (RADIUS) located on the LAN; the IAS Server is a Member of the domain
- The IAS Server the following before authorizing:
- The session is PPTP
- Validate the EAP Authentication
- The user is a member in a specific group in the AD
 These are the steps we need to accomplish:
After talking so much let’s start doing the interesting stuff, let’s start the journey!
- First of all we need to download and install the RTE (Run time Environment) from Aladdin web site: http://www.aladdin.com/etoken/downloads/rte.asp
- The installation is very easy and has the Microsoft “feel and look”.
- To create a group in the Active Directory, on the DC go to Start->Run and enter dsa.msc and press enter.
- The MMC – Active Directory Users and Computers will open, go to the Users OU, right click->New->Group
- To enable the Dial-In option, on the DC go to Start->Run and enter dsa.msc and press enter. Go to the Users OU and select the user you want to allow access, right click on this user->Dial-In tab->Allow Access

- For configuring the CA (Certificate Authority) to enable “Request a certificate for a smart card on behalf of another user by using the smart card certificate enrollment station” please follow the next steps:
The first problem:
When you surf to the CA – http://localhost/certsrv choose Request a certificate->advanced certificate request->
Request a certificate for a smart card on behalf of another user by using the smart card certificate enrollment station,
then you will see the following page:
Figure 1:

You will see that you don’t have a template for the CA and there is no Administrator Signing Certificate. To enable those options first we need to add 2 templates:
- Enrollment Agent
- SmartCard Logon
Open Start
->Run and write “certsrv.msc”
Figure 2:

Right click on the “Certificate Templates” and then select New->Certificate Template to Issue
Figure 3:

Select “Enrollment Agent” and press OK
Figure 4:

Repeat figure 3, then Select “Smartcard Logon” and press OK
Figure 5:

After doing those steps surf to http://localhost/certsrv and select Request a certificate
-> advanced certificate request -> Create and submit a request to this CA
Select “Administrator” template and then select Submit and then Install this certificate
Figure 6:

Go back 2 pages and Select “Enrollment Agent” template then select Submit
then Install this certificate
Figure 7:

-> advanced certificate request -> Request a certificate for a smart card on behalf of another user by using the smart card certificate enrollment station.
Figure 8:

Next step is to create and enroll the user certificate, this is the page you need to see after doing all the above stages:
Figure 9:

Comment
:
We are choosing “Smartcard Logon” because this template contain both Client Authentication and Smart card Logon. Please press on the “Select User” option and choose user from the Active Directory that you want to enroll a certificate to.
Figure 10:

After choosing the user from the Active Directory we need to put inside our USB the eToken smart card and click Enroll
Figure 11:

- Enable and Configuring the ISA 2004 Firewall’s VPN Server
After doing all the instructions above, we are ready to enable and configure the ISA 2004 Firewall’s VPN Server. We are going to enable VPN Clients access based on EAP and RADIUS Authentication At the Virtual Private Networks (VPN) section choose the Verify option to enable the VPN Client access.
Figure 12:

At this section select the option “Enable VPN Client access” and a proper number of your VPN Clients that are allowed to connect, don’t choose astronomical number! This could create a security breach!
Figure 13:

After enabling the VPN Client access, a restart is required.
Figure 14:

Now, in the same page choose the RADIUS Server link.
Figure 15:

Please choose the following 2 options and then select the RADIUS Servers options.
Figure 16:

On this RADIUS Servers windows, select Add
Figure 17:

On the Server name section, put the IP Address of the IAS server that located inside you network
Figure 18:

For more information about Message Authenticator please see the IAS Configuration section below!
Choose a strong secret key that suitable to the secret key on the IAS server.
Figure 19:

After applying all these changes you will see the following message, Click OK.
Figure 20:

After configuring the RADIUS properties on the VPN Section, we need to configure the RADIUS access on the System Policy rules. Open the System Policy by selecting right clicking on the Firewall Policy node in the left pane of the console and choose Edit System Policy.
Figure 21:

Now you need to validate that the Check box on the Enable is marked
Figure 22:

Now go to the To tab and remove the Internal object, Instead put the internal IAS object (for security reasons)
Figure 23:

In the Virtual Private Networks (VPN) page, select VPN Properties.
Figure 24:

Enable just the PPTP option!
Figure 25:

In the Virtual Private Networks (VPN) page, select Remote Access Configuration.
Figure 26:

Select the External interface, which is where the VPN Client connections are allowed to (in this scenario)
Figure 26:

Move to the Address Assignment tab and choose Static address pool or Dynamic Host Configuration Protocol (DHCP) which I don’t recommend in this scenario.
Figure 27:

Go to the Authentication tub and choose Extensible authentication protocol (EAP) with smart cart or other certificate even though the ISA firewall is not a part of the domain!
Figure 28:

After choosing the EAP option you will see the following message, click OK and continue.
Figure 29:

After doing all the steps above, we need to create an access rule for the VPN Clients access.
Right click on the Firewall Policy, choose New
->Access Rule and follow the steps below. Always choose a meaningful rule name! Click Next.
Figure 30:

Choose the Allow option and click Next
Figure 31:

Always choose a specific protocol for the VPN Access, click Add and choose the proper protocol for your scenario, for this scenario I choose RDP. Click Next to continue.
Figure 32:

Add the VPN Clients object to the source section and click Next.
Figure 33:

Always choose a destination server in the VPN Access rules!, Click Next to continue.
Figure 34:

From my experience almost every IT or Firewall Manager configures the VPN Access rules from Any source to Any destination in Any service Allow. This is wrong, guys!
Take a look at the following rule! VPN Access rule need to look like this.
Figure 35:

Configuring the IAS (Internet Authentication Services)
- At the IAS Server machine, click Start and point to Administrative Tools. Click Internet Authentication Service.
- Right click on the “Internet Authentication Service (Local)” and choose Register Server in Active Directory”, This option create
Figure 36:

- When selecting this option you will see this message, press OK and continue to the next phase.
Figure 37:

- In the Internet Authentication Service console, right click the RADIUS Clients node in the left pane of the console and click New RADIUS Client.
Figure 38:

- On the Name and Address page, enter a Friendly name for the ISA firewall. In this example the friendly name will be ISA Firewall. Enter the IP address on the internal interface of the ISA firewall in the Client address (IP or DNS) text box. Click Next.
Figure 39:

- On the Additional Information page, confirm that the Client-Vendor option is set to RADIUS Standard. Enter a password in the Shared secret text box and confirm the password in the Confirm shared secret text box. Make the password complex, with more than 8 characters and a mix of upper and lower case letters, numbers and symbols. Put a checkmark in the Request must contain the Message Authenticator attribute checkbox. Click Finish.
*For more information about Message Authenticator attribute please see the following link:
http://www.microsoft.com/resources/documentation/WindowsServ/2003/standard/proddocs/en-us/Default.asp?url=/resources/documentation/WindowsServ/2003/standard/proddocs/en-us/sag_ias_messauth.asp
Figure 40:

- Delete the 2 default policies in the IAS Remote Access Policies
Figure 41:

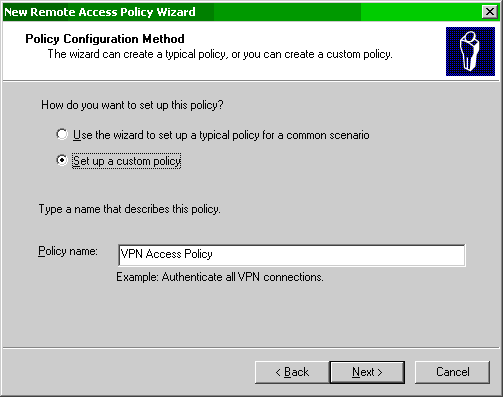
- You need to create 3 policy rules. Right click on the Remote Access Policies and choose New Remote Access Policy
Figure 42:

- Press Next and step forward
Figure 43:

- Always choose a meaningful Policy name and press Next.
Figure 44:

- In this window you need to select 3 attributes:
Figure 45:

- In this window you need to see the 3 attributes you selected, click Next.
Figure 46:

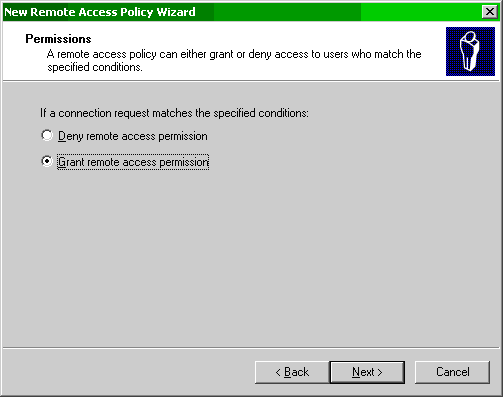
- In this window you need to select the Grant remote access permission option and press Next.
Figure 47:

- Press Next and finish the process.
If you would like us to email you when Idan Plotnik releases another article on ISAserver.org, subscribe to our ‘Real-Time Article Update’ by clicking here. Please note that we do NOT sell or rent the email addresses belonging to our subscribers; we respect your privacy.


