If you missed the first article in this series please read Exchange 2007 Message Classifications (Part 1).
Introduction
In this part of Message Classification in Exchange Server 2007 article series, we’ll see how to use multiple languages, how we define the classification automatically using transport rules and in the last section, we’ll see where this information is kept in the Active Directory.
Working with multiple languages
Due to the flexibility of Exchange Server 2007, we can work with Message Classifications in several languages, thus enhancing the end-user experience.
By default, Exchange Server 2007 has four Message Classifications distributed in ten languages that are: German (DE), Spanish (ES), French (FR), Italian (IT), Japanese (JP), Korean (KO), Portuguese (PT), Russian (RU), Chinese Simplified (zh-CHS) and Chinese Traditional (zh-CHT).
We can create any localization available in OWA and adjust specific text in each language. We will use the following example: we have got some users who use, as a native language, Brazilian Portuguese, and we will create two Message Classifications for this purpose. The description of these message classifications will be shown to the sender and recipient in their desired language. You will see the Message Classifications in OWA and in Outlook 2007, or earlier.
To create a new Message Classification, we have to use the Exchange Management Shell, specifying the localization, in our case pt-br, the parameters that will be used are the same used in the beginning of the article, we have to put the text in the correct language in the attributes SenderDescription and RecipientDescription (Figure 01).

Figure 01: Creating a new localized version in Portuguese for an existent Message Classification
Remember that this will not replace the existing content, we can still see in the figure above that the attributes Identity and Locale are pt-BR\Articles, this information helps us determine the language. When we created the Message Classification called Articles, its ID was Default\Articles, in other words, they are the same Message Classification with different languages.
Testing a message with localized versions
Ok, we’ve defined the Message Classification called Articles to Portuguese and we have to change the OWA of the user Jose.Rodas to the Portuguese language. To do that, we have to open the mailbox of Jose.Rodas in OWA, then we have to click on Options (located at the top of the page on the right side), on the left side click on Regional Settings, and in the Language section we have to choose Portuguese (Brazil), as it is shown in Figure 02.

Figure 02: Changing the mailbox language to Portuguese (Brazil)
With these settings, all the messages sent will use the localized Portuguese version of the Message Classifications. To test this feature, we will send a message from the Administrator to the user Jose.Rodas (OWA located in Brazilian Portuguese) and Anderson.Patricio (OWA located in default English); we will use, in this test, the Message Classification called Articles (Figure 03).

Figure 03: Administrator sending a message to two users who use different languages
Now, let’s see the result for the user Anderson.Patricio that has defined his language as English. Remember that for him, we had defined the RecipientDescription as the English language. (Figure 04)

Figure 04: User configured to English and receiving the description in English
The same message is received by the user Jose.Rodas with the description in Portuguese, this happens because we have defined the correct localization for the Message Classification Articles. Using this resource we can increase the user experience using the messaging system. (Figure 05)
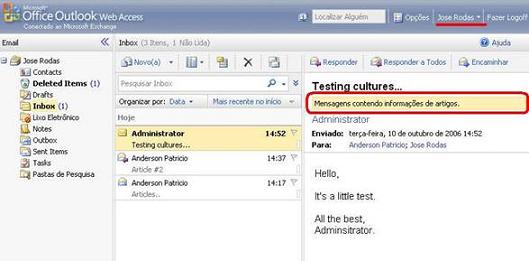
Figure 05: User Jose.Rodas seeing the content in Portuguese
Classifying messages through transport rules
Until now we have seen how to manage the Message Classification at the user level, now we are going to see how the Exchange Administrator can classify messages on the Exchange Servers using Transport Rules on the Hub Transport Server.
Let’s classify messages of the exchange organization in the following way: all messages sent internally that have the string “article” in the subject field will be classified automatically with Message Classification called Articles.
We should use the Exchange Management Console to create the Transport Rule. These steps are necessary to accomplish this task:
- Open the Exchange Management Console
- Expand Organization Configuration
- Click on Hub Transport
- In Toolbox Actions, click on New Transport Rule…
- In the first screen, fill in the name and check the Enable Rule option, click Next (Figure 06)

Figure 06: Initial screen of the Transport Rule wizard
- Conditions. In Step 1, check the option from users inside or outside the corporation and when the Subject field contains specific words and in Step 2, choose Inside and add the word Article, similar to figure 07, and click on Next.

Figure 07: Defining the conditions of the rule
- Actions. Click on apply message classification and choose Articles in Step 2, after that click Next

Figure 08: Defining the action of the rule. This rule will apply a classification to all the messages that satisfy this rule
- In Exceptions, click Next
- In Create Rule, click New
- In Completion, click Finish
It’s done! We’ve just created a transport rule to classify some messages. To test our rule we will send a message from the user Administrator to the users Jose.Rodas and Anderson.Patricio containing the word “article” in the subject field (Figure 09).

Figure 09: Administrator is sending a message not classified at client level to users
For the users receiving the messages coming from the Administrator, they will realize that the message was classified without intervention, in other words, the message was classified by the transport rules. Of course, the message was classified because its contents respect the condition of the transport rule. (Figure 10)

Figure 10: The message was classified automatically by the transport rule
Where are Message Classifications stored?
The Active Directory is the central repository for all Exchange Server 2007 settings. We can use the AdsiEdit.msc tool to verify where the Message Classifications are kept and we can also see where the new Message Classifications are created and grouped by language.
The path to verify is Configuration / Services / Microsoft Exchange / <Organization> / Transport Settings / Message Classifications. We can see in Figure 11 that the Articles classification is in the correct language (Portuguese Brazilian pt-BR).

Figure 11: Seeing our Message Classification through ADSIEdit.msc
Conclusion
In this article on Message Classification we have seen how to manage the flow of messages using Message Classifications, how we can classify using transport rules and use localized versions in multi-language environments.
More information:
Using Transport Rules
http://www.msexchange.org/tutorials/Transport-Rules-Exchange-Server-2007.html