If you would like to read the other parts of this article series please go to:
- Managing PCs using Windows Intune (Part 1) – Introduction
- Managing PCs using Windows Intune (Part 2) – Preparing Your Environment
- Managing PCs using Windows Intune (Part 3) – Managing Computers and Updates
- Managing PCs using Windows Intune (Part 4) – Managing Endpoint Protection and Alerts
- Managing PCs using Windows Intune (Part 6) – Deploy Software
- Managing PCs using Windows Intune (Part 7) – Licenses Policies Reporting
Introduction
The previous articles in this series have examined the System Overview, Computers, Updates, Endpoint Protection and Alerts workspaces of the Windows Intune admin console and showed how to perform various PC management tasks using these workspaces. This present article explains how the Windows Intune administrator can use Microsoft Easy Assist to remotely assist users who are having problems with their PCs.
Note:
This series of articles is based upon a prerelease version of Windows Intune and the final released version may include additional features not included in this version.

How the user requests assistance
As shown in the figure below, the desktop of each PC managed by Windows Intune has a shortcut named Windows Intune Center:

Figure 1: The desktop of a PC managed by Windows Intune.
Double-clicking on this shortcut opens the Windows Intune Center, which the user can use to perform several tasks including:
- Checking for software updates and/or pending software deployments that have been approved by the Windows Intune administrator.
- Scanning for malicious software on their machine using Windows Intune Endpoint Protection.
- Requesting assistance from the Windows Intune administrator by using Microsoft Easy Assist.

Figure 2: The Windows Intune Center lets the user initiate certain tasks.
For example, clicking “Start Windows Intune Endpoint Protection to scan your computer for malicious software” in the Windows Intune Center causes the Windows Intune Endpoint Protection program to be displayed (see next figure). The user can then click Scan Now to launch an immediate scan for malware on her computer if desired.

Figure 3: For example, the user can manually initiate a malware scan on her computer.
Now let’s say our user needs assistance concerning some issue that’s causing problems with her computer. The user therefore begins by clicking “Request remote assistance from your system administrator” in the Windows Intune Center as shown previously in Figure 2. A message is then displayed indicating that the user’s request has been sent to the Windows Intune system administrator:

Figure 4: The user has sent a request for assistance to the Windows Intune administrator.
How the administrator accepts the user’s request for assistance
The user’s request for assistance will be displayed on the Windows Intune admin console in the Alerts workspace, under All Alerts, on the Remote Assistance page:

Figure 5: The Windows Intune administrator is alerted to the user’s request for assistance.
When the administrator clicks “Approve request and launch Remote Assistance” a window opens showing that the request is from user Karen Berg (kberg) as shown below:

Figure 6: Step 1 of approving the user’s request for remote assistance.
When the administrator clicks “Accept the remote assistance request” the Microsoft Easy Assist Entry Page is displayed in Internet Explorer. Microsoft Easy Assist is a feature of Microsoft Office Live Meeting that makes it easy to support remote users when they have problems with their PCs. Windows Intune leverages the capabilities of Microsoft Office Live Meeting to enable administrators to perform remote troubleshooting on PCs managed by Windows Intune.

Figure 7: Step 2 of approving the user’s request for remote assistance.
Since this is the first time our Windows Intune administrator has used this feature, he needs to click “Accept Terms and Install Client” to download and install the setup program for Easy Assist on his Windows Intune admin workstation. When the Download Manager bar displayed as shown at the bottom of the next figure, the administrator clicks Run:
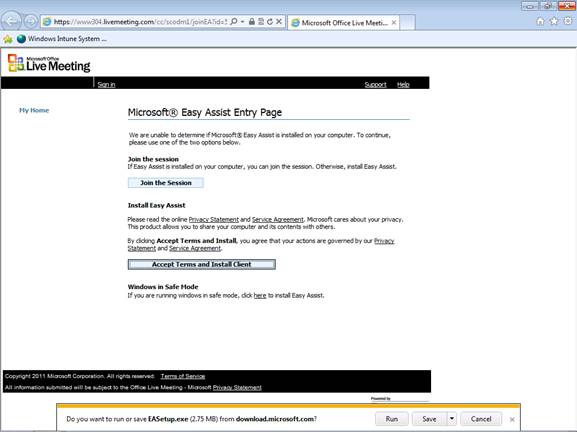
Figure 8: Step 3 of approving the user’s request for remote assistance.
At this point, a dialog will be displayed indicating that Microsoft Easy Assist v2 is being installed on the Windows Intune administrator’s workstation:

Figure 9: Step 4 of approving the user’s request for remote assistance.
How the administrator initiates an Easy Assist session with the user
Once the Easy Assist software has been installed on the administrator’s workstation, he can then click “Join the Session” on the Microsoft Easy Assist Entry Page. Doing this displays a yellow bar as shown below:

Figure 10: Step 1 of initiating an Easy Assist session with the user.
Clicking the Open option on the above yellow bar displays a Join Session dialog box. The administrator Michael Allen types his name into the box to identify himself to the remote user who is requesting assistance:

Figure 11: Step 2 of initiating an Easy Assist session with the user.
The administrator then clicks Join to launch Easy Assist:

Figure 12: Step 3 of initiating an Easy Assist session with the user.
An Easy Assist Session window opens on the administrator’s desktop:

Figure 13: An Easy Assist session has been opened with the user.
When the user responds to the prompt that appears on her desktop, a message box indicating that the user has joined the Easy Assist session is displayed on the administrator’s desktop:

Figure 14: The user has joined the Easy Assist session.
A dialog is displayed on the user’s computer asking permission to share the user’s desktop with the administrator so that the administrator can try to fix any problems with the user’s computer:

Figure 15: The user is prompted to share her desktop with the administrator.
Clicking OK in the above dialog causes the user’s desktop to be shared with the administrator. To indicate this, the user’s desktop background changes to black and the Microsoft Easy Assist box displays a Stop Sharing button so the user can terminate sharing her desktop at any time should she choose to do so. At this point, the administrator can see the user’s desktop but can’t do anything with it.

Figure 16: The user’s desktop has been shared with the administrator.
The administrator now uses Easy Assist to request control over the user’s PC. When he does this, a dialog box appears on the user’s desktop indicating that he wants to take control of the user’s PC:

Figure 17: The administrator requests to take control of the user’s desktop.
When the user clicks Yes in the above dialog, the Microsoft Easy Assist box displays “Michael Allen shares control” which indicates that the administrator can now change settings on Karen’s computer:

Figure 18: The administrator now shares control with the user over her PC.
A dialog also appears on the administrator’s desktop indicating this:

Figure 19: The administrator is notified that he now has control over the user’s PC.
At this point, the administrator can remotely assist the user as if he were sitting in front of the user’s computer. For example, he could restart a service on the user’s computer by opening the Services console from Administrative Tools:

Figure 20: The administrator can now perform troubleshooting steps to try to fix the user’s problem.
Conclusion
Microsoft Easy Assist is a powerful support tool that is included as part of your Windows Intune subscription. Using it, the administrator can remotely troubleshoot problems that occur on PCs managed by Windows Intune.
If you would like to read the other parts of this article series please go to:
- Managing PCs using Windows Intune (Part 1) – Introduction
- Managing PCs using Windows Intune (Part 2) – Preparing Your Environment
- Managing PCs using Windows Intune (Part 3) – Managing Computers and Updates
- Managing PCs using Windows Intune (Part 4) – Managing Endpoint Protection and Alerts
- Managing PCs using Windows Intune (Part 6) – Deploy Software
- Managing PCs using Windows Intune (Part 7) – Licenses Policies Reporting


