If you would like to read other parts to the article series please read:
In the first article in this series, I talked about what Network Access Protection is, and why it is so important. In this article, I want to continue the discussion by showing you how to prepare your network infrastructure for the eventual use of Network Access Protection.
The Network Access Protection Infrastructure
Implementing Network Access Protection requires the use of several servers, each performing a specific role. As you can see in the figure below, we are going to be using a Routing and Remote Access Server, a domain controller, and a Network Policy Server.

Figure A: Implementing Network Access Protection requires several servers to be used
As you can see in the diagram, the Windows Vista client is connecting to a Windows 2008 Server that’s running the Remote Access (RRAS) service. This server acts as the VPN server for the network. The Windows Vista client establishes a connection to this VPN server in the usual way.
When the remote user connects to the VPN server, the user’s credentials are validated using the RADIUS protocol. .The network policy server then determines which health policies are in effect, and what should happen if the remote client is out of compliance.
In a lab environment, a single physical server could be used to host both the Routing and Remote Access Service role and the Network Policy Server role. In the real world VPN servers exist at the network perimeter, and it would completely undermine your network’s security if you hosted the network policy server on a perimeter server.
The Domain Controller
If you look at the diagram shown in Figure A, you will see that one of the required servers is a domain controller. Don’t think of this as a single server, but rather as an entire Active Directory infrastructure. As I’m sure you know, the Active Directory cannot function without a DNS server. That being the case, if this diagram were a literal representation of an actual network, then the domain controller would be hosting the DNS services. Of course, in the real world organizations typically use multiple domain controllers and a dedicated DNS servers.
An additional infrastructure requirement that is not shown on the diagram is an Enterprise Certificate Authority. Fortunately, Windows can be configured to act in such a capacity. In this article series, I will be configuring the domain controller to also function as our enterprise certificate authority. If this were a real world deployment you would want to use a dedicated server as the enterprise certificate authority because of the sensitive nature of digital certificates.
Installing an Enterprise Certificate Authority
The procedure for deploying an enterprise certificate authority varies a little bit depending on whether you are installing the services on a Windows 2003 server or on a Windows 2008 server. Because one of my purpose is in writing this article series is to familiarize you with Windows 2008 Server, the following procedure is intended for installing the certificate services on a Windows 2008 Server.
Before a show you how to install the certificate services, you need to keep in mind that in a real world deployment, you would want to take extreme measures to make sure that your enterprise certificate authority is secure. After all, if someone were to compromise your enterprise certificate authority, they own your network. Because this article focuses on Network Access Protection and not on the certificate services per se, I am going to show you just enough to get the certificate services up and running. In a real world deployment, you would want to put a whole lot more thought into the server’s configuration.
Begin the deployment process by opening Windows 2008 Server’s Server Manager and select the Roles option from the console tree. Next, click the Add Roles link found in the Roles Summary section of the console. This will cause Windows to launch the Add Roles Wizard. Click Next to bypass the wizard’s Welcome screen. You will now see a list of all of the available roles, as shown in Figure B. Select the Active Directory Certificate Server option from the list. Click Next to continue.

Figure B: Windows lists all of the roles that are available to you
At this point, you will see a screen that introduces you to the certificate services and provides you with some words of caution. Click Next to ignore this screen and you will see another screen that asks you which components you want to install. Select the Certification Authority and the Certificate Authority Web Enrollment check boxes.
You will now see a screen similar to the one that’s shown in Figure C, telling you that some additional roles must be installed prior to installing the Certificate Authority Web Enrollment Role. Click the Add Required Role Service button, and then click Next.
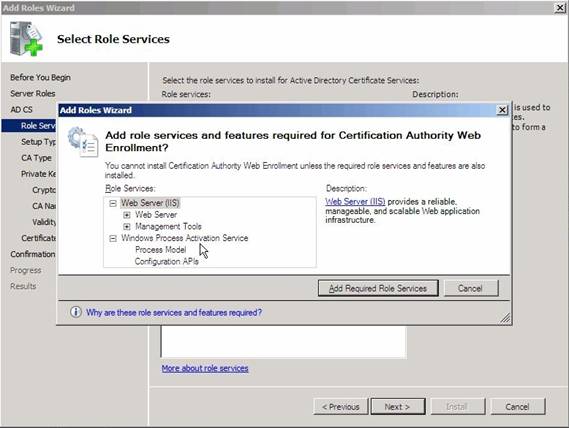
Figure C: The Certificate Services Web Enrollment Role cannot function without IIS
You will now see a screen that asks you if you would like to create an enterprise certificate authority or a standalone certificate authority. Choose the Enterprise Certificate Authority option and click Next. You will now be prompted as to whether this server should act as a Root CA or as a Subordinate CA. Since this is the first (and only) certificate authority in your lab, you should choose the Root CA option. Click Next to continue.
The Wizard will now ask you if you want to create a new private key or if you want to use an existing private key. Again, this is a lab setup, so choose the option to create a new private key and click Next to continue.
The next screen that you will encounter asks you to either create a new private key or to use an existing private key. Since no private key exists yet, choose the option to create a new private key, and click Next.
You should now see a screen that’s similar to the one shown in Figure D, asking you to select a cryptographic service provider, a key length, and a hash algorithm. In a real world deployment these are all things that you would want to carefully consider. Since we are setting this certificate authority up solely for demonstration purposes just go with the defaults and click Next.

Figure D: Choosing the correct cryptographic options would be critical in a real world deployment for security reasons
The next screen that you will see gives you a chance to define a common name and a distinguished name suffix for the certificate authority. Again, just go with the defaults and click Next.
You should now see a screen asking how long the certificates should be valid for. The default time period is 5 years, which is fine for our purposes, so just click Next. The next screen that you will see asks you where the certificate databases and the corresponding transaction logs should be located. In a production environment, choosing an appropriate location is critical to fault tolerance and security. Since this is a lab just go with the defaults and click Next.
As you will recall, we had to add an additional role midstream in order to support the Certificate Services Web Enrollment role. Therefore, the next screen that you will see is an introduction to IIS. Click Next to bypass this screen, and you will see a screen asking you which Web Server components you want to install. It is important to understand that Windows has already made the appropriate choices for you, so just click Next.
You will now see a screen detailing the options that you have selected. Click the Install button and Windows will copy the necessary files and configure the underlying services. When the process completes, the results screen should show you that the roles have been installed successfully, as shown in Figure E. Click Close to complete the process.

Figure E: When the installation process completes, click the Close button
Conclusion
Now that I have shown you how to configure the enterprise certificate authority, it is time to begin configuration of the VPN server. I will show you how in Part 3.
If you would like to read other parts to the article series please read:


