A new Windows 7 feature called AppLocker attempts to address everything that is wrong with software restriction policies in previous versions of Windows. This article explains why software restriction policies are ineffective and how AppLocker can help.
Over the last several generations of Windows, if you wanted to restrict which applications users were allowed to run, your only real options were to use Software Restriction Policies, or a third party utility such as Bit9’s Parity. The problem with using software restriction policies is that, to be perfectly frank, they really are not very good. While it is possible to lock down user workstations using software restriction policies it tends to be very difficult to create policies that the users can’t easily circumvent.
I will never forget a conversation that I had with someone in Redmond many years ago. Software restriction policies were about to be introduced for the first time, and I had just seen them demonstrated for the first time. During the demo I had noticed that it would be fairly easy for a user to get around most of the types of policies that could be created, and I asked the presenter what good software restriction policies were if they were so easy to circumvent. I was told that software restriction policies were in their first generation form, and that they would get better over time. I was also told that even though users could circumvent some of the policies that users wouldn’t be able to do so by accident. They would have to perform deliberate actions to get around the policies, and at that point you could terminate them for violating your corporate security policy.
I have to tell you that the answer that I was given to my question really didn’t make me feel any better, but I accepted the fact that software restriction policies were brand new, and assumed that they would be greatly improved in the next version of Windows. To my disappointment, Microsoft only made minor changes to software restriction policies in Windows Vista and in Windows Server 2008. They added a new type of rule called network zone rules, and introduced a new security level called Basic User, but that was pretty much the extent of the changes.
The good news is that in Windows 7, Microsoft has finally redesigned software restriction policies. This newly redesigned feature has also been renamed to AppLocker. Do not expect AppLocker to be as comprehensive as third party desktop lockdown solutions, but it is quite a bit better than software restriction policies were.
Software Restriction Policy Shortcomings
Before you can really appreciate AppLocker, you need to understand what it was about software restriction policies that made them so terribly ineffective. Besides, AppLocker still supports the same types of rules as the software restriction policies did, so I think that it makes sense to give you a quick crash course in software restriction policy rules.
Software restriction policies are made up of various types of rules. You can create certificate rules, hash rules, path rules, internet Zone rules, and network zone rules.
Certificate Rules
Certificate rules are probably the most secure of the available rule types. They allow you to either permit or to deny applications based on the application’s digital signature. The problem with this type of rule is that when software restriction policies were first introduced with Windows XP, almost nobody signed their code. Even today you will find software vendors that do not attach a digital signature to their applications.
Another problem with certificate rules is that they have too broad of a scope. If I choose to allow applications that have been signed by Microsoft, then all Microsoft applications will be allowed unless I create a separate rule with a higher priority that blocks a specific unwanted Microsoft application.
Hash Rules
The second type of rule that software restriction policies support is a hash rule. The idea is that Windows can create a mathematical hash of executable files, and use that hash to uniquely identify the application. I have to admit that hash rules were a good idea at the time that they were first introduced, but today they are impractical. Anyone who is responsible for match management within an organization knows that we are bombarded by patches at an alarming rate. Any time that you patch an application, the hash changes for any files that have been replaced, rendering previously existing hash rules obsolete.
Path Rules
Path rules are one of the weaker types of rules. They allow or block applications based on the path in which the application has been installed. This can be a file system path or a registry path. The problem with this type of rule is that if a user has sufficient rights to install an application, then they also have sufficient rights to move that application to a location that is not going to be affected by path rules.
Internet Zone Rules
Internet zone rules are classic examples of a good idea that was poorly implemented. The basic idea behind Internet zone rules was to keep users from downloading and installing applications from the Internet by taking into account the Internet zone that the file was downloaded from… There are a few problems with this though.
For starters, Internet zone rules only apply to MSI files (Windows installer packages). Another problem is that Internet zone rules only apply at the time that the file is downloaded. This means that if a user downloads a ZIP file containing an application, then an Internet zone rule will not prevent that application from being installed.
Network Zone Rules
Network zone rules are similar to Internet zone rules, except that rather than examining the Internet zone that a file is being downloaded from, they examine the network location where the file currently exists. For example, you could create a policy that only allows users to run applications that are installed on the local computer. The big problem with this type of rule is that before it can be engaged, the application in question has to already be somewhere on your network.
The Heart of the Problem
I have talked about some of the shortcomings of the various types of rules, but the real heart of the problem involves the fact that software restriction policies are designed to block various types of applications. The reason why this is a problem is because there are an infinite number of applications that are not authorized for use on your network, but a finite number of applications that are authorized. It is easier to permit a specific set of applications than it is to try to block a large number of unknown applications. Thankfully, AppLocker provides this capability through the use of whitelisting.
Getting started with Applocker
Although AppLocker is far superior to Software Restriction Policies, there are some major issues that you need to be aware of before you ever create your first AppLocker rule.
Compatibility
Although AppLocker is technically a new version of the Software Restriction Policies feature, AppLocker is not compatible with Software Restriction Policies. If you currently have Software Restriction Policies defined within a Group Policy Object, those policies will continue to work, even if you upgrade your organization’s PCs to Windows 7. However, if you define AppLocker policies within the same Group Policy Object that already contains your Software Restriction Policies, then computers that are running Windows 7 will ignore your software restriction policies, and only the AppLocker policies will be applied.
On the flip side, if a Group Policy Object contains both Software Restriction Policies and AppLocker policies, then computers that are running Windows XP and Vista will ignore the AppLocker policies and will only use the Software Restriction Policies. This happens because the AppLocker feature does not exist in legacy operating systems.
Limitations
Although AppLocker does offer a big improvement over Software Restriction Policies, it does have some limitations. The biggest limitation is that if users have administrative permissions over their own computers, then AppLocker can be easily circumvented.
Microsoft typically recommends that you do not give users administrative rights, but in the real world doing so is sometimes unavoidable. After all, there are some applications that simply won’t function correctly unless the user has total control over the system.
If you want to use AppLocker, but your users have administrative permissions, then I would recommend taking some time to see if there are any alternatives to giving the users full administrative control over their computers. Perhaps you can provide users with full control over certain folders without actually having to give them full blown administrative permissions. This approach does not always work though, because some applications require that the user be able to modify the registry or other parts of the operating system.
If users do require full blown administrative access to the system, you might be able to get away with simply locking down the administrative tools. For example, you might be able to create a rule that locks down things like the Registry Editor or Windows PowerShell. If you attempt to use this approach, you must take care not to make the rule global in scope. After all, your help desk staff will likely require access to the various administrative tools so that they can correct problems with user’s machines.
Basic AppLocker Strategies
Although AppLocker supports some of the same basic types of rules that Software Restriction Policies use, the basic way in which AppLocker works is quite a bit different from what you might be used to. In fact, it is easy to get yourself into a lot of trouble if you do not understand the way that AppLocker works. Therefore, I recommend that you pay close attention to what I am about to tell you in this section.
In order to safely use AppLocker, you have to understand Microsoft’s basic philosophy behind AppLocker rules. This philosophy revolves around the idea that there are specific applications that you use in your organization. In contrast, there are a nearly infinite number of applications that your organization doesn’t use. Don’t think of these applications in the traditional sense, but rather as executable code. For example, some of the types of “applications” that you may not have approved for use in your organization might include older versions of the applications that you do use, video games, malware, peer networking software, and the list goes on.
My point is that there are way more applications that you do not want users to run than there are applications that users are supposed to be using. That being the case, it is far easier to provide Windows with a whitelist of approved applications than it is to block every single application that you want to prevent from running. This is Microsoft’s philosophy behind the way that AppLocker rules work
This leads me to the first major concept behind AppLocker rules. Even if you remember nothing else from this entire series, please remember this. AppLocker rules are organized into collections (which I will talk more about later). Although it is possible to create an explicit denial, AppLocker rules should usually be thought of as a mechanism for granting permission to something (remember, it is easier to approve the software that you want to allow than to ban the software that you want to restrict). Now here comes the really important part. If you create so much as even one single rule in a rule collection, then Windows automatically assumes that you want to prevent everything else from running.
This is an extremely important concept to grasp because let’s suppose for a moment that you wanted your users to be able to run Microsoft Office and Internet Explorer, so you create a rule that allows them to do so. In doing so, you have denied the user the rights to run anything else, including the Windows operating system. Believe it or not, it is easy to accidentally lock a user out of Windows by improperly creating AppLocker rules. This is something that I am going to address a lot more later in the article.
The last thing that I want to talk about is denials. As you may recall, I mentioned earlier that it is possible to prevent users who have administrative permissions to the system from running administrative tools, but that you can create an exception for the helpdesk staff. This type of configuration requires a bit of backward thinking.
Given the way that AppLocker works, we can’t just deny everyone access to the administrative tools. Instead, we would have to grant everyone access to the Windows system files. From there we could add a denial for the administrative tools that applies to a specific group of users (everybody but the helpdesk staff). You don’t have to do anything for the helpdesk staff because they have access to the administrative tools because you have given everyone access to the Windows system files.
Opening the AppLocker Console
You can access AppLocker through the Group Policy Object Editor. It is located at: Computer Configuration | Windows Settings | Security Settings | Application Control Policies | AppLocker. You can also get to AppLocker by selecting the Local Security Policy shortcut from the Administrative Tools menu. When viewing the Local Security Policy, AppLocker is located at: Security Settings | Application Control Policies | AppLocker. You can see what the AppLocker container looks like in Figure 1.

As you can see in the figure, the console is divided into three sections. The Getting Started section gives you a warning message which indicates that once you begin creating AppLocker rules, only the applications that are defined by those rules will be allowed to run. There are also a couple of links that you can use to learn more about AppLocker or to determine which editions of Windows AppLocker rules apply to.
The Configure Rule Enforcement Section
The Configure Rule Enforcement section displays a warning message indicating that in order for AppLocker rules to be enforced, the Application Identity Service must be running. If you look at Figure 2, you can see that the Application Identity Service is not configured for automatic startup by default.
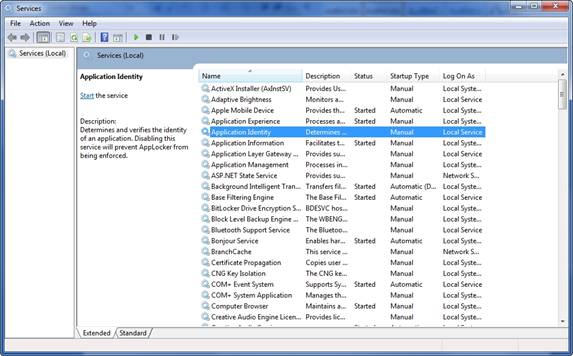
If you are just experimenting with AppLocker on a single PC, then it is usually best to use the Service Control Manager to set the Application Identity service’s Startup type to Automatic, and then start the service. If you are planning on using AppLocker with all of your Windows 7 desktops, then it is better to enable the Application Identity service at the group policy level. System services are located at Computer Configuration | Windows Settings | Security Settings | System Services within the group policy tree.
If you look back at Figure 1, you will notice that the Configure Rule Enforcement section of the AppLocker console contains a Configure Rule Enforcement link. Clicking this link takes you to the AppLocker properties sheet, shown in Figure 3.

As you can see in the figure above, AppLocker rules are not configured by default. Do not let that fool you though. According to the Windows 7 documentation, “If enforcement is not configured but rules are present in the corresponding rule collection, those rules are enforced”.
Keep in mind that once you start creating rules, any applications that are not explicitly defined by those rules are no longer allowed to run. According to the text from the Windows 7 documentation, simply creating a rule causes the rule to be enforced, even if you have not selected the Configured check box for the rule collection.
To avoid accidentally locking yourself out of Windows, I recommend going ahead and select the Configured check box for all three rule collections. After doing so, you should set the drop down list to Audit Only for each of the rule collections.
When a rule collection is set to Audit Only mode, the rules within that rule collection are not enforced. Instead, any time that a user runs an application that would have been affected by a rule in the collection, information about the rule and the application are written to the AppLocker event log.
There are two main reasons why I recommend that you set each rule collection to Audit Only before you even begin creating any rules. Firstly, doing so is a safety measure. As long as AppLocker is working in Audit mode, you do not have to worry about locking yourself out of the system. Secondly, auditing your rules allows you to test to see how well the rules are working. When you examine the audit logs, you may find that you need to revise your rules because an application that should be prohibited is being allowed to run. On the other hand, you might discover that your rules are too restrictive and that they are impacting critical applications. Auditing allows you to find out exactly how your rules are going to behave, but without the potential for adverse side effects.
Advanced AppLocker Properties
If you look back at Figure 3, you will notice that the AppLocker Properties sheet contains an Advanced tab. If you select this tab, you will be given the option of enabling the DLL rule collection, as shown in Figure 4.

As you look at the image above, the first thing that you will probably notice is the big, bold text warning you that DLL rules can affect system performance. Let me just say that there is a reason why Microsoft does not list DLL rules amoung the other rule collections on the properties sheet’s Enforcement tab.
If you choose to enable the DLL rule collection, then you must approve every single DLL that is used by authorized applications on your system. This tends to be a really big job, and it is easy to accidentally miss a DLL. If you forget to approve a DLL file, then applications that depend on that DLL will not run correctly.
Of course the warning text in the dialog box tells you that enabling DLL files can affect system performance. The reason why this is the case is because most applications use at least a few DLLs. This means that when a user loads the application, checking to make sure that the application is approved for use is no longer enough. Windows must also check each DLL file, and that takes some time to do.
Depending on how the application is designed, it may need to periodically load DLLs. This action can lead to increased system response time as the user works within the application.
Keep in mind that DLL rules do have their place. If security is of a paramount concern to your organization, then enabling DLL rules might be a good idea. For everyone else though, I would recommend that you avoid enabling the DLL rule collection.
Default Rules
Once you are ready to begin creating AppLocker rules, I recommend that you get started by creating a set of default rules. Earlier, I mentioned that you could accidentally lock yourself out of Windows if you applied AppLocker rules incorrectly. Default rules are designed to keep that from happening. They create a set of rules that is designed to allow Windows to run.
Ironically enough, Default Rules are not created by default. To create the default rules, open the Group Policy Object Editor and navigate through the console tree to Computer Configuration | Windows Settings | Security Settings | Application Control Policies | AppLocker | Executable Rules. Now, right click on the Executable Rules container and choose the Create Default Rules command from the resulting shortcut menu.
When the default rules have been created, right click on the Windows Installer Rules container and select the Create Default Rules command from the shortcut. Finally, right click on the Script Rules container, and select the Create Default Rules command. At the time that this article was written, there were no default script rules, but that may eventually change, so it is a good idea to go ahead and at least try to create the default script rules
Reviewing the Default Rules
Although the default rules are designed to protect Windows, there is a chance that the default rules may conflict with your corporate security policy. You can fine tune the default rules to make them more restrictive, but you must be very careful in doing so.
If you look at Figure 5, you can see that Windows creates three default executable rules. The first rule allows everyone to run all files located in the Program Files folder. The second rule allows everyone to run all files that are located in the Windows folder. The third rule allows the BUILTIN\Administrator account to run any file on the system.

Let me start by saying that you should not attempt to alter the third rule. The BUILTIN\Administrator account needs full access to the system. Beyond that though, you can modify the first two rules to make them more restrictive. For example, you may want to create a set of rules that allow individual applications that are located in the Program Files directory to run, rather than granting blanket permissions to the entire folder.
As you decide how the rules should be applied, it is important to keep in mind that the default rules are only giving users permission to run applications. Creating an AppLocker rule does not give users the ability to install new applications to these locations. If a user wants to install an application, they must have the appropriate NTFS permissions. There is a loophole that you should be aware of though.
By default, users have full read / write / create rights to the C:\Windows\Temp directory. When the default executable rules are created, the user is automatically granted permission to execute applications residing in the C:\Windows\Temp directory, because it falls beneath the C:\Windows directory. This means that a user could potentially install an application to the Temp directory and run it.
Before I show you how to modify the default rules, I want to take a moment and show you the default Windows Installer rules. As was the case with the default executable rules, Windows created three default Windows Installer rules, which you can see in Figure 6.

The first of the default Windows Installer rules allows all users to run any Windows Installer file, so long as it has been digitally signed. It does not matter who signed the Windows Installer file, or where the file came from. If the file has been digitally signed, users can run it.
The second of the default Windows Installer rules allows all users to run any Windows Installer file that is located in the %systemdrive%\Windows\Installer folder. In this case, the Windows Installer files do not even have to be signed. As long as the Windows Installer file is in the designated folder, users are allowed to run it.
The last of the Windows Installer rules allows the BUILTIN\Administrator account to run all Windows Installer files. As was the case before, you should leave this particular rule alone, because the BUILTIN\Administrator account needs these permissions.
Getting Ready to Modify the Default Rules
I realize that there are some of you who were absolutely cringing when you read some of the permissions given by the default rules. Rest assured that I am going to show you how to change those permissions. Before I get into that, there are a few more concepts that I need to address.
I have explained that Executable Rules pertain to executable files, but believe it or not, AppLocker has a very specific definition of executable files. AppLocker defines executable files as .EXE or .COM files. Even though .BAT, .PIF, and a few other formats are technically executable, they are not covered by the default executable file rules.
Just as AppLocker has a specific definition for executable files, it also has a specific definition for Windows Installer files. Windows Installer files are defined as .MSI and .MSP files.
The Anatomy of a Rule
The key to creating a new AppLocker rule or modifying an existing rule is to understand what the key components are that make up a rule, and how those components work together. After that, you can modify an existing rule by simply right clicking on the rule and selecting the Properties command from the resulting shortcut menu. From there, you can make the desired modifications and click OK. Likewise, you can create a new AppLocker rule by right clicking on a rule category and selecting the Create New Rule command from the shortcut menu.
When you create a new rule, Windows launches a wizard that walks you through the process. In contrast, modifying an existing rule involves manually editing the contents of the various fields on a properties sheet. In either case though, you are dealing with exactly the same set of options. That being the case, I want to talk about the various options and what they do.
If you look at Figure 7 below, you can see the properties sheet that is used whenever you modify an existing rule. The first two options on the properties sheet’s General tab allow you to assign a name to the rule, and to enter an optional description of the rule. Although entering a description is optional, I recommend being as descriptive as possible because as you begin to accumulate AppLocker rules, it can be tough to remember what each rule does.

The next set of options found on the General tab allow you to control who the rule will apply to, and whether or not that user or group should be allowed to run the specified applications. For example the rule shown in the figure above allows members of the built in Administrators group to run certain applications. To see which applications this group allows to run, we must switch to the Path tab, as shown in Figure 8.
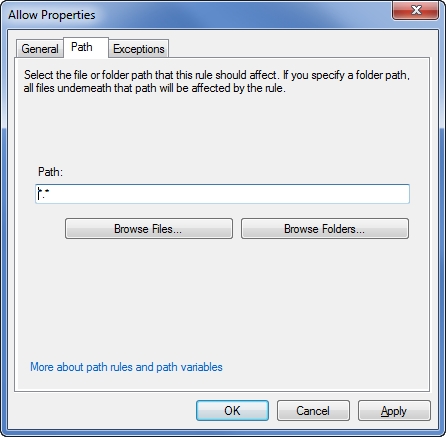
The properties sheet shown in the figure above only includes a Path tab because it pertains to a path rule. Had this been a publisher rule or a file hash rule, the name of the tab would be different. In any case though, this tab sets up the conditions for the rule. For example, in the figure above the path is described as *.*, which means any path. Therefore the condition that activates this rule is essentially “any path”. As you can see in the figure though, we could have just as easily specified a more specific path, or even an individual file.
The final tab on the properties sheet is the Exceptions tab. As the name implies, the exceptions tab, which is shown in Figure 9, allows you to make exceptions to the rule. An exception can consist of a Publisher, File Hash, or a Path rule. For example, the AppLocker rule that I have been showing you is designed to allow Administrators to run any Windows installer file, regardless of its location. If we wanted to create an exception to the rule, we could set the rule up so that the Administrator is able to run any Windows Installer file unless it is located in the C:\Program Files\Games folder. Another variation might be an exception based on the file hash of the installer package for Grand Theft Auto. That way, an administrator could install pretty much anything that they need to, but they can’t install Grand Theft Auto.

While I am on the subject of rule exceptions, I want to point out that sometimes exceptions work backwards from what I have just described. As you will recall, you can set up a rule to either allow or deny permission to run an application. When I showed you the deny option, you might have thought that it was a little strange to have a denial option when AppLocker’s default behavior is to deny access to anything that you have not explicitly granted users permission to use. The reason why the Deny option exists is because you can actually grant permissions by creating an exception to a Deny rule.
I know that this sounds confusing, so let me give you an example. Suppose that for some reason you wanted to block access to the entire Program Files folder (do not actually block this folder, this is just an example), but that you need for users to be able to run applications that are located in \Program Files\Microsoft. You could accomplish your objective by creating a rule that denies access to the \Program Files folder, but that lists \Program Files\Microsoft as an exception to the rule.
Automatically Generating AppLocker Rules
As you can see, AppLocker rules are not very complicated. Even so, once you start creating AppLocker rules, you have to authorize any application that you want users to be allowed to run. If you neglect to authorize an application, the users would not be able to run it. My point is that even though Microsoft makes it easy to create an AppLocker rule, creating a comprehensive set of AppLocker rules can be a lot of work. Thankfully, there is help.
AppLocker contains a mechanism for automatically generating the necessary rules. To access this feature, just right click on one of the rules containers, and select the Automatically Generate Rules command from the shortcut menu. When you do, Windows will launch a wizard that prompts you for the name of a file path to analyze, a security group that the newly created rules should apply to, and a name to assign to the set of rules. You can see what this wizard looks like in Figure 10.
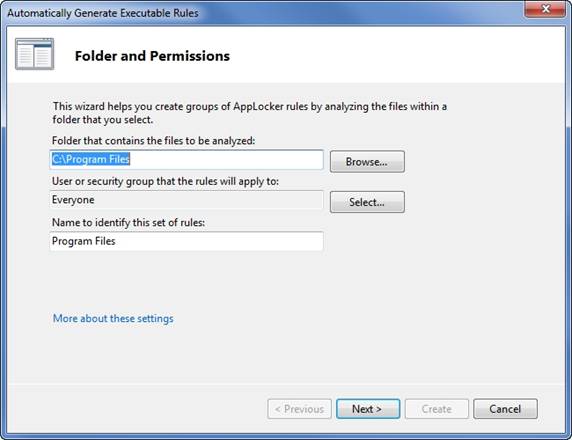
When you click Next, Windows asks you some questions about how the rules should be created. By default, Windows creates publisher rules for any signed applications, and file hash rules for all other applications. This is just the default behavior though. You have the option of creating other types of rules.
Once you have decided what types of rules you want to create, click Next and the rules will be generated. When the process completes, you will see a screen similar to the one shown in Figure 11. As you can see, this screen tells you how many rules of each type were created. You also have the option of reviewing the files that were analyzed or of viewing the rules that were automatically created.

Conclusion
Although AppLocker is a huge improvement over Software Restriction Policies, it is far from being a substitute for third party application management software. Even so, AppLocker rules do a reasonably good job of allowing you to lock down your desktops so that users are only allowed to run authorized applications.


Great article!!
Do you know how people are gathering the logs during the audit phase to understand what applications they should be whitelistsing? Im thinking a SIEM product like splunk (which we currently use) could be valuable in this regard…
I am glad that you liked the article. Using Splunk sounds like a viable approach. Although I am by no means a Splunk expert, your plan sounds as though it will work out fine.