We are going to play with several components and features of Microsoft Azure to address a common requirement in several organizations. We are going to use automation accounts to perform daily tasks to stop and start VMs based on tags. As long as you assign the right tag, the automation will take care of the rest, and you will have time to get your coffee because you won’t be running manual tasks like old times.
Creating a simple scenario
Let’s create a simple scenario: We have a need to turn machines on and off based on some projects requirements to save costs. You may be thinking, “There are a couple of options available, such as existing runbooks available or Start/Stop VM solution in the automation account.”
However, the idea here is to show how we can make a dynamic and modular Azure automation account to address your requirements. On top of that, we will go over every single step to get that going, using the same process you can apply to different needs in your corporation.
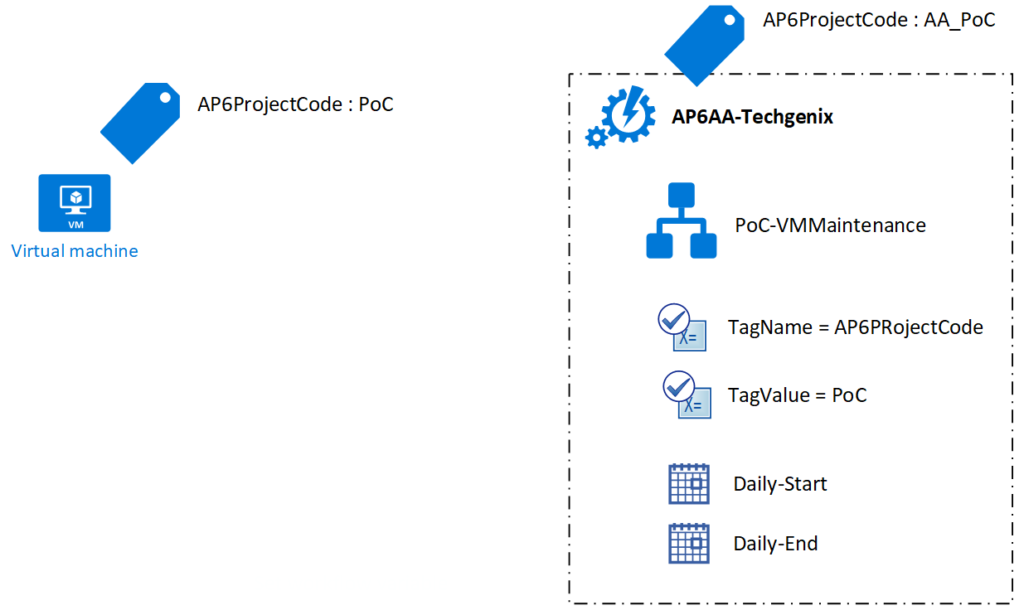
The approach is simple, we are going to assign a tag to all VMs that must be managed by our runbook, and we are going to define a tag name and a tag value. The runbook will use the variables to retrieve the tag name and value, then based on that information will take action.
The action itself can be either turn on or turn off the given virtual machine. However, we will use a runbook parameter to define the action. This way we can address this solution with a single and simple script.
The entire solution is summarized in the diagram below, and the target VMs require a tag to be assigned and an automation account with a few features: runbook, two variables, and two schedules. I’m also associating a tag to the Azure automation account with a piece of unique information, and we are going to use that information within the runbook to retrieve additional information.
Creating the Azure Automation Account
That is the easiest of the steps. Logged on to Azure Portal, search for automation accounts and click on it. In the new blade, click on Add, and provide the name for the new automation account, resource group, location, and make sure to create the Azure Run As Account (it is the default setting). Click on Create and wait for the completion process.
We are going to use the new Az modules in our script. Please download these modules from the Gallery into the automation account:
- Accounts
- Resources
- Compute
- Automation
Creating the runbook
In the new newly automation account, click on runbooks (Item 1). A list of all available runbooks will be displayed on the right side. To create a new one, click on Create a runbook (Item 2). In the new blade displayed on the right side, label the new runbook and select PowerShell as Runbook type, click on Create.
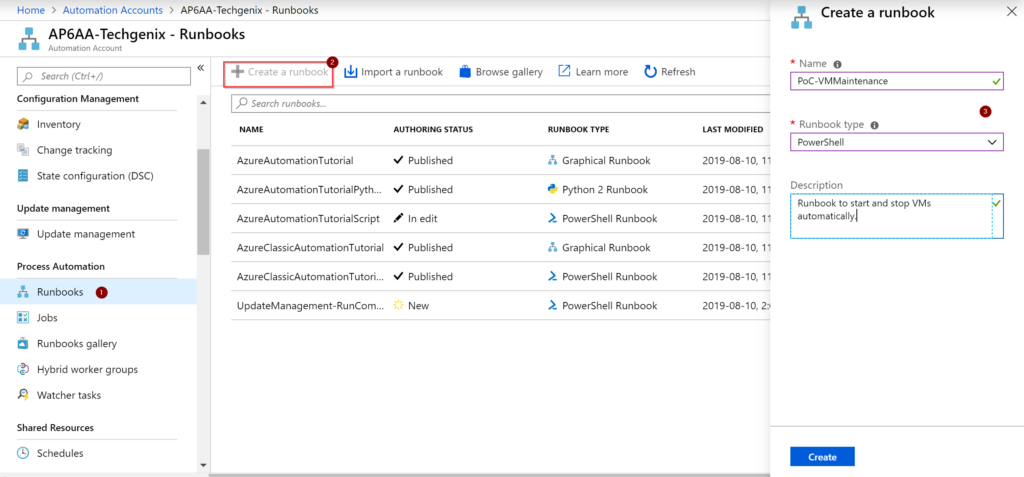
A new blade just for the runbook that we have just created will be displayed. Click on Edit. You can copy and paste the script from this article or download the script from my GitHub here.
We are going over the details of the script. In the first portion of the script we define the single parameter, which is the $Operation, which could be on or off (default value). We also are importing the required modules that we are planning to use in our current runbook.
param (
[string]$Operation = "Off"
)
#Importing modules...
Import-Module Az.Accounts
Import-Module Az.Resources
Import-Module Az.Compute
Import-Module Az.Automation
This section comes from the template provided by Microsoft to use the AzureRunAsConnection. It authenticates the current RunBook using the AzureRunAs account. After the authentication is complete, the runbook will have access to the Azure management plane, thus access to manage resources using the permissions available for this automation account. By default, the new accounts will receive a Contributor role at the subscription level.
#
# Connnection Phase
#
$connectionName = "AzureRunAsConnection"
try
{
$servicePrincipalConnection = Get-AutomationConnection -Name $connectionName
Connect-AzAccount `
-ServicePrincipal `
-TenantId $servicePrincipalConnection.TenantId `
-ApplicationId $servicePrincipalConnection.ApplicationId `
-CertificateThumbprint $servicePrincipalConnection.CertificateThumbprint
}
catch {
if (!$servicePrincipalConnection)
{
$ErrorMessage = "Connection $connectionName not found."
throw $ErrorMessage
} else{
Write-Error -Message $_.Exception
throw $_.Exception
}
}
In this section, we retrieve information about the current automation account based on the tag that we assigned to the runbook (red section). Having that initial information, we can retrieve the tag name and values that we are going to be looking at the VM level to perform the defined action.
#
# Retrieving Variable Information
#
$vAAccount = Get-AzResource -TagName 'AP6ProjectCode' -TagValue 'AA_PoC' -ResourceType 'Microsoft.Automation/automationAccounts/runbooks'
$vTemp = ($vAAccount.Name).Split("/")
$vAAccountName = $vTemp[0]
$vRunBook = $vTemp[1]
$vTempAA = Get-AzAutomationVariable -AutomationAccountName $vAAccountName -Name "TagName" -ResourceGroupName $vAAccount.ResourceGroupName
$vTagName = $vTempAA.value
$vTempAA = Get-AzAutomationVariable -AutomationAccountName $vAAccountName -Name "TagValue" -ResourceGroupName $vAAccount.ResourceGroupName
$vTagValue = $vTempAA.value
Write-Output "========="
Write-Output $vAAccountName
Write-Output $vRunBook
Write-Output $vTagName
Write-Output $vTagValue
Write-Output "========="
In this final portion of the script, we search for all VMs that match the tag name and value that we retrieve from the automation account variables. Then, we use the $operation parameter to understand if our action will be to turn on or off the VMs that match the criteria.
We also perform some additional tests. For example, we check the current status of the VM before sending a start or stop cmdlet.
# Script body
$vms = Get-AzResource -ResourceType 'Microsoft.Compute/virtualMachines' -TagName $vTagName -TagValue $vTagValue
If ($vms -eq $null) {
Write-Output 'No VMs couldn't be found on this subscription.''
Exit
} Else {
Write-Output "We have found VMs. We are going to validate and if doable we will take them $Operation."
}
if ($Operation -eq "on") {
Write-Output "Starting the VM Resources..."
ForEach ($vm in $vms){
Write-Output $vm.Name
If ((Get-AZVM -Name $vm.Name -status).PowerState -ne "VM running") {
Start-AZVM -Name $vm.Name -ResourceGroupName $vm.ResourceGroupName
Write-Output "-> Status: VM is being started."
} Else {
Write-Output "-> Status: VM is already running."
}
}
} Else {
Write-Output 'Stopping the VM Resources...'
ForEach ($vm in $vms){
Write-Output $vm.Name
If ((Get-AZVM -Name $vm.Name -status).PowerState -ne "VM deallocated") {
Stop-AZVM -Name $vm.Name -ResourceGroupName $vm.ResourceGroupName -Force
Write-Output "-> Status: VM is being stopped."
} Else {
Write-Output "-> Status: VM is already deallocated."
}
}
}
The final step is to Save and Publish the current script.
Creating the variables
Instead of creating static code in your script to look for Tag Name and Values, we decided to use variables to keep those values. If that changes in the future, there is no need to change the script.
In the Automation Account first blade, click on Variables, add a variable and on the new blade, assign a name, type, and value. We created two: TagName and TagValue, as depicted in the image below.

Creating the schedule
So far, in our journey, we created the script and variables, but they are not active. Our next step is to create a couple of Schedules at the automation account level. Please, repeat the steps below to create two schedules: Daily-Start and Daily-Stop.
In the automation account first blade, click on Schedules (Item 1), Add a schedule Item 2), and in the new blade (Item 3), assign a name, description and define the time and recurrence for the script. Click on Create.

A schedule by itself does not do us any good. Our next step is to assign the newly created scheduled to our runbook.
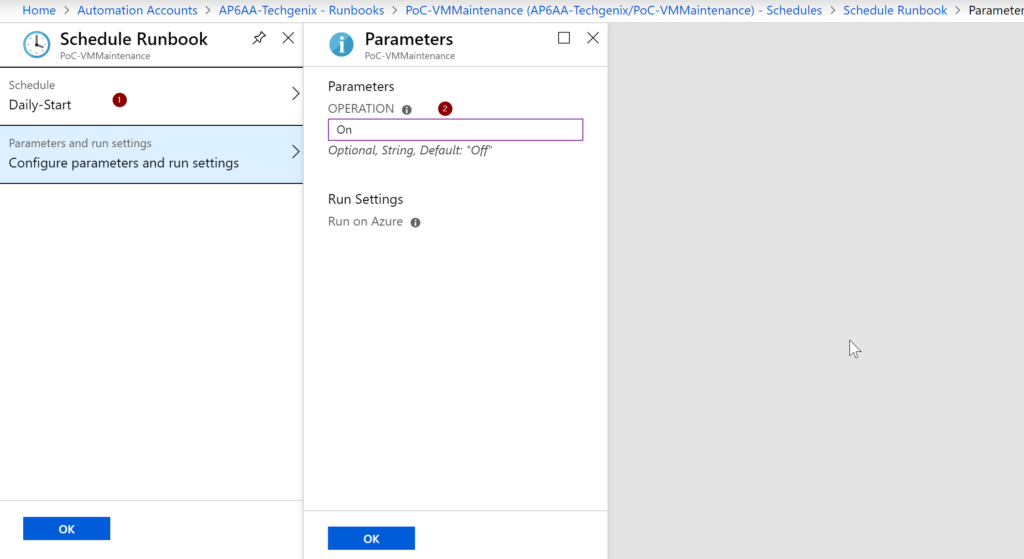
In the main blade of the automation account, click on Runbooks, and double click on our runbook, which is PoC-VMMaintenance. In the new blade, click on Schedules, and Add a schedule. We will repeat these steps twice (one for each Schedule).
In the new blade, select the desired schedule (Item 1), and in the Parameters and run settings, type on for Daily-Start schedule, and leave empty or type Off for the Daily-End schedule.
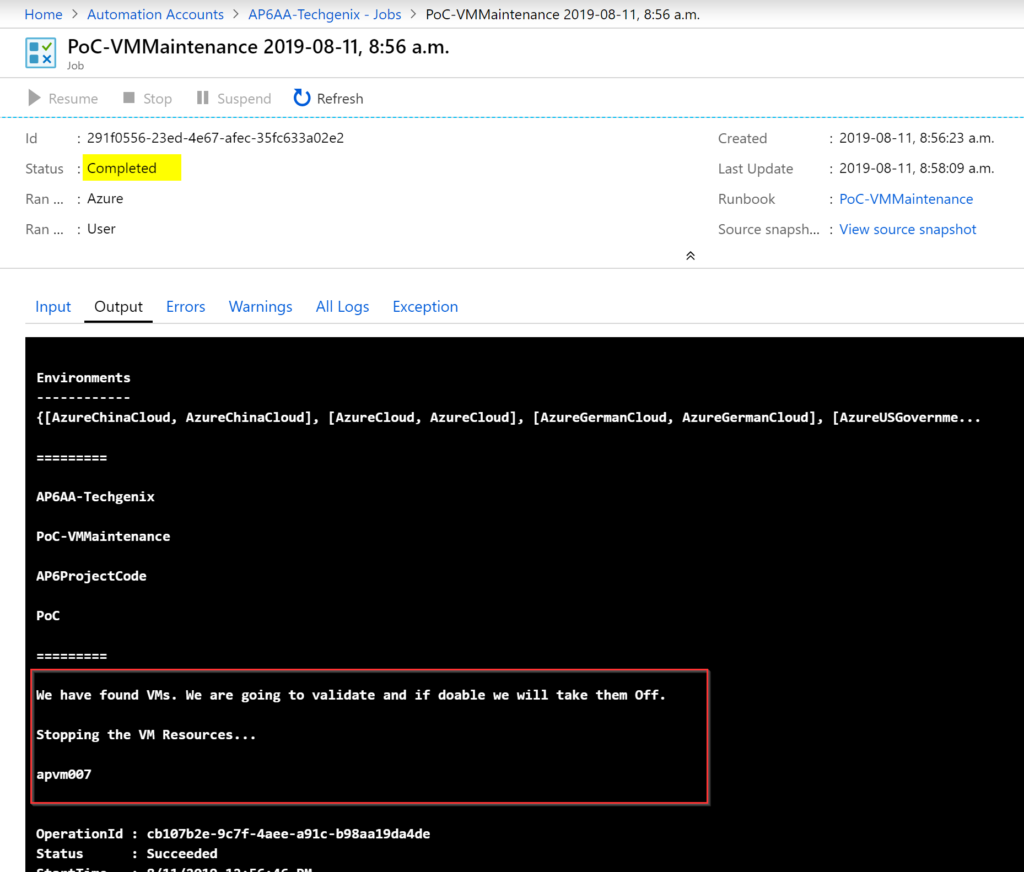
Checking the automation process
Before going for your coffee, the last thing that we need to do is to check if the automation account is working as planned. Check the Jobs area. All ran schedules will be listed, and we can check status, logs generated during the execution of the runbook.
In the example below, we can see that a VM was deallocated as part of the process.
Featured image: Shutterstock


This does not appear to work anymore