While creating my articles on how to deploy Microsoft Teams to allow your remote task force to collaborate, I’ve noticed that although I touched several key points here and there about Azure AD and applications, we haven’t discussed the lifecycle of an application from its creation and features that can be used to secure it using Azure Premium. In this two-part article series, we are going over the process to publish an application, enable single sign-on (SSO), configure the users that have access to it, use conditional access to enforce security, create security reviews, and self-service to allow users to use the application.
Our choice for this series was the GitHub Enterprise application, but the same process can be applied to virtually any application (with some changes in the SSO). Still, at the end of the day, the most important thing is to understand the process.
Setting up your GitHub Enterprise
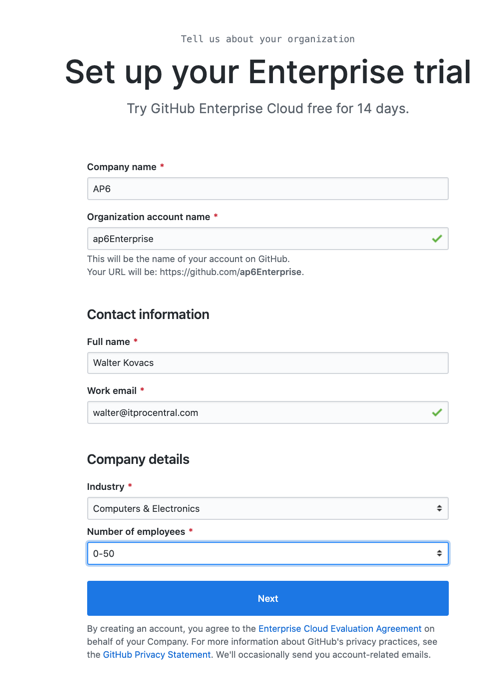
The first step is to point your browser to GitHub Enterprise, and then click on Start a Free Trial. On the new page select Enterprise Cloud.
If you are not authenticated or do not have an account in GitHub, the first page will be Create your account, which you are going to use to authenticate. This account defined in this step is the administrator of your organization.
On the second page, fill out the information. The most important thing on this page is the Organization Account name (in this article we are defining ap6Enterprise), and we will use it in the Azure Active Directory portion. Save that name because we are going to use it later on.
Adding GitHub application in Azure Active Directory
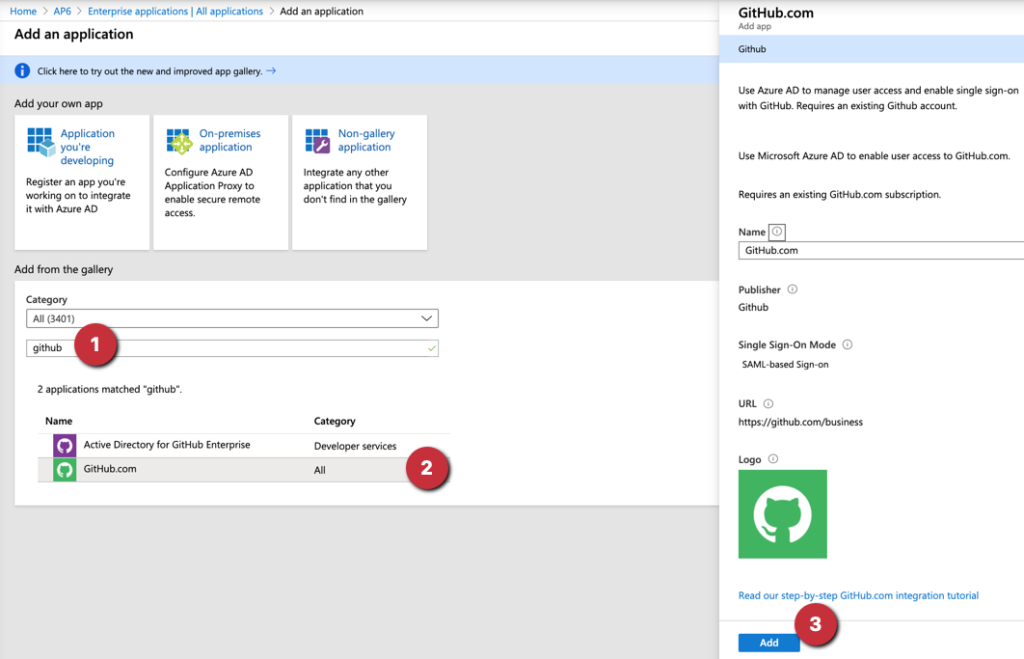
Logged in the Azure Portal, click on Azure Active Directory, Enterprise Applications, and click on + New Application. Type GitHub (Item 1), select GitHub.com from the list (Item 2), and on the new blade, click on Add (Item 3).
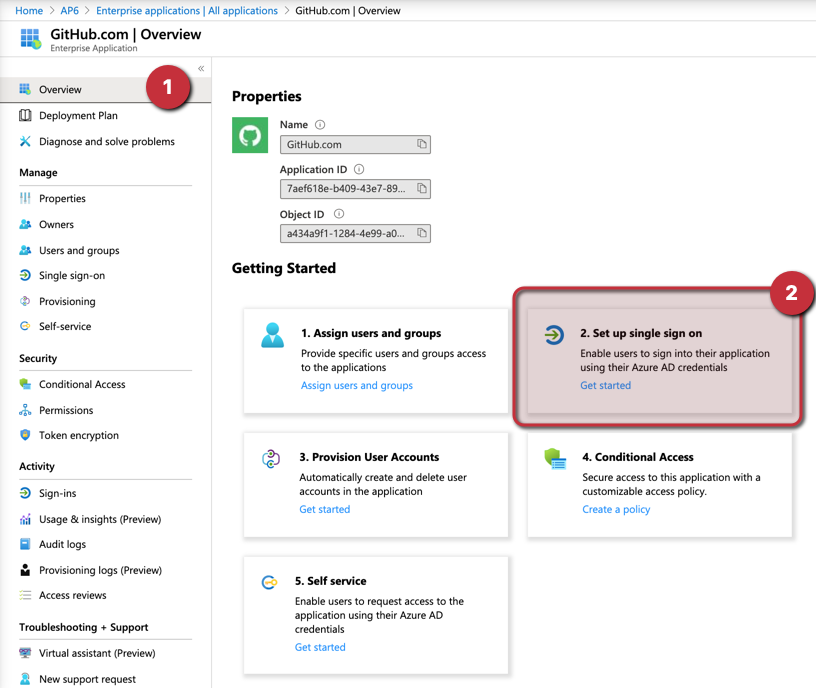
The new application (in this case, GitHub.com) will be listed under Enterprise Applications item in the Azure Active Directory blade. In the application blade, click on Overview and click on Set up single sign-on (Item 2).
A new blade will show up, and we need to decide the method to configure the single sign-on, and that configuration relies on the application that we are installing more than anything else. In GitHub’s case, they support SAML. Click on it.
We are going to park the authentication configuration for now because we need to complete some tasks before that. Our next step to prepare the environment is to create a group to support this application. We will call it AP6-AzureApp-GitHub, and we are going to add two users (Adrian Veidt and Daniel Dreiberg).
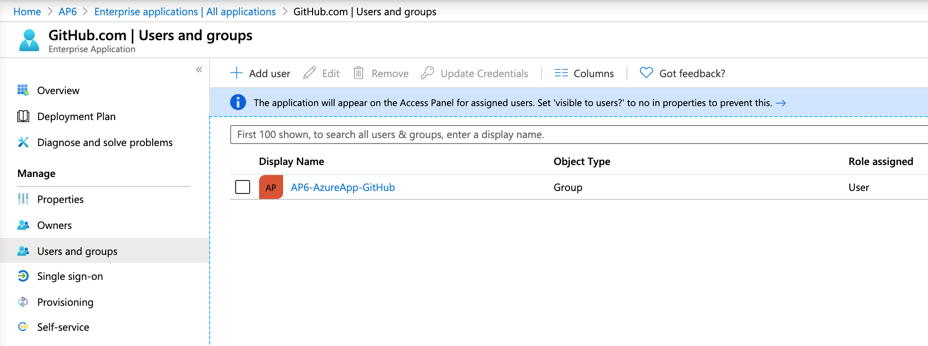
The final step is to go back to the application, and then click on Users and Groups, and we will add the Azure AD Group that we have just created. Members of the group will be allowed to consume the application.
Configuring the authentication using single sign-on
The entire authentication will be completed using both sites (Azure AD and GitHub Enterprise). We will start configuring the Azure Active Directory.
Logged in the Azure Portal, click on Azure Active Directory, click on Enterprise Applications, and click on the desired application on the right side (GitHub.com). In the new blade, click on Single Sign-On. A list with all the steps required to enable the integration will be shown on the right side.
In the Basic SAML Configuration step (Item 1). We will click on Edit, and we will configure Identifier (Entity ID), Reply URL (Assertion Consumer Service URL), and Sign-on URL. We will use these values below, make sure to replace the ap6Enterprises (in red) string for the name that you assigned to your organization in GitHub.
- Identified (Entity ID): https://github.com/orgs/ap6Enterprise
- Reply URL: https://github.com/orgs/ap6Enterprise/saml/consume
- Sign-on URL: https://github.com/orgs/ap6Enterprise/sso
In the User Attributes & Claims task (Item 2). Click on the Edit icon, and then change the name to user.mail. The final result should be the same as the picture being depicted below.
In the SAML Signing Certificate task (Item 3). We are going to download the Certificate (Base64), and after the download completes, we will edit that file with any text editor available. We will use that content soon.
In the Setup GitHub.com task. We will copy the content of the first two items (item 4), which are: Login URL and Azure AD Identifier. We will use that info on the other side of the fence (GitHub Enterprise).
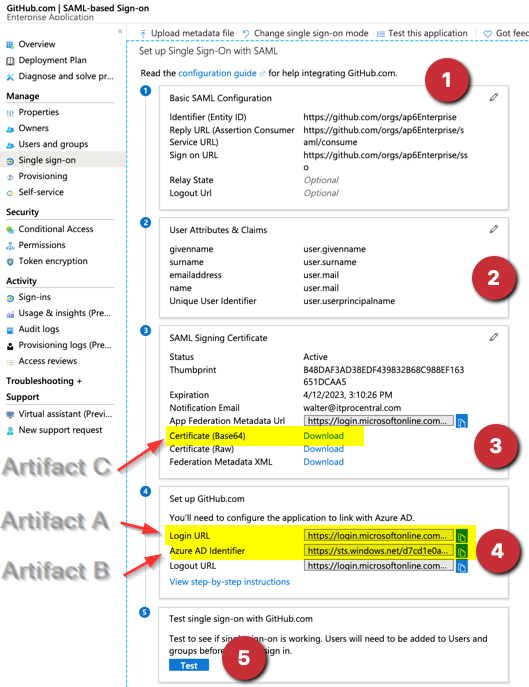
We labeled some areas of the previous image as Artifacts A, B, and C, and we will match that information on the GitHub Enterprise configuration portion that follows next.
We still have to go back to Azure Active Directory to test it, but we will switch gears now and start configuring the required steps on GitHub Enterprise.
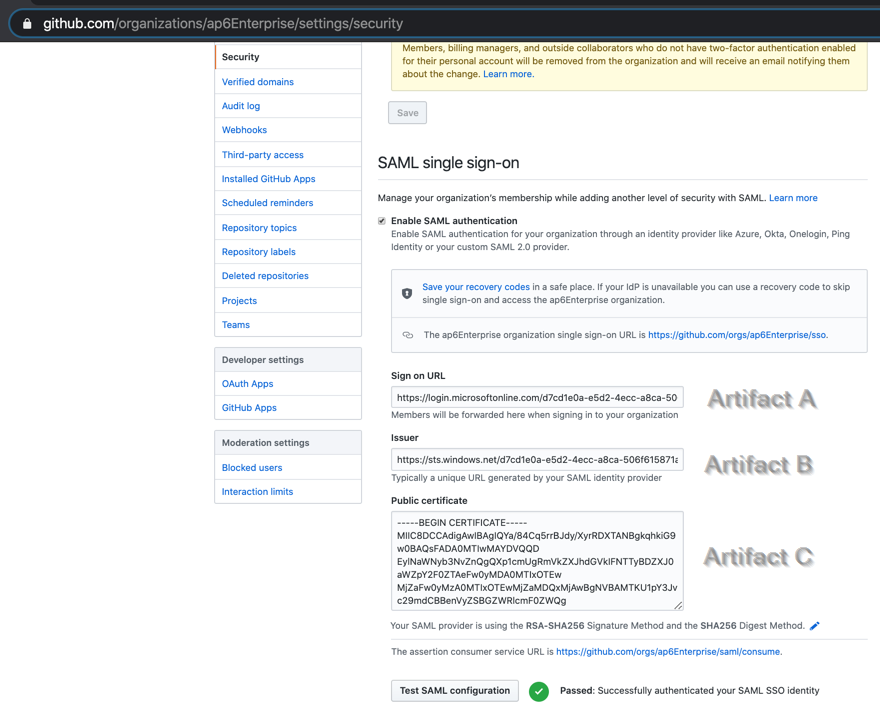
Logged in to GitHub Enterprise (https://github.com/organizations/YourOrganizationName, in case you are not sure), click on Settings and then Security item.
We are going to copy the URL from the Azure Portal in the Sign-on URL (Artifact A) and Issuer (Artifact B) and paste the content of the certificate (Artifact C).
Also, change the authentication to RSA-SHA256 in both places: signature method and digest method, and then click on Test SAML configuration to validate the settings and the connection.
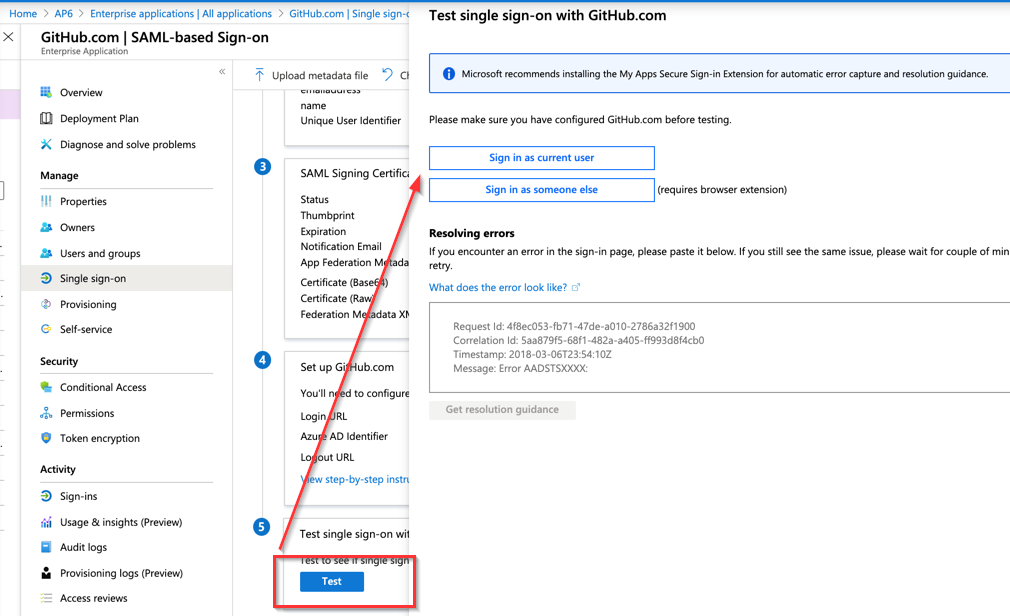
After getting a passed result on the GitHub Enterprise portal, we can test from the Azure Active Directory side as well. Click on Test and Sign in as current user. The result (if the user belongs to the application) should be successful.
Initial end-user experience
We can use one of our test users that belong to the group that is assigned to the application and go to My Apps at Microsoft. After authenticating, we will see a link for GitHub.com. Click on it.

A Single sign-on to <EnterpriseName> will be displayed. Click on Continue, and that will enroll and allow the user to access the Enterprise automatically. If the current user does not have a GitHub account, an account must be created as part of the process.

Azure AD and applications: Next step, security (stay tuned!)
In this initial article, we covered the steps required to configure the single sign-on between Azure AD and GitHub Enterprise. We covered the basics to publish the application and assign some users manually. In our next article, we will improve the security of Azure AD and applications by adding conditional access and self-service with approvals to the given application.
Featured image: Shutterstock


