In a previous article here at TechGenix, we covered all the steps required to replicate a workload (in this series is a simple CentOS VM running Apache Web Server) to a different Azure region. In this article, we are going to test and perform the failover process and to get acquainted with the features and functionalities available using Azure Site Recovery. Keep in mind that we are creating the process to start testing and failover servers, but there is more to it. To get a reliable and seamless disaster recovery process between regions, we will have to work with more Azure features, which may include Traffic Manager, runbooks, and so forth.
Checking the scenario and the existing environment
Just a quick refresh for the reader: We have this simple environment being deployed on our tenant. We are going to configure a Linux VM to run a webserver and perform a test and a complete failover.

These were the steps that we executed on the Linux server to get the server all patched up and running a webserver. We created a simple index.html page to show to the Internet that the server is up and running.
sudo yum update
sudo yum install httpd
sudo vi /var/www/html/index.html
sudo systemctl status httpd
sudo systemctl start httpd
In the example below, we can see the last two commands above where we checked the status of the service and started it afterward. The VM was configured with a public IP and a DNS setting (vm001.canadacentral.cloudapp.azure.com — if you are not sure how to do that, we covered this neat feature in this blog post here).

The VM alias can be accessed through the Internet, and the welcome page is being displayed.

Using the disaster recovery portal
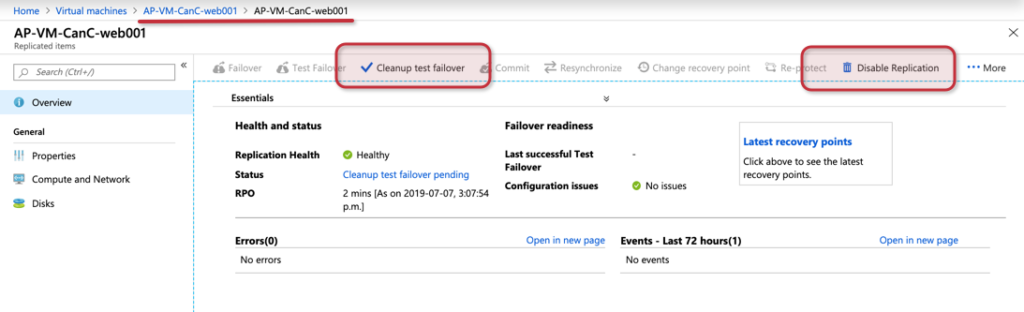
There are a couple of ways to manage the failover capabilities from a protected VM. The easy way is going to the VM’s properties and then Disaster Recovery. We can also find the same dashboard by going to the Azure Site Recovery in the Azure Portal. Click Replicated Items, and select one of the replications available. Both options will land on the dashboard depicted in the image below.
This dashboard will provide virtually all the information to control the failover process. In Item 1, we have the option to initiate Failover or Test Failover processes. In Item 2, we can check the replication status and the RPO (recovery point objective).
In Item 3, we have options to check the replication properties in several layers: Properties, Compute and Network, and Disks. We also have the opportunity to check the Latest recovery points (Item 4), which will bring a new blade with a list of all recovery points available. These recovery points will be listed as either crash-consistent or app-consistent.
We have two areas to list all the Errors and Events -Last 72 hours that are a click away from the administrator to retrieve the required information.
Last but not least, in Item 5, we can see a graphical representation of the components involved in this current replication, including the regions.

Testing the failover
A test failover is a requirement to check your failover process but also can be used to spin your production/protected environment in a separate environment for testing. Some teams may want to use that for the QA environment to test a new code that requires immediate attention.
To start a new test failover, click on Test Failover, and on the new blade, we need to select the Recovery Point and the Azure Virtual Network and click on Okay.

The process may take a few minutes, and the result will be a new VM running on the target location (in our case: East US).
Both VMs are running at the same time, and some items need to be addressed in the newly VM, as follows:
- The NSG is not being replicated, just the VMs, thus we need to associate or create the same NSG and apply to the VNet of the disaster recovery site.
- There is no public IP being replicated to the new VM, and we must create a new one and assign it accordingly.
- There is no DNS name replication, and we can associate a new one for the testing.
- Make sure that the service is up and running on the failover VM as soon as the test failover process is complete.

Just to be safe, after assigning the public IP to the failover VM, we edited the file and added some info at the end of the test page (Live from East US (Test Failover)).

After testing all the failover environment and making sure that everything is right according to the plan, we can go back to the same dashboard. At this time, we have two options: Cleanup test failover and Disable replication.
When selecting Cleanup test failover, we need to explain the process, and there is a checkbox to clean up the VMs that will delete all the resources.

If we select Disable Replication, then the VM will be kept, but the replication will be removed from Azure Site Recovery.

Creating a disaster recovery plan
We covered the steps required to test failover, and we saw that there are some items to be performed even in a single-server application. We didn’t mention that in the first article, but the ASR protection also creates an Azure Automation account. Using automation, we can create scripts to be performed during the failover process. In this script, some of the tasks may include operations on the VM and Azure platform changes (network security groups, public IPs, and so forth).
To create a recovery plan to be used during the failover, click on Recovery Plans (Site Recovery) item when checking the Azure Site Recovery main blade. Assign a name (source and target and select the VMs that are going to be part of this plan), click on OK.
When managing the recovery plan, the cloud administrator can add tasks and associate those tasks to the runbooks related to the Azure Automation Account. We can perform a test failover using the Recovery Plan.
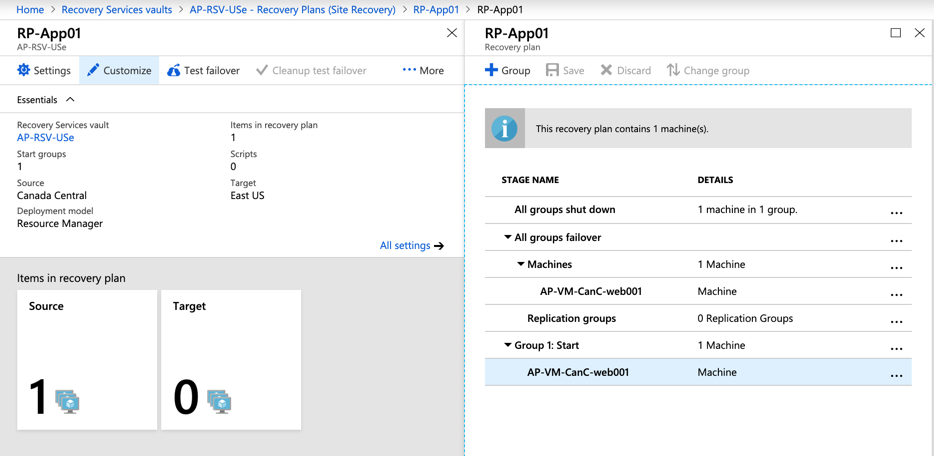
Having the recovery plan created with the proper runbooks and tasks configured, we can use it to start a failover. When running any process, we can always check the status by clicking on the status of the operation. In the new blade, we will have detailed information about the job currently being executed.
Performing the failover
When performing a failover either directly from the protected item or using the recovery plan feature, we can select an existing recovery point. We also have the option to shut down the current VM before performing the failover.
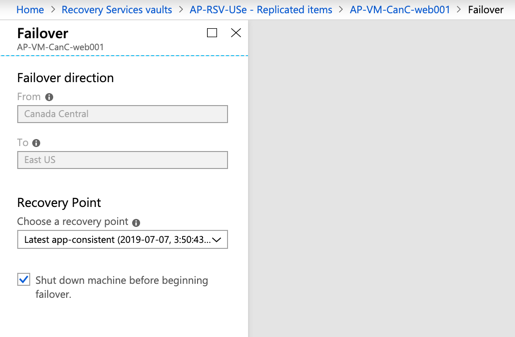
The result will be the original VM being turned off at the source region, and a replicated VM up and running in the second datacenter. We can Commit or change the recovery point to another date and time to make sure that the server is operational before bringing it back to production.
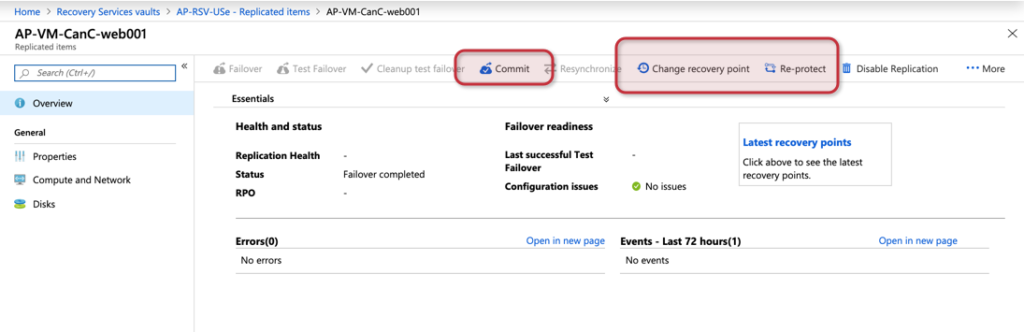
After committing and having the environment failed over to the disaster recovery location, the cloud administrator can Re-Protect the workload, and that will make sure that the replication is working but at this time

Validating the Azure Site Recovery process
The common question is to find out what is going on with Azure Site Recovery, and there are plenty of options in the Azure Site Recovery blade.
The first one is the site recovery jobs, which will display all jobs executed with their status. The cloud administrator can check each one of the jobs to get more detailed information by downloading an Excel spreadsheet with a summary of the job. We can also use site recovery events to see events related to Azure Site Recovery in specific. Another option is to configure email notification from that same blade.

Featured image: Pixabay


