Active Directory (AD) is one of the most popular directory services used by millions of people worldwide. Since it is developed by Microsoft, it ships as an integral part of all Windows Server operating systems. AD is one of the most vital components in a Windows network, and when it crashes, everything comes to a standstill. This is why a foolproof Active Directory backup and restoration disaster recovery strategy is vital for business continuity. And that’s exactly what we’ll explore in this article.
But before you get into the backup and restoration process, you must know what you’re doing and its implications.

What you should know
Read through this section first before attempting an Active Directory backup and restoration.
- There are two types of restoration, namely an authoritative restore and a non-authoritative restore. Understand the difference before choosing the one that best fits your situation.
- Have multiple domain controllers to provide a full recovery without a backup when one of your domain controllers fail. That said, do a regular backup, so you can restore when all your controllers fail due to a virus attack, database corruption, or other reasons.
- Backup at least two domain controllers, if you can’t do a complete backup.
- Enable the Active Directory Recycle Bin so that you can restore deleted objects quickly.
- Create a document that includes your backup policy, frequency, disaster recovery plan, and more.
- Backup your active directory at least once daily and twice or more if it is large.
- Understand that not all domain controllers are the same, so have a backup strategy accordingly.
- Keep an offsite backup of your AD. Also, follow the 3-2-1 rule where you keep two backups on different media locally and one offsite.
- Know what FSMO is and the process of transfer/seize.
- At the minimum, back up the system state that includes your DNS server, Windows system files, COM+ class registration database, and more.
Now that you have the groundwork ready, let’s see how to back up the Active Directory.
How to backup Active Directory
A Windows Server backup utility is the easiest way to back up your AD as it is designed for specific use-cases like AD backups.
Installing Windows Server backup
Here is a step-by-step guide to install the Windows Server backup.
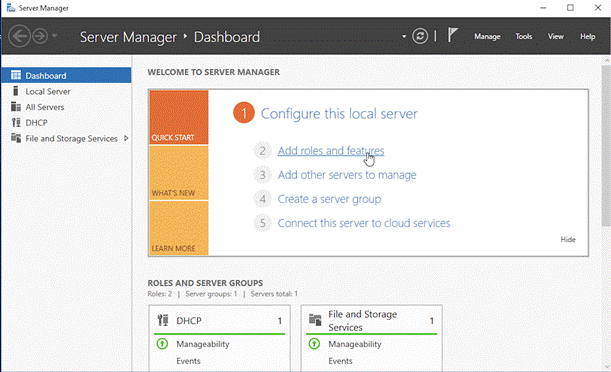
- Click the Windows button and navigate to Server Manager.
- On the dashboard, look for the “Add roles and features” option on the right-hand pane.
- Click “Next” a few times until you get to the features page.
- Look for an option called “Windows Server Backup” on the right-hand pane, check it, and click next.
- Click the install button on the next page, and this installs your Windows Server backup utility.
Note that this is not the only way to install the Windows Server backup, and you can also use PowerShell for the same.
Full server backup
Next, do a full server backup. This backs up the operating system, applications, and all the data associated with it. Do this if you have tons of critical data and applications. This option is helpful to restore the entire server when needed.
The other option is a system state backup that includes the backup of only the AD components. This option comes with limitations as you can recover your AD only on the same server and doesn’t help when your operating system becomes corrupt.
You can’t restore to a different computer either, and that’s why a full server backup is recommended over a system state backup. Also, the full server backup includes AD’s system state as well and hence, is more comprehensive.
Here are the steps for a full server backup.
- Create a backup disk. Remember, this disk has to be the same size as the one you’re backing up. For example, if your current disk is 1TB, the backup disk should also be only 1TB.
- Open the Windows server backup utility and look for an option called “Backup Schedule” on the rightmost pane.
- Click this, and on the next page, choose “Full server backup.” If you think a system state is enough, select the “custom” option. This screen shows the backup size.
- In the next screen, you can select the items to back up. For a full server backup, click the “Advanced settings” button, navigate to VSS settings, and choose “VSS full backup.”
- In the next screen, schedule the backup time based on your preferences.
- In the “Specify Destination Type” screen, choose “Back up to a volume.” The “Back up to a shared network folder” option overwrites the backup each time.
- Confirm your selections and click finish.
These steps complete your backup configuration.
Changing the task scheduler
The last process is to tweak the task scheduler to run your backup.
- Go to Windows search and type “Task Scheduler.” This will display the app and double-click to open it.
- You’ll see the backup task on the right-hand pane. Double-click it.
- On the General tab, check if the user account is SYSTEM. Look for an option called “Configure for:” towards the central bottom part and choose your current operating system.
- Go to the Settings tab and make any changes if needed. Ideally, check the “Allow task to be run on demand” option and, if required, choose the max time limit for your task, so it automatically stops if the backup exceeds the set time.
- Click OK.
With this, your AD backup is done, and it runs as per your configuration.
If all this looks cumbersome, many third-party tools ease this process for you.
How to restore the Active Directory

To restore the AD on a different domain controller (DC), install the same Windows version on the new DC along with ADDS and the Windows Server Backup tool.
Boot in DSRM
Start the restore process by booting your server in Directory Services Restore Mode (DSRM). To do this,
- Reboot the server.
- In the boot menu, press F8 for advanced options.
- Scroll down and select the Directory Services Restore Mode.
- Press Enter, and this will reboot the computer in a safe mode. It won’t start the directory services.
The other option is, run msconfig and select Safe Boot > Active directory repair in the boot tab. Finally, restart your server, and it will start in the DSRM mode.
Recover your items
Once your computer is in DSRM mode, start the recovery process.
- Run the Windows Server Backup.
- Look for the “Recover” option in the rightmost menu and click it.
- This opens the recovery wizard. In the first screen, choose “A backup stored on another location” option.
- Select the disk and give the exact path where your backup is located.
- Select the data of the backup you want to use.
- Next, choose the recovery type. It can be files and folders, volumes, or the system state.
- Choose the location for recovery. It can be the original location or pick a different one.
- Next, you’ll get a couple of warnings depending on the recovery type. Click OK for everything.
With this, your AD recovery on a new system starts.
Reboot the server in normal mode when the recovery process is over. Finally, log in with admin privileges and check if everything is in order.
Restore AD objects
When you want to restore specific objects, use the Active Directory Recycle Bin. If you haven’t configured it, use the authoritative restore mode.
In this restoration type, the domain controller’s directory matches the state it was in when the backup was done. You don’t even have to do the entire directory, but can choose specific AD objects to restore.
Thus, this is how you can backup and restore your AD. If you’ve used any third-party tools for backup and restoration, please share your experience in the comments section.
Featured image: Shutterstock


Thank Good Artical
explained very well thanks
How does ‘Windows Server Backup’ differ from ‘Microsoft Azure Recovery Service’ for domain controller backup and restore?
To add to my earlier comment, how complicated can this get? Looking at a couple of vendor’s products to recover AD and they reference documentation from Microsoft detailing about 28 different steps to perform that could take up to 5 or 6 business days.
My first comment was how does ‘Windows Server Backup’ differ from ‘Microsoft Azure Recovery Service (MARS)?’ It does follow the offsite copy of the backup and the System State can be recovered, just wondering if there is anything special about having the backup done directly on the server.
Hello, which is the proper method for restoring a lone domain controller – it’s the only dc in the network (very small site), thus no replication…
Kind regards,