If you would like to read the other parts in this article series please go to:
- Configuring IIS To Host an FTP Site (Part 1)
- Configuring IIS To Host an FTP Site (Part 2)
- Configuring IIS To Host an FTP Site (Part 3)
Introduction
So far in this series, I have shown you how to create an FTP site that users can access over a secure SSL session. SSL encryption is not everything though. Without the proper authorization mechanisms in place, it is still possible for anonymous users to access your FTP site. In this article, I want to conclude the series by talking about authorization as it applies to FTP sites in IIS 7.0.
Authentication
You can not really perform any type of authorization unless you are also performing authentication.
Open the Internet Information Services (IIS) Manager, and navigate through the console tree to <your server> | Sites | <your FTP site>. Next, double click on the FTP Authentication icon, located in the console’s middle pane. As you can see in Figure A, you have a choice of enabling either Anonymous Authentication or Basis Authentication. For our purposes, we need to enable Basic Authentication. Therefore, right click on the Basic Authentication option, and then select the Enable option from the shortcut menu.

Figure A: You must enable Basic Authentication
Authorization
Authentication establishes the user’s identity, but now we need to take some steps to determine whether or not the user is going to be allowed to access the FTP site. If the user is allowed to access the site, then authorization dictates whether or not the user is allowed to perform the action that they are attempting.
There are a couple of different forms of authorization that are supported for FTP sites. You can perform authorization by domain and IP address or by user and group name.
Address and Domain Name Restrictions
Address and domain name restrictions are usually used when users access the site anonymously, but can be used in conjunction with basic authentication to provide an extra degree of security. Adding a domain or IP address restriction is really easy to do. With your FTP site selected, double click on the FTP IPv4 Address and Domain Restrictions icon, located in the center column.
When the console switches to Features View, right click on an empty area in the center pane, and then choose either the Add Allow Entry or the Add Deny Entry option from the shortcut menu. Both options work in the same way, but one will grant access to the specified address or domain, while the other will block access.
When prompted, simply enter either the IP address or the domain name that you wish to base the rule on. As you can see in Figure B, you have the option of specifying either a single IP address, or an entire IP address range.

Figure B: You can create an authorization rule based on IP addresses or domain names
As you look at the figure above, you might notice that there is no field to specify a domain name. The reason for this is that domain name restriction rules place a huge burden on the server because each connection requires a reverse DNS lookup in order to determine the domain name that is associated with the IP address. Therefore, Microsoft hides the domain name option by default.
If you want to enable domain name rules, then right click in an empty area of the Features View pane, and then choose the Edit Feature Settings command from the shortcut menu. Doing so will cause Windows to display a dialog box that allows you to set the default behavior for unspecified connections to either Allow or to Deny. Besides controlling the FTP server’s default behavior though, the dialog box also contains a check box that you can use to enable domain name restrictions, as shown in Figure C.

Figure C: You can use the Edit IPv4 Addresses and Domain Restriction Settings dialog box to enable domain name restrictions
FTP Authorization Rules
Normally, if you are going to be performing basic authentication on FTP connections, you will use FTP authorization rules to control who is able to do what. You can access the FTP authorization rules by selecting your FTP site in the IIS Manager console, and then double clicking on the FTP Authorization Rules icon, found in the console’s middle pane.
Once the console switches to Features view, you can create an FTP Authorization Rule by right clicking in an empty area of the console’s middle pane, and then choosing either the Add Allow Rule or the Add Deny Rule command from the shortcut menu.
Setting up a rule is pretty simple. If you look at Figure D, you can see that a rule basically just consists of a user or a group to whom the rule will apply, and a permission. For example, a rule can be applied to All Users, All Anonymous Users, Specified User Groups (such as Admins, Users, or Guests), or to specific users.
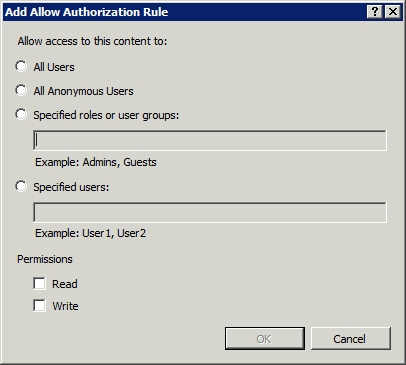
Figure D: You must specify a user or a group of users, and then specify a permission
Even though the console will allow you to do so, I recommend that you never apply rules to individual users. Otherwise, managing permissions could turn into a logistical nightmare. You are always better off either specifying a group or using one of the other available options.
Setting a permission could not be any easier. All you have to do is select; the Read check box, the write check box, or both. One thing that you must keep in mind though, is that these are IIS level permissions. There will almost always also be NTFS permissions that apply to the folder that the FTP site is using. You must ensure that the NTFS permissions are adequate to allow the specified users to access the FTP site or else the permissions that you set through IIS won’t matter.
Directory Browsing
Although it seems a little strange (at least to me it does), you ca not use authorization rules to control directory browsing. For that you will have to select your FTP site in the IIS Manager console, and then double click on the FTP Directory Browsing icon located in the console’s middle column.
As you can see in Figure E, you can display the directory listing in either MS-DOS style, or in UNIX style. There is not an option to disable directory browsing though. If you want to disable directory browsing, then make sure that you do not assign users the Read permission when you create an authorization rule.

Figure E: You can customize directory browsing for the FTP site to make the server look like a DOS (Windows) server or a UNIX server
In addition to controlling the directory style, you also have the option of displaying virtual directories, the number of available bytes in the directory, and four digit years, all by selecting the corresponding check boxes.
Conclusion
As you can see, setting up an FTP site in IIS 7.0 is pretty straight forward. The main things that you need to remember are that SSL encryption does not take the place of authentication and authorization, and that the permissions that you set through the IIS console do not override NTFS permissions.
If you would like to read the other parts in this article series please go to:


