In the first part of this series about customizing Azure DevOps work items, we created these items: Network Requirements, Application Requirements, and Application. Each one of them had specific fields to capture what was required to gather and use to complete our cloud modernization project.
By default, the organization can start taking advantage of Azure DevOps using the default processes. However, in this article series, we are going to show how to customize your experience and take advantage of built-in features in Azure DevOps that can make a big difference and save time and improve collaboration.
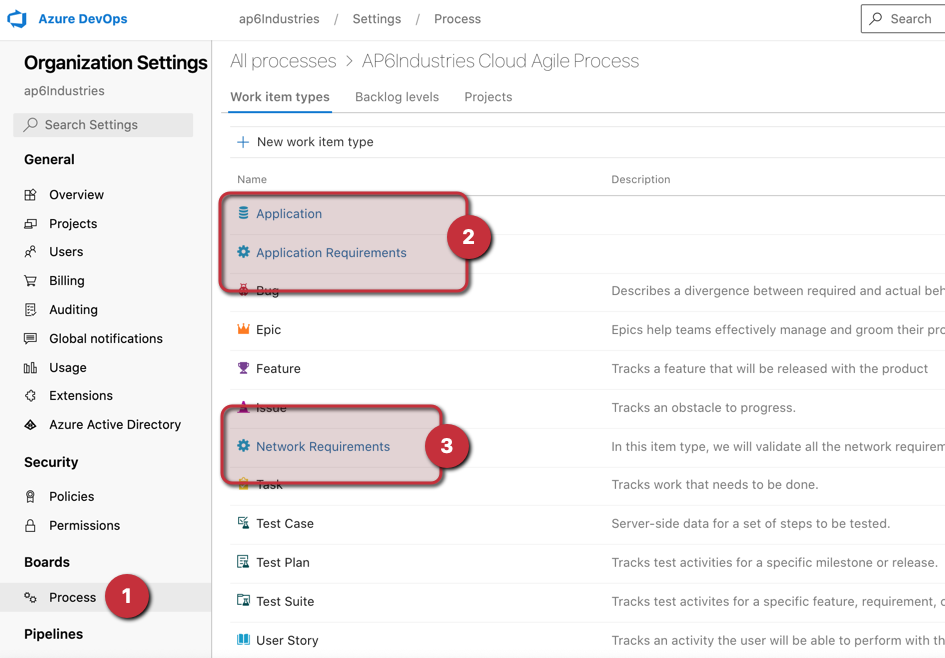
To manage the work items and the customized process in general, click on Organization Settings, Processes (Item 1). We can see the worked items that we created on Item 2 and Item 3 of the image below.
Managing backlog and work items flow
Understanding how the backlog levels work is vital to customize the process in Azure DevOps. Bear in mind that the items may change based on your process. In this article series, we are using the Agile process. Here is a quick summary of the backlogs available at the available process
- The Portfolio backlogs section is the top-level structure of your project, and we are going to use Epic and Feature.
- The Requirement backlog is known as the product backlog, and they will be listed on the Kanban board.
- The Iteration backlog is the one that is listed in the Sprints and Task boards.
The Backlog levels tab is where we configure how the different work item types will be used in our project/backlogs. The Agile default structure is depicted in the image below, and a summary of the backlog areas and their work item types are also described here:
- Portfolio backlogs: Epic and Feature.
- Requirement backlog: User story.
- Iteration backlog: Task.
- Other work item types: Bug.

The first change that we are going to introduce is to add the application work item to the backlog. In the Requirement backlog area, hover at Stories and click on Edit/Rename. We are going to select the Application and click on Save.

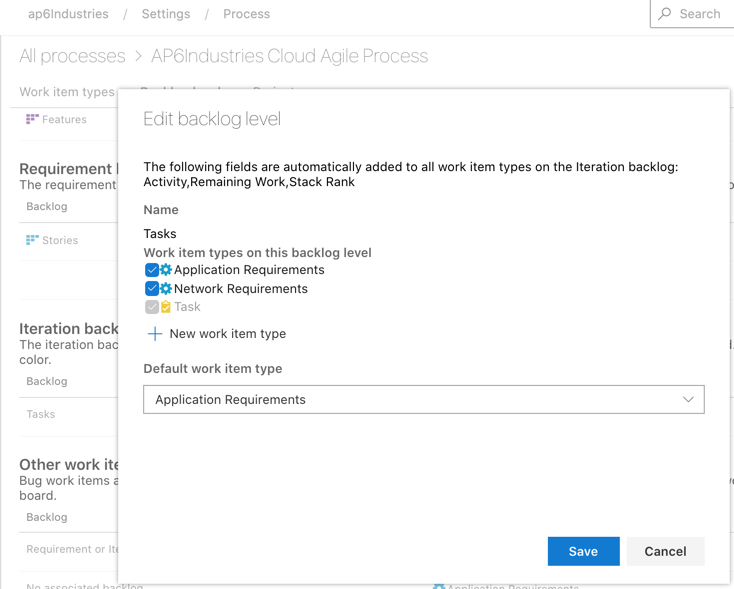
The second change is changing the iteration backlog. Hover the mouse over the item, click on … and then Edit. In the new page, select all the work items that we are going to use. In our case, we are going to choose Application Requirements and Network Requirements. Click on Save.
What does it change?
First, we will expand Boards (Item 1), and click on Backlogs (Item 2). Click on the area highlighted on Item 3 and select Epics.
Here is a hint: Click on the + and – buttons on Item 4 to expand by level the backlog.
We can click on the + Modernizing the Applications, Item 5). In a Feature (portfolio backlog) item, we can see all the items configured in the Requirements backlog, which is either Application or User story.

If we look at the Application Work Item, we will see the fields that we defined, and on the related work, we can see the parent and child items.

When we click on + at the Application Work Item, we can see that the available options are Application Requirements, Network Requirements, and Tasks (iteration backlog).

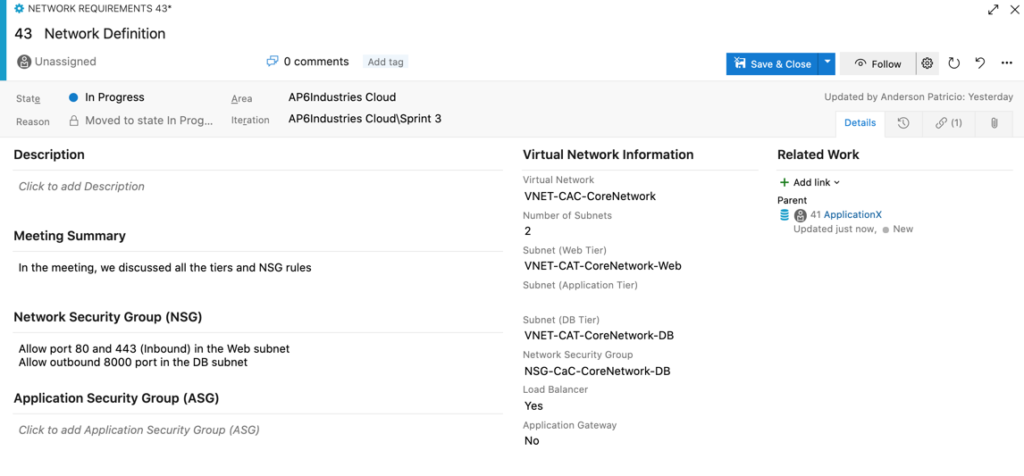
When we look at the Network Requirements, we see all the fields that we defined when creating the process.
Managing Azure DevOps work items states
We can improve the new Azure DevOps work items by defining States and Rules. To manage the states that a new work item can have, we should click on Project Settings, Process, find the desired process from the list, click on it, click on states.
A list of the existing States for all possible categories (Proposed, In progress, and Completed) will be listed (Item 2). To create a new one, click on New state, and we can define the name and the category, as well as the color to associate to this new state.

The result will be a new state available when managing the Network Requirements work item type.

Managing rules
To manage Rules, we can use the Rules tab. We can create a lot of automation to improve the process and save time for the team users using Azure DevOps.
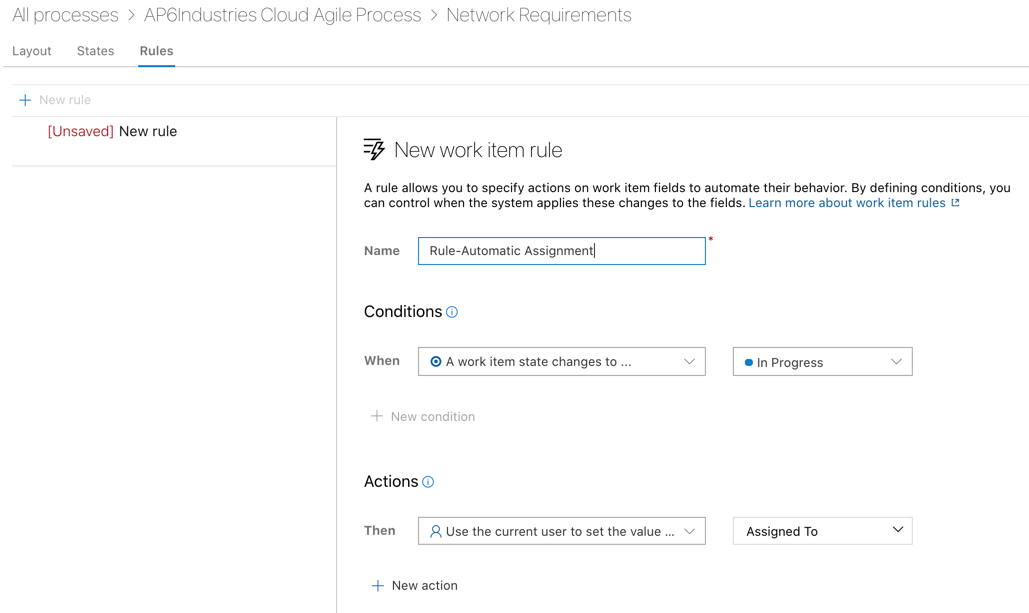
The rule is a combination of a specific condition, and when that condition is met, then one or more actions will be triggered.
In the example below, we created a rule to auto-assign the current logged-in user in Azure DevOps when the state changes to In progress.
The result can be seen as soon as we change the state to In progress, which meets the condition defined in the rule. Thus, the action is triggered, and the current user is assigned automatically to the Network Requirements work item.

Azure DevOps work items: Improving end-user experience
That concludes our two-part articles series about Azure DevOps work items customization. The goal is to create work items that are relevant for your project, with the information that you need, and, at the same time, remove any unnecessary information, and use states and rules to improve the end-user experience with some automation at the work item level.
Featured image: Shutterstock


whats with all this gui bullshit tho?
How do i list and edit work items from cli