Microsoft Azure uses Azure Resource Manager (ARM), which allows automation and consistency when deploying cloud solutions. Often, a solution consists of several pieces, which could be any type of resource, including VMs, Storage Accounts, VNETs, and Network Security Groups. We do have the option to manually create a solution using Azure Portal and that is totally fine. But in a corporate environment we need consistency and to be able to reuse code to deploy the infrastructure and solutions. We can achieve that using ARM templates, which are files based in JSON (JavaScript Object Notation), where we define which resources and their configuration, and using Azure Portal, Visual Studio, PowerShell, and CLI we can have the solutions being deployed in a consistent matter. We can use the same information to deploy the same solution in several environments and that is extremely useful when working in large and complex environments.
In this article, we will explore some steps how to get your ARM template from an existent resource in Azure Portal, and then use the template to deploy using Visual Studio, Azure Portal Deployment, or PowerShell. Keep in mind that these are not the only methods to use your ARM templates — we can also use Azure CLI, Visual Studio Team Services, and others to take advantage of ARM templates, but the focus on this article will be Visual Studio, Azure Portal, and PowerShell.
First steps: Using ARM templates and Visual Studio
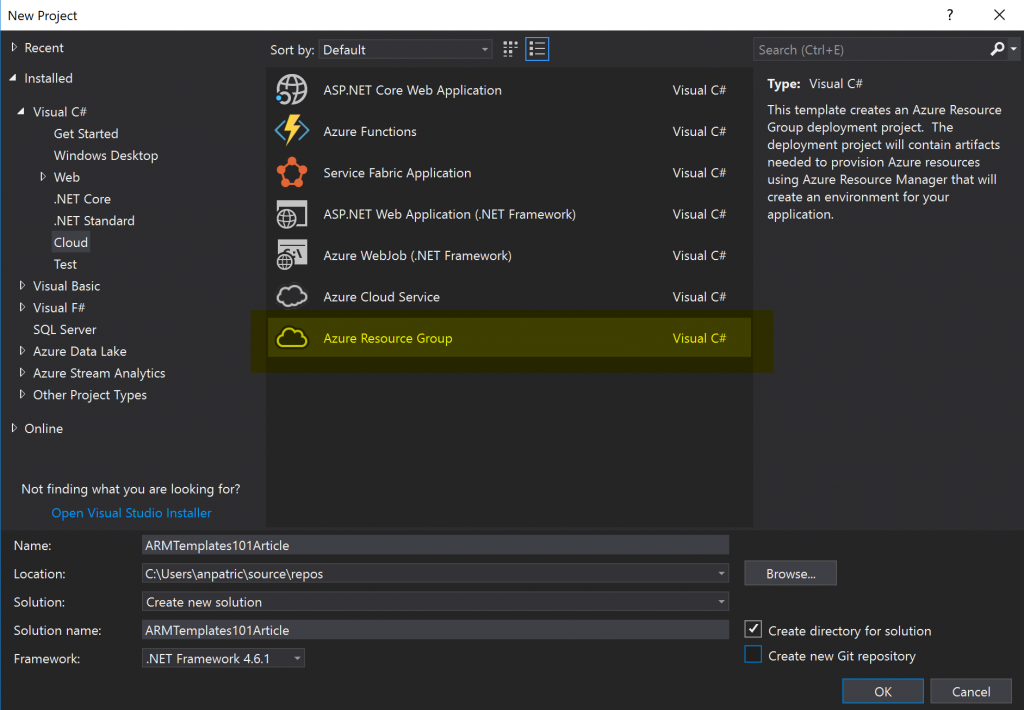
Let’s start exploring Visual Studio and ARM templates. We will see how to get enough information from an existent deployment to help create our own ARM templates. For now, let’s create a create a new project (File / New Project) and select Azure Resource Group located under the Cloud item.
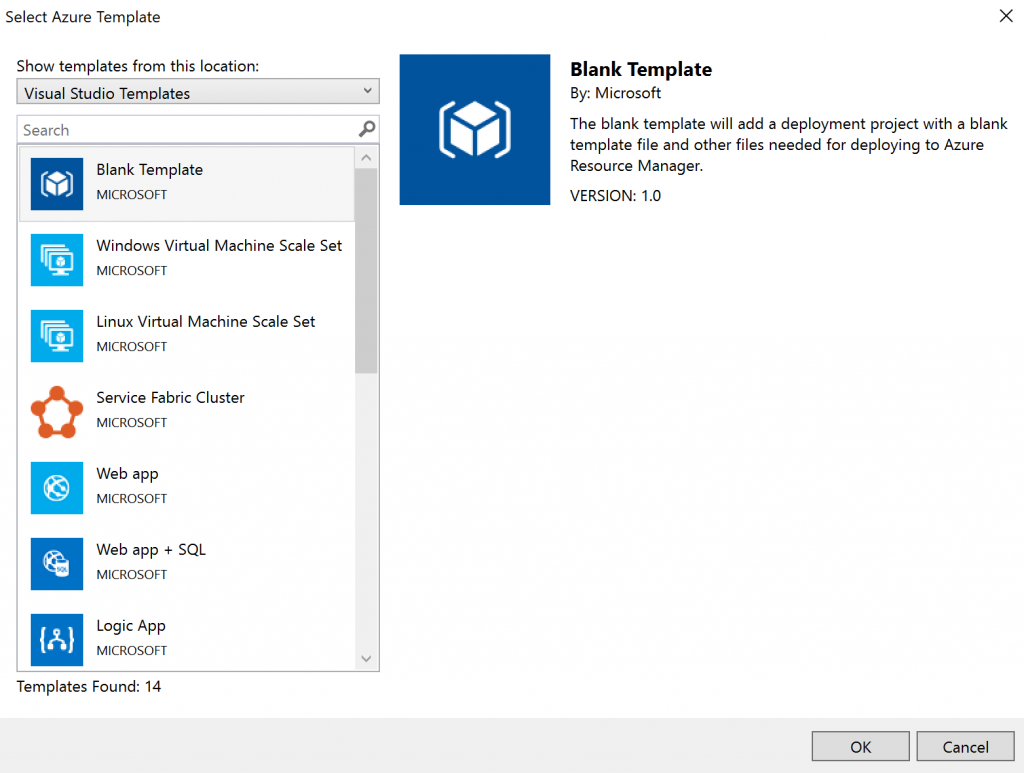
A wizard will show up and it will ask which type of resource we are trying to deploy. We can start from scratch by selecting Blank Template or pick any of the templates available. Keep in mind that we can bring this wizard by adding a resource later on through the graphical user interface.
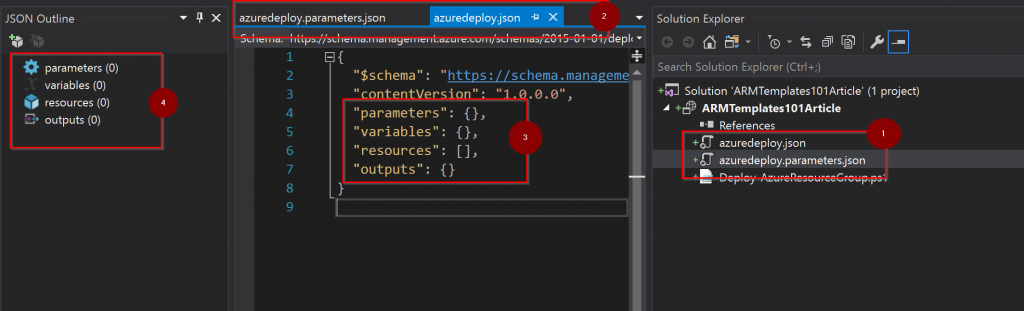
The initial page of Visual Studio provides tons of information for your future ARM templates. Basically, on the right side (Item 1, below) we will have all files that are part of the current solution (we should have azuredeploy.json and azuredeploy.parameters.json files). Every file that we open (item 2) will be listed there, and we can edit the code by clicking on those tabs.
Every JSON file contains four main sections: parameters, variables, resources and output where we will eventually add our code to deploy our Azure resources. In the left side (item 4), we have a graphical representation of what is listed on the code (item 3), for any new entry in the code, an icon will be displayed in the left side which helps to understand the items that are being added and for navigation purposes.
We can add new resources in the existent ARM template in two different ways. We can write the code, copy from an existent deployment or pieces of code from Internet (GitHub for example), or use Visual Studio to add resources (just right-click on resources and then Add a new resource and select the resource from the list and enter the information and perform the changes to meet our requirements).
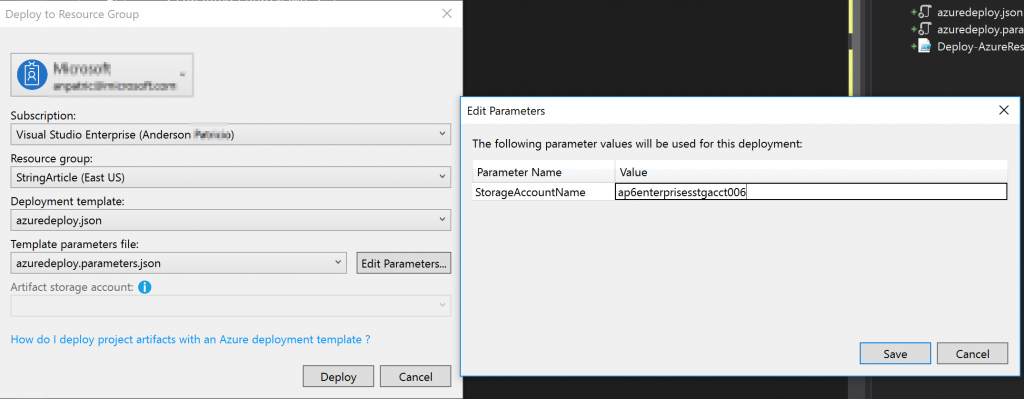
In order to deploy from Visual Studio, right click on Solutions Explorer, click on Deploy, and New. In the new dialog box, select or add your subscription, define the Resource Group, and both JSON files.
If we click on Edit Parameters located beside of Template parameters files we can provide the values and when we hit Save all those settings will be automatically saved on the azuredeploy.parameters.json file.
Using automation script
One of my favorite methods is using the Automation Script feature. My recommendation to understand the capabilities available is creating a new Resource Group in Azure Portal and then create the desired resource. In this article, we are going to create a Storage Account. Click on Create a Resource, type storage, and create your Storage Account.
Now that we have a resource in our Resource Group, we can check the Automation script, and on the new blade, we can see a generalized ARM template to deploy the current resource. We can check the ARM templates and parameters file, and several other deployment methods, such as Azure CLI, PowerShell, .NET, and even Ruby.
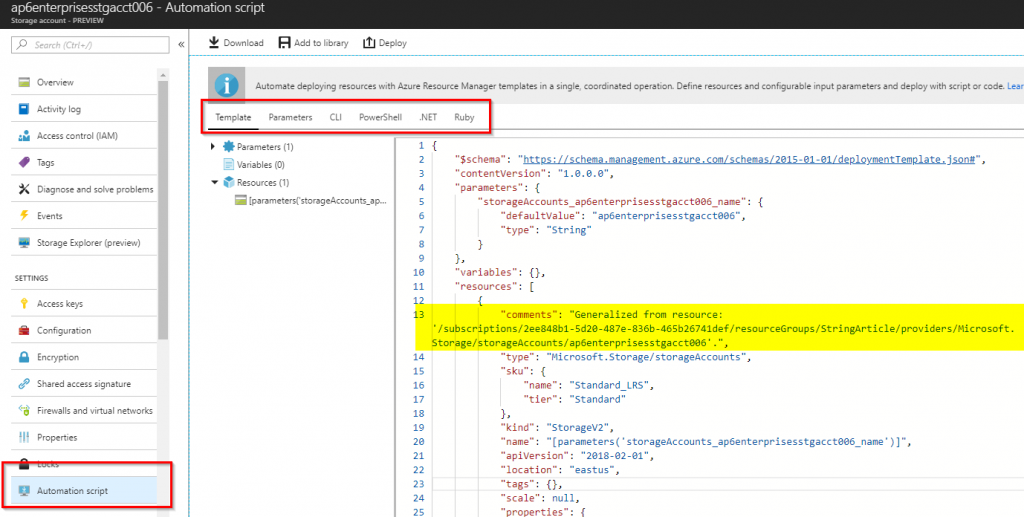
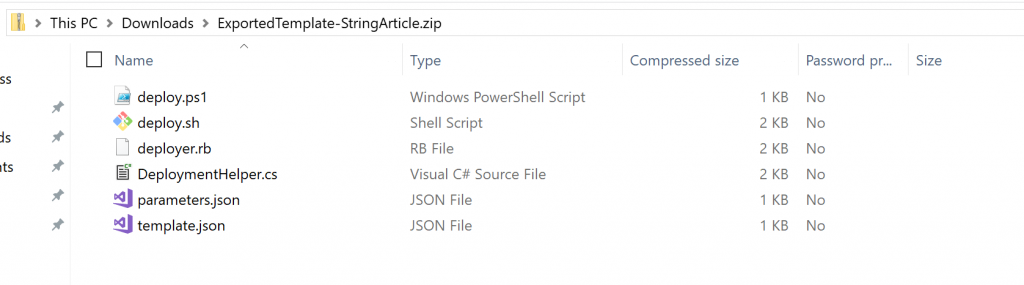
One of the features is to download a zip file containing the deployment process to deploy on every single method described and the ARM templates (template.json and parameters.json).
If you want to perform a new deployment using the current ARM template information, just click Deploy and a Custom Deployment blade will be displayed. It already has all the ARM template information from the previous blade. Basically, we just need to check the information. In our case we want to use a different name to avoid an error during deployment.
In the same location, we have the ability to change the template itself or even parameters on the fly. In order to deploy, just select the option I agree to the terms and conditions stated above and click on Purchase to start the new deployment.

A couple of important points and recommendations about Automation Script that we must be aware of before using the feature, as follows:
- The Automation Script will always reflect all resources deployed in any given resource group. If you want to troubleshoot a specific resource, having a resource group with just the object is much simpler to read than a busy resource group with tons of resources deployed.
- The ARM template that we see in the Automation Script is related to what you currently have. For example, if you deploy a Storage Account and after a couple of days deploy 10 VMs and you change the initial Storage Account to use GRS instead of LRS, the current Automation Script will have all the VMs and the storage account configured as GRS.
- You can use the same feature to check properties and values when you perform a change in any given resource for troubleshooting purposes or when creating your own ARM templates
- My recommendation is to get rid of comments lines because they inform us that this current template was generalized and the source information (not required when deploying new stuff)
Using PowerShell
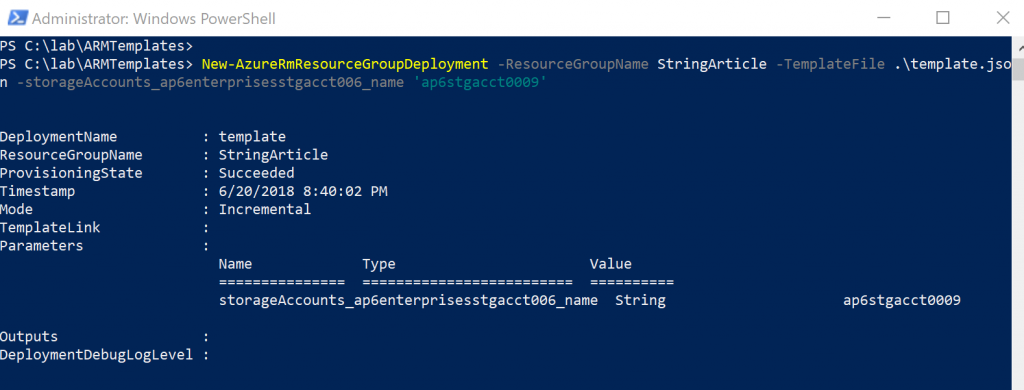
If you have your ARM template and your parameters, we can take advantage of PowerShell and use the New-AzureRMResourceGroupDeployment cmdlet. We need to provide the Resource Group name, the template file, we can also pass the parameters that the template file is expecting, or even pass the parameter file with all the answers.
In the example below, we have a parameter on the JSON file called storageaccounts_ap6enteprisesstgacct006_name and I’m assigning the name ap6stgacct0009 where the result will be a new Storage Account with that name.
Keep in mind that we are just using the parameter name that came from Automation Script at the beginning of this article. In a normal scenario, we would work on the parameters names to keep it simple and easy to deploy.
Final thoughts
In this article, we provided some guidance on how to get information to create your ARM template files, and how to deploy it using Azure Portal, Visual Studio and/or PowerShell. But we have just scratched the surface.
Using ARM templates, we have several methods to integrate them in our deployment lifecycle. We can take advantage of the tools we explored in this article, but also take advantage of GitHub to deploy cloud solutions.
Featured image: Freerange Stock


I am trying to modify a runbook powershell script to call an arm template to spin up a new container.
Getting an error: System.Management.Automation.ParameterBindingException: A parameter cannot be found that matches parameter name ‘TemplateFile’.
Could you assist?
My visual studio shows the JSON Outline as blank so I don’t have the option to right click and add resources as in your first step. Do you have any syntax examples for using existing storage accounts or existing app service plans or existing app insights but still generates a new function app?