One of the nightmares of every security professional is having all workstations and servers sharing the same local administrator name and password, and as soon as the password is known then all workstations/VM that share the same password can be accessed as local administrators. Think this can’t happen? Trust me, this scenario is not farfetched. Several companies that I worked with in the last few years still have this strategy in place. Microsoft has a tool called LAPS (Local Administrator Password Solution), which can be applied on workstations and servers. It leverages Active Directory to store the password of the local administrator and we can define the complexity and how often such password is changed. Using LAPS, we can have every single server and workstation using a secure, unique, and complex password and at the same time support the local admin’s needs from the service desk teams.
How does it work? It is simple. A couple of attributes will be added to the Active Directory schema and they will be used at the computer-object level. On those attributes, the password and expiration time will be written by the tool. We can control access to those attributes using ACL (Access Control List) to keep them secure and available only for required users.
We have a lot of ground to cover in this article, and the following diagram explains the process that we will follow to get LAPS in place before you finish your cup of coffee!
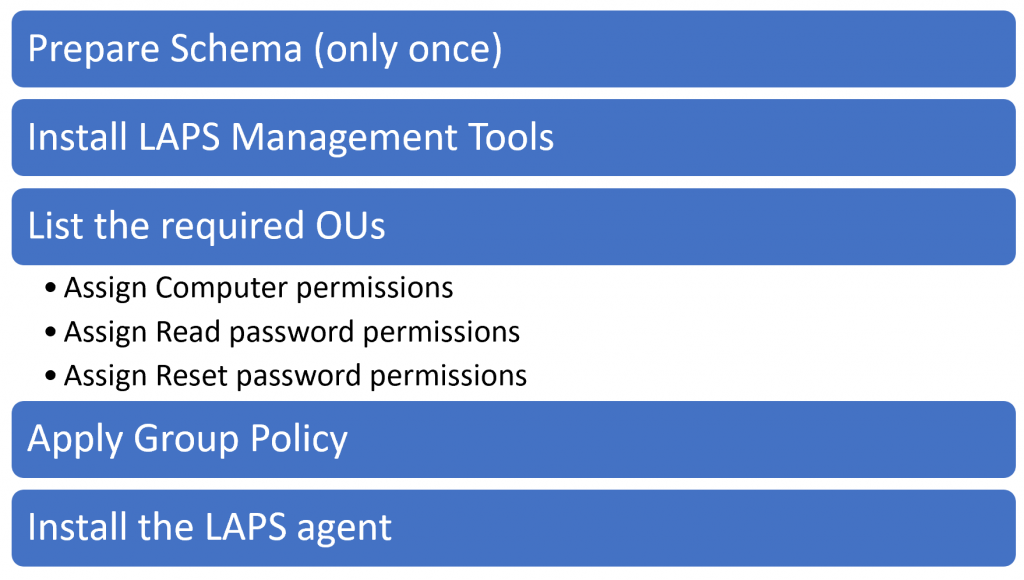
Getting LAPS
The first step is to download the LAPS solution. The package has two installation files (x64 and x86 platforms respectively) and there are three files that document the entire solution and step-by-step installation process.

Installing LAPS (management server)
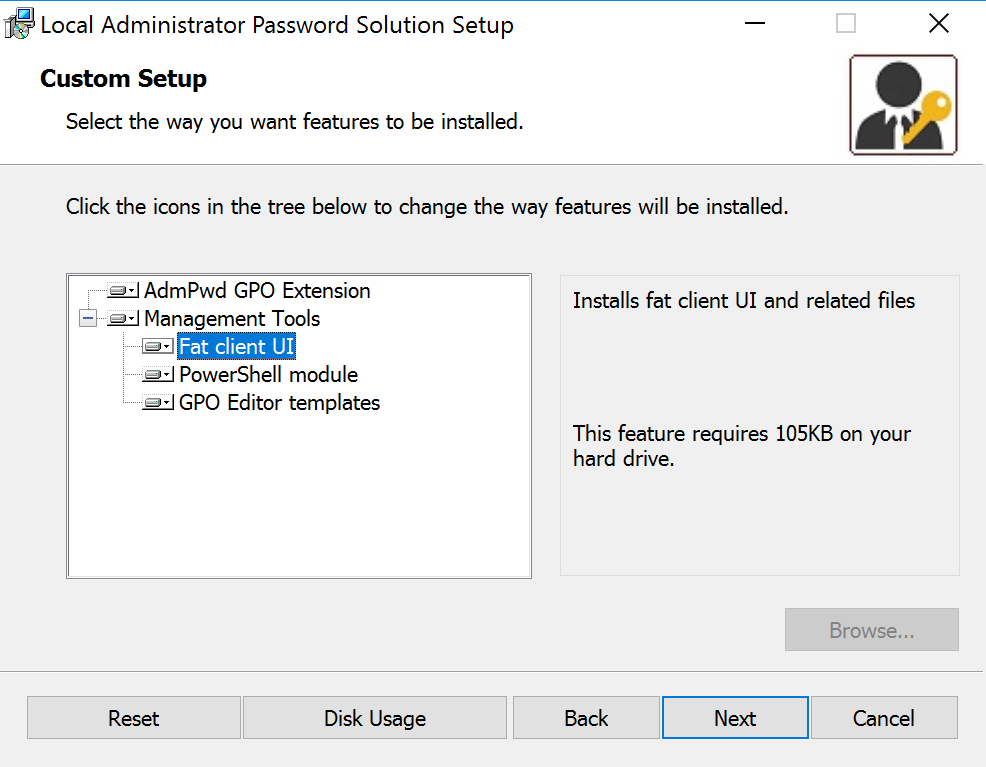
Log on to the server that will be the Management Server. Double click on the LABS.x64.msi file that we have downloaded from the previous step. The installation process does not require a lot of changes. The only page is the Custom Setup, where we should select all management tools available, which are Fat Client UI, PowerShell Module and GPO Editor templates.
Note: The PowerShell module will install the AdmPwd.ps, which is key for most of the tasks that we will perform in this article. The file itself can be found at C:\Windows\System32\WindowsPowerShell\v1.0\Modules\AdmPwd.ps
Configuring the server environment
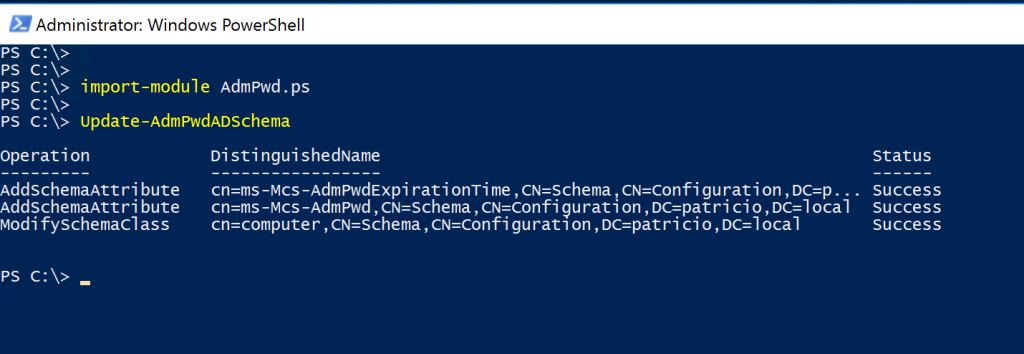
The first step is to extend the Active Directory schema (you need to be a schema admin), and logged on to the server where we installed LAPS, run PowerShell as an administrator and run these two PowerShell cmdlets. The results should be similar to the image depicted below.
Import-Module AdmPwd.ps
Update-AdmPwdADSchema
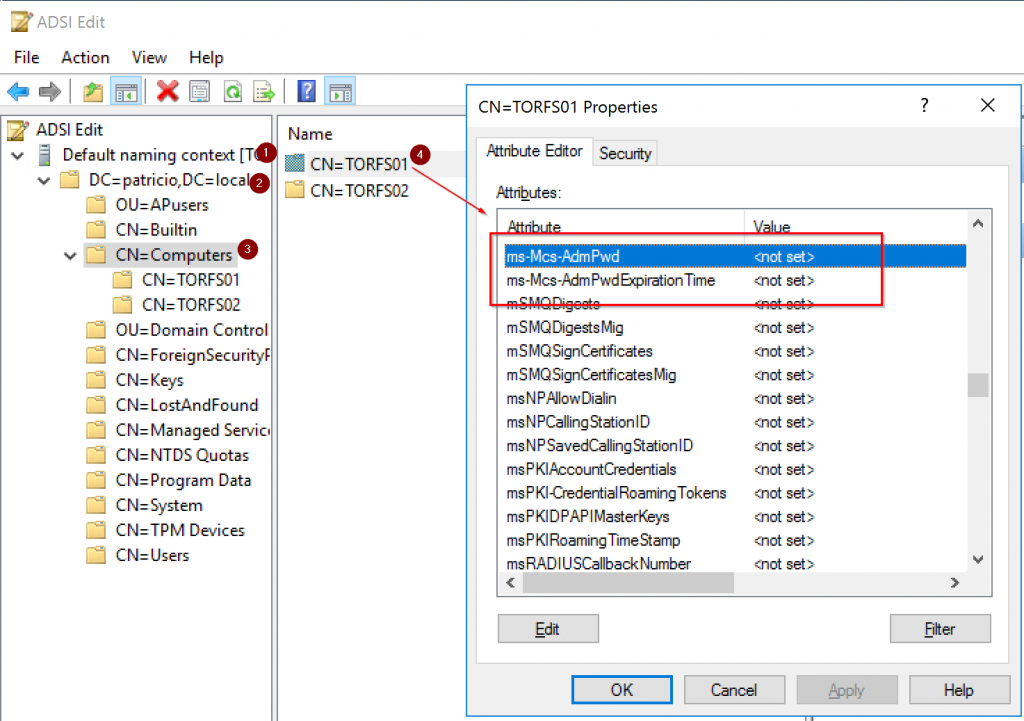
The result of this schema extension can be validated using ADSIEdit. We can connect to the default naming context, expand any OU that has at least one computer object, and then ask the property of any computer object. In the list of attributes, we should have two new entries: ms-Mcs-AdmPwd (the password is in clear text, hold your horses we can secure using ACLs!), and ms-Mcs-AdmPwdExpirationTime (when the password will expire).
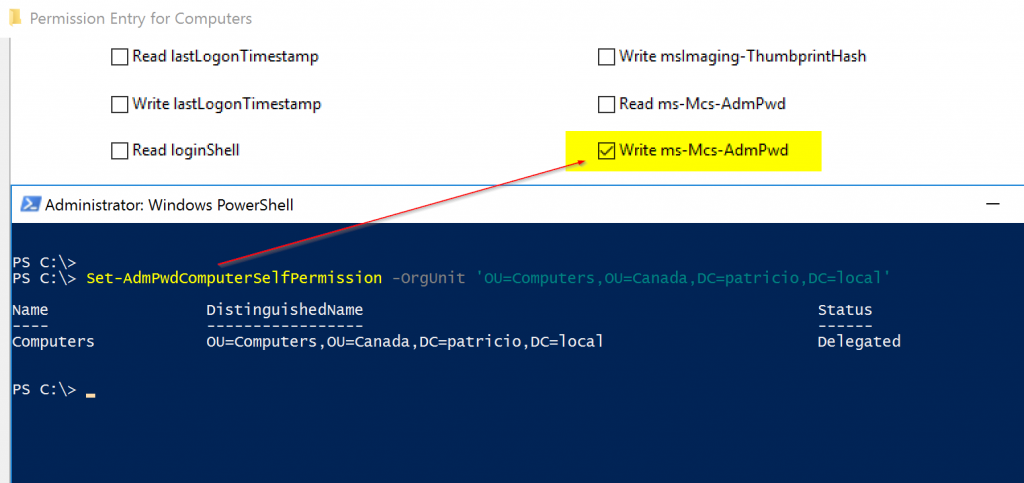
Another key configuration is to assign permission to the computers to write the password in Active Directory. We can do that manually, but the best way is using the Set-AdmPwdComputerSelfPermission cmdlet. We just need to provide the OU that we want that permission assigned. The result will be a SELF object receiving write permissions on the ms-Mcs-AdmPwd and ms-Mcs-AdmPwdExpirationTime attributes.
It is a good practice to list all Organization Units that will contain computers and assign permission on all of them.
Managing LAPS permissions with PowerShell
At this stage, we have the management tools installed on our server and the tools will provide the interface to manage permissions in Active Directory. In theory, we can do this manually, but the PowerShell module comes in handy with all functions to help us out.
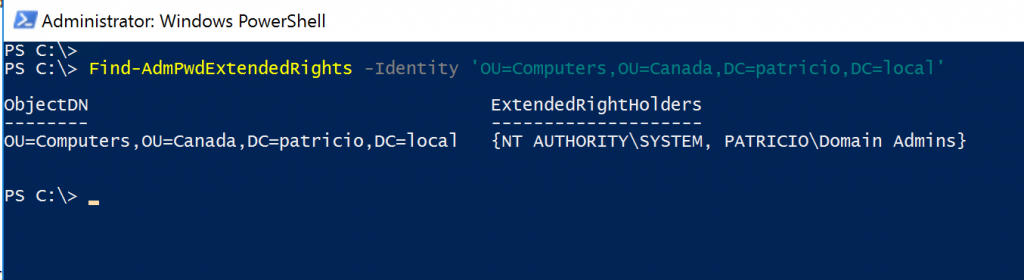
The first cmdlet that we will explore is the Find-AdmPwdExtendedRights. To be able to read the password of any given computer that has LAPS agent installed and configured, the user requires Extended Rights permission on the computer object.
Using this cmdlet, we can list all groups/users that have that Extended Rights permission at the Organization Unit (OU) level. We can use the simple name of the OU or the complete path (my preference). In the example below, we can see that only System and Domain Admins will be able to read passwords of computers located on Canada\Computers OUs.
To allow users and groups to read the password, we need to assign the proper permissions, and that can be accomplished using the Set-AdmPwdReadPasswordPermission cmdlet. We just need to specify the Organization Unit and the Group(s).

If you need users or groups to reset passwords of computers in your environment, then we need to use the Set-AdmPwdResetPasswordPermission cmdlet, which has the write permissions where the previous cmdlet had only read permissions.

A summary of the PowerShell cmdlets available and the parameters required to make them work are described in the following table.
| cmdlet | Identity parameter | Additional Parameter |
| Find-AdmPwdExtendedRights | -Identity ‘<OUPath-or-Name>’ | – |
| Set-AdmPwdResetPasswordPermission | -AllowedPrincipals <Group> | |
| Set-AdmPwdReadPasswordPermission | ||
| Set-AdmPwdComputerSelfPermission | – |
Configuring LAPS Group Policy
Having the Active Directory schema extended, permissions in-place to write in the attributes that are part of the solution is the basic requirement. The Group Policy and the agent at the client are the ones that enforce everything that we have done so far.
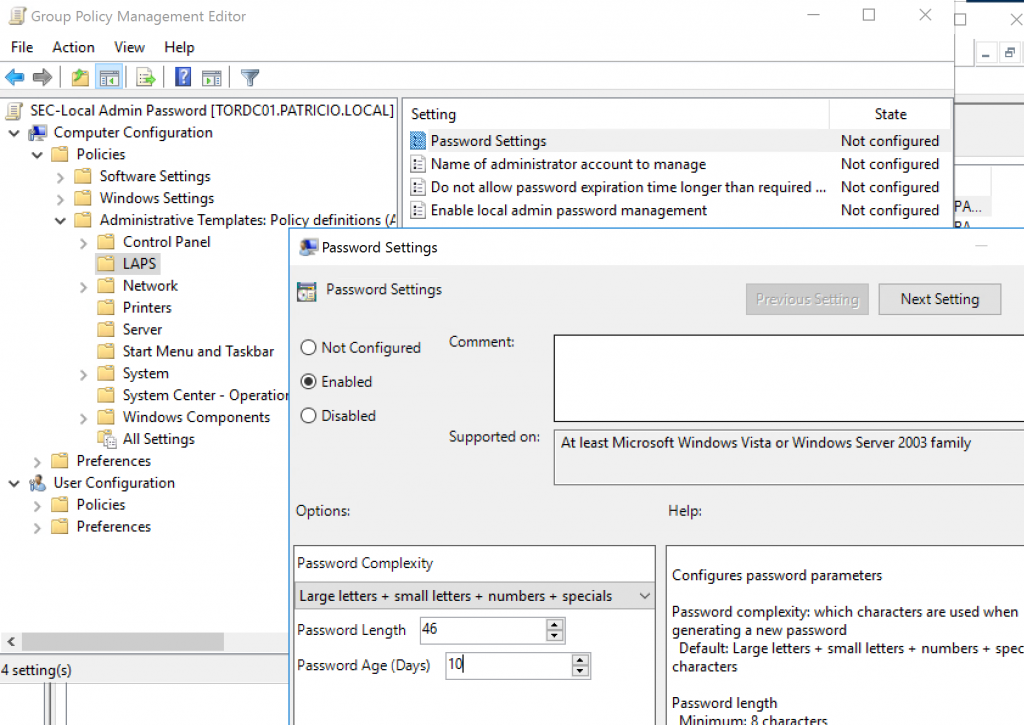
The LAPS installation adds a template in the Administrative Templates section when using Group Policy Management Editor. We just need to create a new Group Policy and navigate to Computer Configuration / Policies / Administrative Templates / LAPS. We will have four settings that will help to define the settings that we want to be applied on our servers and workstations.
The first one is Password Settings, where we can define the complexity, length, and age of the password that will be generated for the local administrator. The second setting is Name of the administrator account to manage. This is where we define the name of the account that is already configured on your servers and workstations, if the name entered here does not match the local administrator of the server that is receiving the policy, it will fail. The setting Enable local admin password management is where we define if we are going to control the password management, and it should be enabled.
Installing LAPS agent and testing
Using the same installer file that we downloaded at the beginning of this article, we just need to run the following command line locally on the server/workstation and that will install the Local Administrator Password Solution, which can be checked on the App & features item in the Control Panel. We can automate the installation process through GPO, SCCM, and any other tool that you current IT uses.
Msiexec /I C:\Temp\LAPS.x64.msi /quiet

Visualizing the current local administrator password
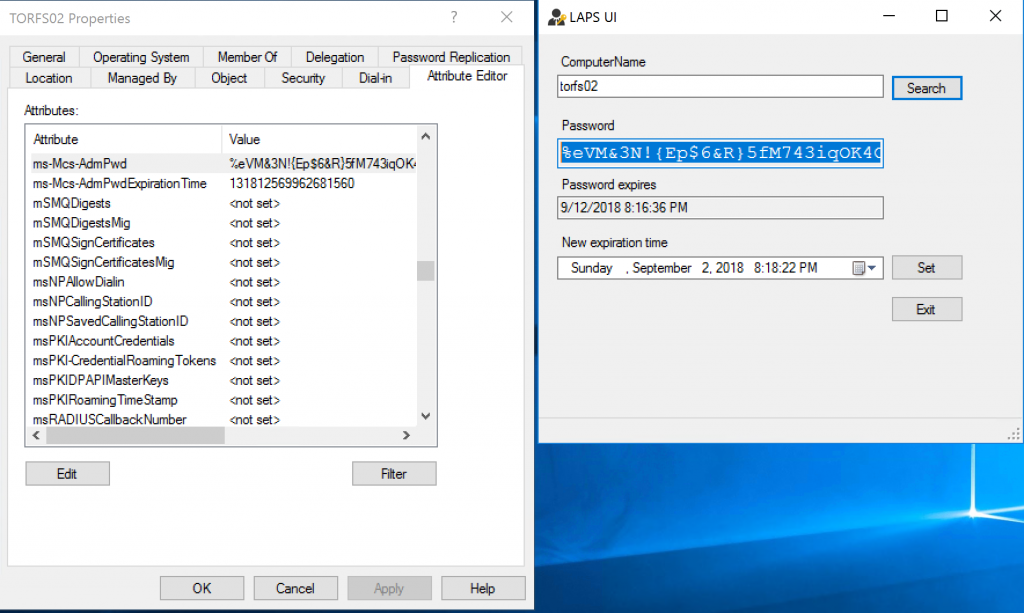
You may be wondering, How do I know the password of any given machine using the solution that we have just implemented, right? There are a couple of ways of accomplishing this task. The first one is using LAPS UI, which was installed on the management server, and just provide the machine name and the password will be displayed (screen on the right side of the image below).
The other option is checking the server/workstation properties using Active Directory Users and Computers, and looking for the ms-Mcs-AdmPwd attribute and it will contain the current password.
Good job! Your system is now more secure.
Featured image: Shutterstock


Hi there,
would you maybe add a little explanation or scenario description of when to use LAPS? I understand what it does but still fail to see a practical application it sounds like I can do almost the same with GPOs without LAPS.
GPO u need to change the password manually, with LAPS it is automatically changing, i guess.
An interesting article. Is it advisable to install LAPS on servers? What happens after a server restore if the local administrator password is older than last saved in the AD? Without local admin, domain joining is not possible after restore if necessary.
Hello Ovidu,
Your question intrigued me. Why need a solution like LAPS is to make it certain that no client workstation / server local admin user account share the same password. But we are doing this to avoid pass the hash attach or credential theft. If an attacker is able to elevate its privileges on the machine then a tool like mimikatz can be executed to steal the credentials from the machine either in clear text (wdigest) or hash ntlm. This can be used to laterally move across different machines till I am able to hit the jackpot which is Domain Admin account. Hence randomizing local administrator password is just one of the things that is very much required to avoid credential theft and lateral movement attack. If you disable the local admin account on all the machines then you don’t need such a solution.
(the password is in clear text, hold your horses we can secure using ACLs!)
Where is the part?
Just one note: do not forget that by default if user able to join a computer to domain he will be owner of computer object in AD and will be able to get LAPS passwords of computers he joined. To solve this issue you need to modify default security descriptor for “creator owner” it is described in article
https://blogs.msdn.microsoft.com/laps/2015/07/17/laps-and-permission-to-join-computer-to-domain/
can i use any domain member windows 2012 R2 Std. server for LAPS installation or must i have to install on Domain controllers ?
It’s not necessary to use a domain member machine or a windows server as long as the machine can able to communicate to your AD is fine, but domain account that can extend your AD schema is necessary to run the powershell like Domain Admins or Schema Admins account.
Installing it on your Domain Controllers is not advisable as it will change the built-in administrator account of your AD that have the master key role of your domain kingdom, unless that you also want to do the change.
Very Nice, I had never heard of LAPS and now I know what it is and how to implement it. Thanks very much Anderson