If you would like to read the other parts in this article series please go to:
- Diagnostic and Recovery Toolset (Part 1)
- Diagnostic and Recovery Toolset (Part 3)
- Diagnostic and Recovery Toolset (Part 4)
- Diagnostic and Recovery Toolset (Part 5)
Introduciton
As described in the first article of this series, DaRT provides tools for troubleshooting and repairing Windows-based computers that won’t boot because of system file corruption, driver incompatibility issues, malware infection, and other types of problems. With DaRT 6.5, which is part of MDOP 2009 R2, you can troubleshoot computers running Windows 7, Windows Server 2008 R2, or earlier versions of Microsoft Windows.

Before you can use DaRT, you must first install it on a computer, typically an administrator’s workstation. You can then use this workstation to create bootable DaRT media you can use to boot Windows-based computers that won’t boot using the Windows Recovery Environment (WinRE). Once in the WinRE, you then have access to the various tools and wizards provided by DaRT and can attempt to repair the problem computer. This article walks you through the first two steps of installing DaRT and creating bootable DaRT media.
Installing DaRT
We’re going to install DaRT on an administrator’s workstation running Windows 7 x64 Enterprise edition and then use it to troubleshoot computers running Windows 7 that fail to boot properly. Begin by inserting your MDOP 2009 R2 CD into your CD-ROM drive or using an .iso file mounting utility to mount the DaRT .iso file you downloaded from the volume licensing site (or MSDN/TechNet site if you’re just evaluating DaRT). The splash screen is displayed:

Figure 1: Step 1 of installing DaRT.
Clicking on the Microsoft Diagnostic and Recovery Toolset icon in the splash screen above displays a screen that lets you install the version of DaRT you want to use:

Figure 2: Step 2 of installing DaRT.
Clicking on Install DaRT 6.5 (64-bit) in the above screen launches the Setup wizard shown next:

Figure 3: Step 3 of installing DaRT.
Proceed through the wizard, performing the type of install you choose:

Figure 4: Step 4 of installing DaRT.
After DaRT is installed on your workstation, you should install the Windows Debugging Tools so you can access these tools when using DaRT to troubleshoot Windows 7 x64 Enterprise edition computers that won’t boot. To install the Windows Debugging Tools for 64-bit Windows, open the URL http://www.microsoft.com/whdc/devtools/debugging/ using Windows Internet Explorer:

Figure 5: Step 1 of installing the Debugging Tools for 64-bit Windows.
Scroll down this page and click on the link that says Debugging Tools for Windows 64-bit Versions:

Figure 6: Step 2 of installing the Debugging Tools for 64-bit Windows.
On the Debugging Tools for Windows 64-bit Version page that appears next, click the link that says Download Debugging Tools from the Windows SDK:

Figure 7: Step 3 of installing the Debugging Tools for 64-bit Windows.
The Microsoft Download Center now opens, displaying the Microsoft Windows SDK for Windows 7 and .NET Framework 4 page:

Figure 8: Step 4 of installing the Debugging Tools for 64-bit Windows.
After clicking the Download button on the above page, the Windows SDK Setup Wizard begins:

Figure 9: Step 5 of installing the Debugging Tools for 64-bit Windows.
On the Installation Options wizard page, clear all the checkboxes except for Debugging Tools for Windows:

Figure 10: Step 6 of installing the Debugging Tools for 64-bit Windows.
After installation of the Debugging Tools is finished, the All Programs group of your Start menu should look something like this:

Figure 11: DaRT and the Windows Debugging Tools are now installed.
At this point you’re now ready to create bootable DaRT media you can use to start an unbootable Windows-based computer to attempt to repair the computer.
Creating Bootable DaRT Media
We’ll create a bootable DaRT CD we will use later for troubleshooting computers running Windows 7 x64 Enterprise edition that won’t start properly. Begin by launching the ERD Commander Boot Media Wizard from your Start menu:

Figure 12: Step 1 of creating a bootable DaRT CD.
Click Next when the wizard appears:

Figure 13: Step 2 of creating a bootable DaRT CD.
Insert your Windows 7 x64 Enterprise product media in your DVD drive. Then on the Select Boot Image wizard page, click Browse and select your DVD drive:

Figure 14: Step 3 of creating a bootable DaRT CD.
Clicking OK in the dialog above returns you to the Select Boot Image wizard page:

Figure 15: Step 4 of creating a bootable DaRT CD.
On the Preparing Files wizard page, click Next:

Figure 16: Step 5 of creating a bootable DaRT CD.
The wizard will now expand the boot image from your Windows 7 product media (this may take a few minutes):

Figure 17: Step 6 of creating a bootable DaRT CD.
On the Tool Selection page, you can either install all DaRT tools (the default) or choose to exclude certain tools from your bootable DaRT CD. For example, if you don’t want Helpdesk to be able to wipe disks or reset local passwords because of your corporate security policy, you can exclude these two tools from your CD. We’ll install all the DaRT tools:

Figure 18: Step 7 of creating a bootable DaRT CD.
On the Crash Analyzer Wizard page, the wizard should have automatically found the Debugging Tools you installed previously on your workstation, so simply click Next on this page:
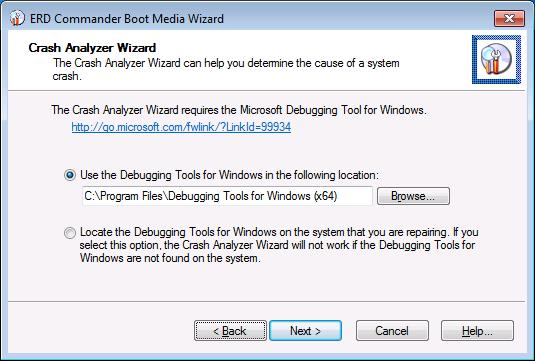
Figure 19: Step 8 of creating a bootable DaRT CD.
On the Standalone System Sweeper Definition Download page, we’ll leave the Yes option selected since we want the latest malware signature file on our DaRT CD:

Figure 20: Step 9 of creating a bootable DaRT CD.
At this point the malware signature file for Standalone System Sweeper will be downloaded (this may take a few minutes):

Figure 21: Step 10 of creating a bootable DaRT CD.
On the Additional Drivers page, you can select .inf files for any drives you want to include on your DaRT CD. In most cases you won’t need to do this, but if you plan on using DaRT to troubleshoot Windows servers you may need to add mass storage drivers here. We’ll just leave this blank and click Next:

Figure 22: Step 11 of creating a bootable DaRT CD.
The Additional Files page lets you add files to your DaRT CD such as specialized troubleshooting utilities if you have any you want to include:

Figure 23: Step 12 of creating a bootable DaRT CD.
The next page shows the path to where the .iso file for your DaRT CD will be placed once it has been generated by the wizard. The default location is the desktop of the current user:

Figure 24: Step 13 of creating a bootable DaRT CD.
At this point, the DaRT boot image is created:

Figure 25: Step 14 of creating a bootable DaRT CD.
Once the .iso file has been created, the next page lets you burn the image to recordable CD media. This particular workstation I’m using doesn’t have a writable CD drive, which is why the option to burn the image is grayed out below:

Figure 26: Step 15 of creating a bootable DaRT CD.
The wizard now finishes:

Figure 27: Step 16 of creating a bootable DaRT CD.
At this point I copied my .iso file to another computer that had a writeable CD drive and burn the image to writable CD media. Now I’m ready to use my bootable DaRT CD to try and repair a Windows 7 computer that won’t boot properly.
Conclusion
This article showed how to install DaRT 6.5 on an adminstrator’s workstation and create a bootable DaRT CD for troubleshooting unbootable Windows-based computers. In the next articles of this series we’ll learn how to use our DaRT CD in different troubleshooting situations.
If you would like to read the other parts in this article series please go to:


