In the past, the process of encrypting a virtual machine in Microsoft Azure required an Azure AD app account to perform the work. Nowadays, we have a more straightforward way to encrypt our VMs in Microsoft Azure, and this new method has integration with Azure Portal. In this article, we are going to cover the basics to enable the encryption using the new method, including the creation of an Azure Key Vault. We will also include the steps that can be performed in the Azure Portal and the PowerShell cmdlets/functions to support the encryption process. There is no transition process from the previous method to this new one. The recommendation is to use this new method moving forward.
Provisioning the Key Vault
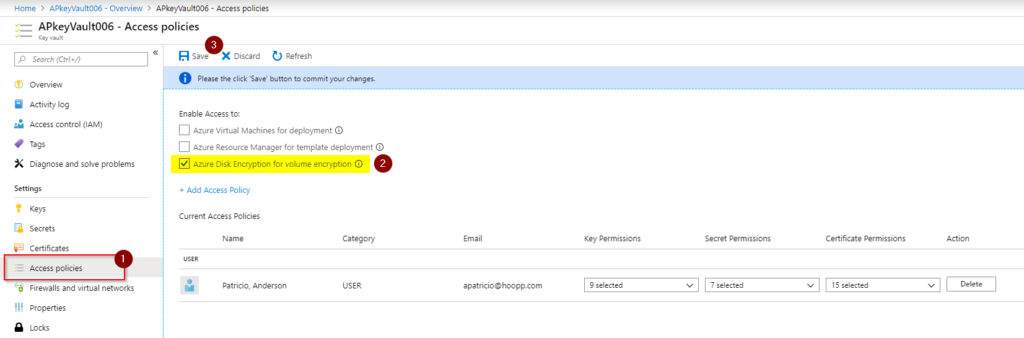
The first step is to create a Key Vault. Logged on Azure Portal, click on create a resource, type Key vault and on the new blade, click on Create. A new wizard will be displayed, and it will allow us to configure all basic settings that we need to start using the new Key Vault with disk encryption. In the Basics tab, define a name, region, and resource. Click on Next: Access Policy. In the Access Policy tab. Check the Azure Disk Encryption for volume encryption option, click on review + create to start the provisioning of the Key Vault.
Note: If you are using a hub and spoke topology, the use of a Key Vault on your shared infrastructure area at the hub is the right approach. This way, all your encrypted VMs will take advantage of that centralized Key Vault to retrieve and encrypt their disks.

In case you have missed the configuration above and just created the Key Vault, we can always enable Disk Encryption by selecting Access Policies in the Key Vault properties.
After creating the Key Vault, our next step is to create our first set of keys that will be used to encrypt our disks. Open the Key Vault that we have just created, click on Keys, and then click on Generate/Import.
In the Create a key page, select generate, and type a name for the new key. (In our example, we are labeling as PROD-DiskEncryption because we are going to use that only key for the entire PROD environment.)
Define the key type, RSA key size, and we can define activation and expiration for the key. Click on Create.

Encrypting a VM using Azure Portal
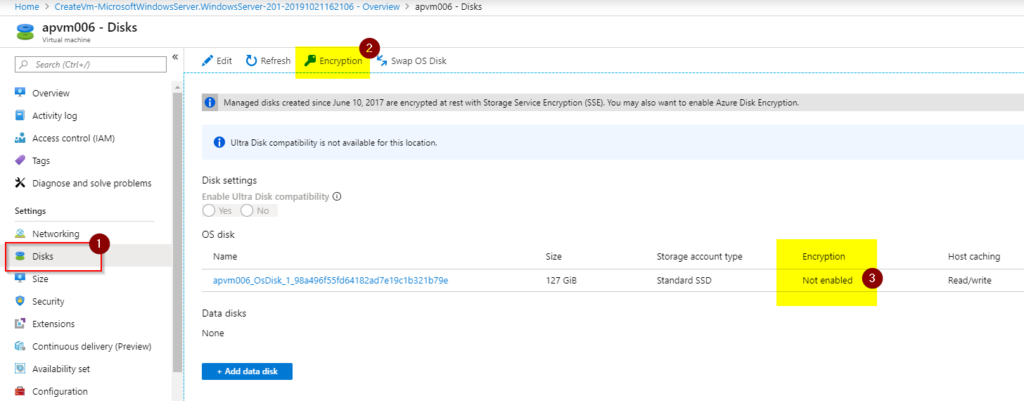
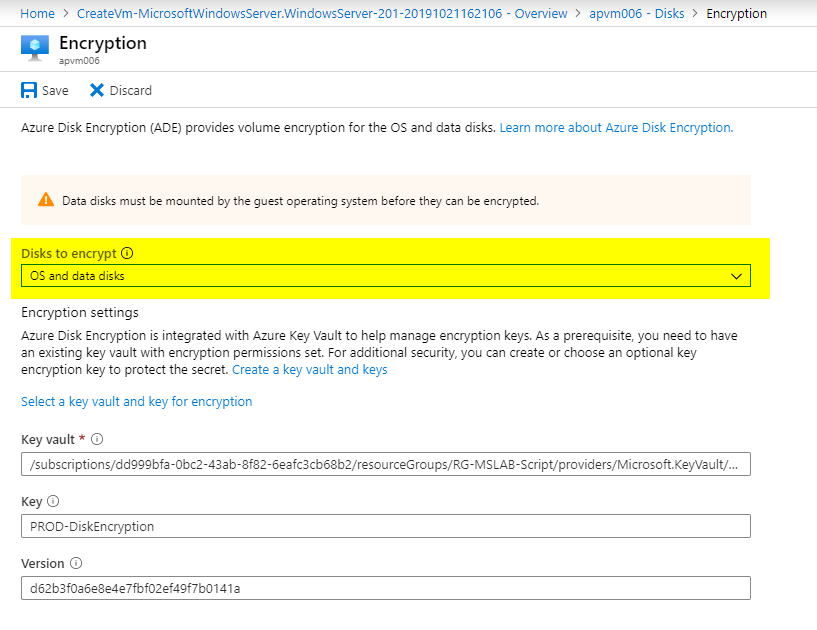
Nowadays, the Azure Portal offers an easy way to encrypt your VM with integration with Azure Key Vault. In the VM where we want to encrypt the disk, click on Disks (Item 1), and a list of all existing disks associated with the given VM will be listed.
In Item 3, we can see the current status of the encryption for any given disk. To start the encryption process, click on Encryption (Item 2).
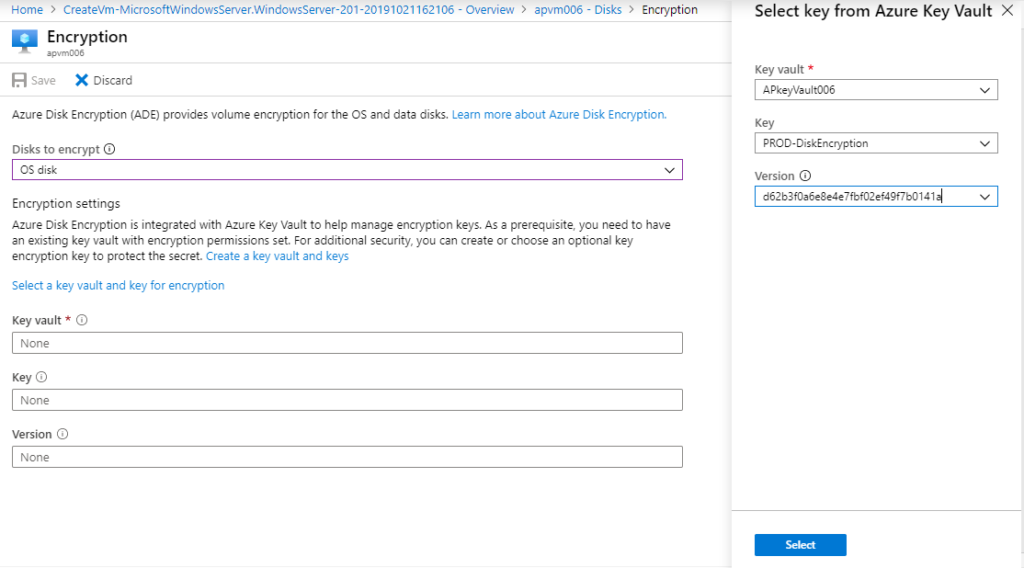
In the new blade, we have three options: None (no encryption), OS disk (just the operating system) or OS and data disks (all disks in the VM).
For now, let’s select just the OS Disk, and we can fill out the information required (Key Vault, key, and version). However, we can take advantage of the Select a key vault and key for encryption link. This link will provide a drop-down menu of all Key Vault, Keys and version available in your current environment, select the key that we have just created and click on select and save.
As soon as you click on Save, a dialogue box asking for confirmation will be displayed. Click on Yes. This process will cause the VM to restart. Make sure that you are doing that during the planned maintenance window.
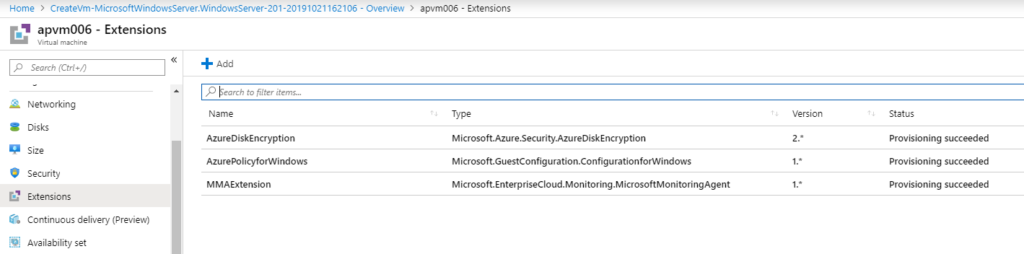
As part of this restart, the AzureDiskEncryption will be added to the VM, as depicted in the image below.
Managing disks and encryption scenarios
Life is good, and the operating system disk is being encrypted. However, one thing is sure: changes will occur! Let’s run a couple of possible scenarios when managing disk encryption to see how to act when these requirements arise on your ticket system.
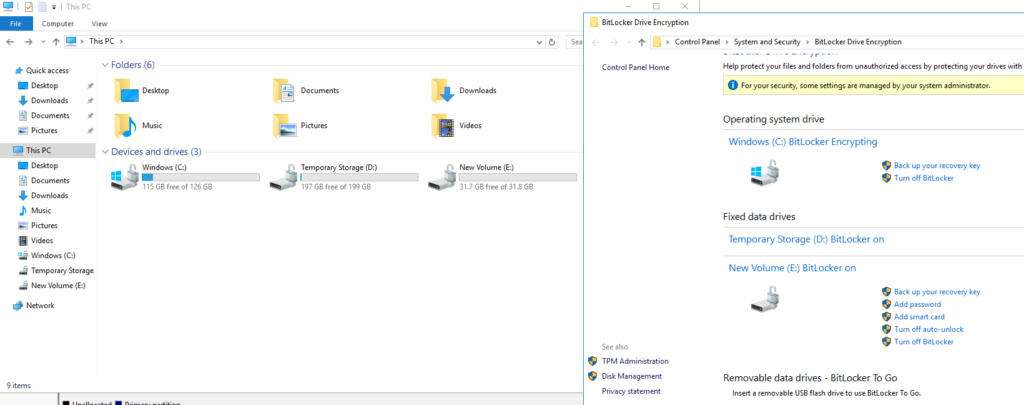
Let’s start with a requirement to add a new data disk on the same VM that we have been working on this article. The most important thing before thinking about encryption is to understand that the disk must be present and mounted in the operating system for the encryption to work.
If you add the disk using Azure Portal, the disk will show up on the VM as uninitialized, and it won’t be encrypted. Make sure that you initialize, format, and assign a letter on the disk (or perform similar steps if it is part of a storage spaces pool).
After having the new disk presented to the operating system, go back to the Encryption button, and change the data to OS and data disks and hit Save. At this time, a reboot will not be required, and after completion, the new disks will be encrypted.
We can see the encryption in action in the image depicted below. We have just added a new volume (Letter E:\), and after performing the procedure above, the new disk was encrypted as part of the process.
When you add new disks to the VM, we need to repeat the process to encrypt the new disks.
Using PowerShell with disk encryption
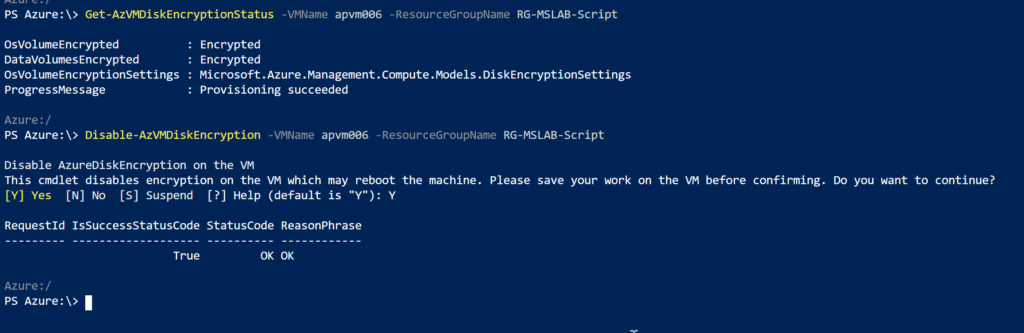
The first PowerShell cmdlet that we must be aware of is Get-AzVMDiskEncryptionStatus, which allows us to check the current status of the encryption at the VM level.

We can also enable encryption using PowerShell. However, it requires several parameters such as Key Vault (ID and URL) and the actual Key (Key URL). Having all that information the cmdlet (Set-AzVMDiskEncryptionExtension) would be similar to the one listed below
Set-AzVmDiskEncryptionExtension -ResourceGroupName <ResourceGroupName> -VMName <VMName> -DiskEncryptionKeyVaultId <Key Vault Resource ID> -DiskEncryptionKeyVaultUrl <Key Vault URL> -KeyEncryptionKeyVaultId <Key Vault Resource ID> -KeyEncryptionKeyUrl "<Key URL>" -VolumeType "All"
I have to admit that gathering that information is not a walk in the park because you need to retrieve that information using two cmdlets and put the pieces together to create the cmdlet above. I wrote a small function (no validation at this stage) and you need to provide the Key Vault name, the Key name, and the VM name.
The function will gather all required information in variables and start the encryption of all disks on the provided VM. Here is the code for the function, and to use it in a PowerShell session, type EncryptVM KeyVaultName KeyName VMName.
Function EncryptVM($KeyVault,$KeyName,$VM){
$kv = Get-azKeyVault -VaultName $KeyVault
$key = get-Azkeyvaultkey -Name $KeyName -VaultName $KeyVault
Set-AzVmDiskEncryptionExtension -ResourceGroupName $kv.ResourceGroupName `
-DiskEncryptionKeyVaultId  $kv.ResourceID `
-DiskEncryptionKeyVaultUrl $kv.VaultURI `
-VMName $VM -KeyEncryptionKeyVaultId $kv.ResourceID `
-KeyEncryptionKeyUrl $key.id -SkipVmBackup -VolumeType "All"
}
Using PowerShell, we can disable the disk encryption using the Disable-AzVMDiskEncryption cmdlet by providing the VM name and that will force the VM to restart. After the restart, all disks will be unencrypted.
Note: The documentation states that OS volumes are not supported to be unencrypted after enabling encryption. For more information, please click here.
Featured image: Freerange Stock


Good Article.
Hi Anderson,
I have created a vm and enabled encryption (OS disks and Data disks), when I attach a new disk the encryption type is SSE with PMK whereas for the OS disk it says SSE with PMK and ADE
The advisor also flags the VM as not encrypted.
Any clue what I am missing?
ThomasC, if your OS disk is encrypted BitLocker might be another convenient way to encrypt secondary drives.
You will have to go on a disk section, additional setting to encrypt the newly attached data disk which is yet to encrypt as you wish (like you have already done the encryption on OS and data disk that says PMK & ADE), just select the key vault and save (don’t select keys unless you wish to use CMK).
Once you select save, it will pick key vault and encrypts your new data disk as you have others. By design, new disk is encrypted by Azure as default setting PMK (Platform managed key) which is you can assume needs to be encrypted.
I think Advisor takes some time to update. You do not state how long you waited. MS seem to keep this a close guarded secret in terms of how long is the wait. Their Docs have never been the best