In a previous article, we showed you how to configure your POP3 settings in Exchange 2019 for organizations that still use that old but reliable email technology. IMAP4 is also used quite extensively by clients, and many prefer IMAP4 over POP3. Customers who have their email with a hosting provider can use Outlook Anywhere, but because of a cost perspective, they go with IMAP. As mentioned in the POP3 article, we will be using the Exchange Management Shell to configure IMAP settings for Exchange 2019 and won’t be using the Exchange admin center.
Here’s what we will be covering:
- IMAP internal settings
- IMAP external settings
- Login type
- X509 certificate
- Certificate
- Service settings
Let’s start with services and service settings:
IMAP4 services and service settings
When you install Exchange Server 2019, you will notice that the IMAP4 has two services, just like Exchange 2016. These services are as follows:
- MS Exchange IMAP4
- MS Exchange IMAP4 BE
Like with POP3, you have two services for IMAP4, and we will explain what they are used for. The first service (IMAP4) is your frontend service that IMAP4 clients will connect to. The second service (IMAP4 BE) is where connections are proxied to the backend service on a mailbox server where the active copy of the mailbox is.
IMAP4 still makes use of port 143 and port 993. Now that you understand what each service does, you will also notice that the services are set to manual, and on the backend, it is not configured. The first step is to configure the services so they are set to automatic when the server starts up. To change this, you can launch Services.msc and manually update them, or you can use PowerShell, which is a lot quicker and easier to configure them with. Open PowerShell (elevated) and run the commands below to set the StartupType to automatic:
Set-Service MSExchangeIMAP4 -StartupType Automatic
Set-Service MSExchangeIMAP4BE -StartupType Automatic
In the image below, you can see the commands that were run using the Exchange Management Shell. If you want to confirm everything, you can open services.msc and check:

As you can see above, no errors are thrown, and it also looks like nothing has been done. But the services have been set, so the next time you reboot, they will start automatically. Let’s first take a look at the default settings for IMAP4. To get this, you run the following command:
Get-IMAPSettings -Server EX2019A | fl
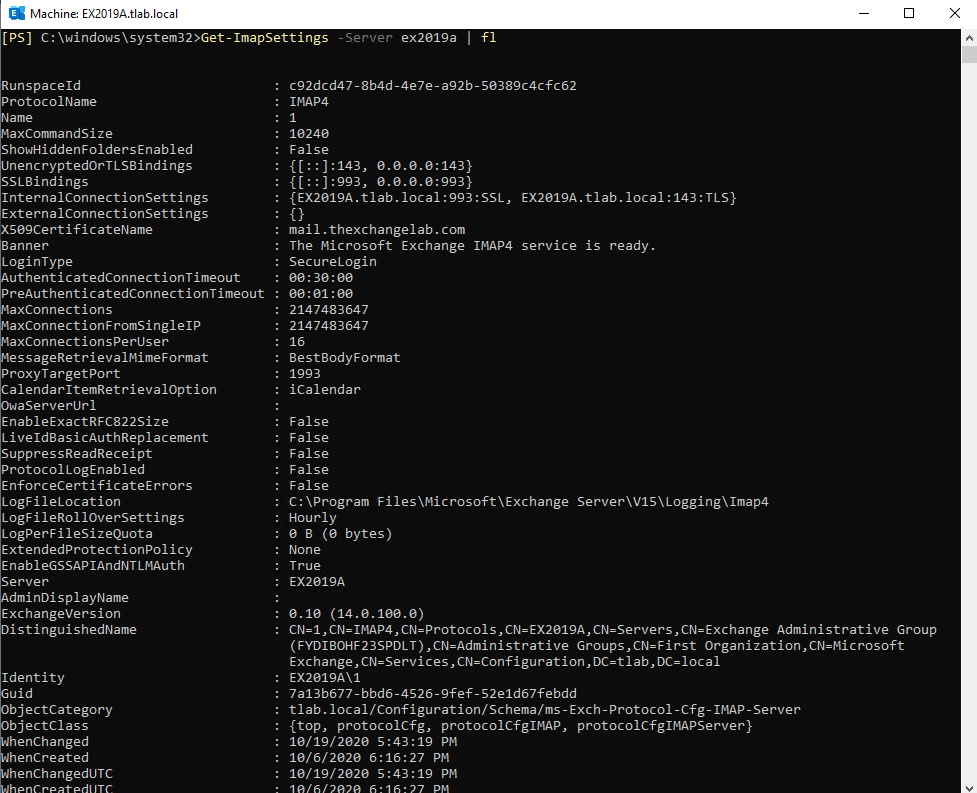
Exchange 2019 IMAP configuration: Internal and external settings
If you take a look at the output, it is basically the same as POP3, the internal connection settings have the local server name, and the external connection settings is blank.
In your Exchange 2019, you need to configure these IMAP settings, and you will notice the commands look similar, which they are, but the ports are different. Open up the Exchange Management Shell (elevated), and we will be running the following commands below:
Set-IMAPSettings -server EX2019A -ExternalConnectionSettings "mail.thexchangelab.com:993:SSL","mail.thexchangelab.com:143:TLS" -X509CertificateName mail.thexchangelab.com
Set-IMAPSettings -server EX2019A -InternalConnectionSettings "mail.thexchangelab.com:993:SSL","mail.thexchangelab.com:143:TLS" -X509CertificateName mail.thexchangelab.com
As you can see above, we now set the IMAP settings for server EX2019A, and both SSL and TLS are configured. The next thing we need to configure is the LoginType. This can be achieved by running a command in the Exchange Management Shell (elevated). You will notice the default is set to SecureLogin, and you can leave it like that, or if you want to change it to Plain Text, you have the option of setting that as well. Here is the command:
Set-IMAPSettings -Server EX2019A -LoginType PlainTextLogin
Once you have run the command above, you can go back and check the settings to make sure it all has been set.
Certificates
If you make use of a wildcard certificate, you will notice when you enable the SSL certificate, which we will cover in the next section, that you will get an error, and it will tell you to run the command below:
Set-IMAPSettings -server EX2019A -X509CertificateName mail.thexchangelab.com
If you noticed in the image above, the X509 name was already set. I am not using a wildcard in this example, so you shouldn’t receive an error when enabling the services. Let’s move to the last part of certificates, and this is to enable our Exchange certificate for whatever services we want it to run. You have the option of setting the following services:
- IIS
- SMTP
- IMAP
- POP
Below is a sample command that enables all the services on the SSL certificate we have imported on our Exchange 2019 Server:
Enable-ExchangeCertificate -server EX2019A -Thumbprint <> -services IIS,SMTP,IMAP,POP
I left Thumbprint with brackets <> because each certificate in each environment will be different. If you are not sure how to get a certificate thumbprint on a server, you can run a simple command to get it. Here is the command:
Get-ExchangeCertificate -Server EX2019A
It will return all the certificates on that Exchange 2019 Server, and then you can copy the thumbprint and replace <> with the long numbers/letter combination. Once all of this has been completed, you can now reboot your Exchange 2019 server, and then you can test if IMAP4 will connect when you set up a profile in Outlook. Remember, you need to make sure on the authentication tab when setting up the profile that you enable “my server requires authentication” for it to work depending on how you configured the server.
You may have noticed that some of the above has been repeated, it’s because the process is basically the same, except that you have different ports and different protocols.
Featured image: Shutterstock


Hello,
those two lines are exacly the same, confusing and not helpfull
Set-IMAPSettings -server EX2019A -ExternalConnectionSettings “mail.thexchangelab.com:993:SSL”,”mail.thexchangelab.com:143:TLS” -X509CertificateName mail.thexchangelab.com
Set-IMAPSettings -server EX2019A -InternalConnectionSettings “mail.thexchangelab.com:993:SSL”,”mail.thexchangelab.com:143:TLS” -X509CertificateName mail.thexchangelab.com