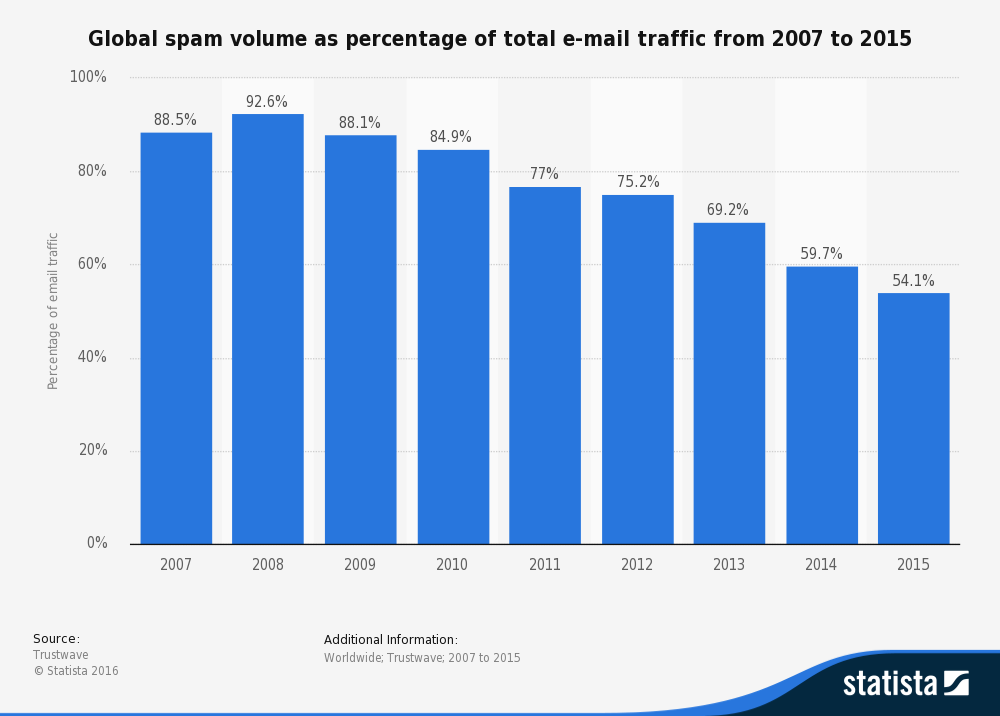
Junk mail. Spam. Whatever you call it, it’s the bane of every email user’s existence. According to SecureList, a project of antivirus software vendor Kaspersky Labs, spam makes up more than half of all email traffic. At least it’s getting better: It’s actually been going down steadily since 2008, when Trustwave pegged it at a whopping 92.6 percent.
The reason we are seeing less junk mail in our inboxes is thanks to server-side spam filtering. These intelligent algorithms work off aggregated analyses of email addresses, sending and relaying IP addresses, and keyword scanning of headers, subjects, and message bodies.
But they’re not perfect.
Not a day goes by that one of my users doesn’t complain that they never got an email they were expecting. “Check your spam folder” is the first instruction given, of course, but what about important emails that weren’t expected? Better to let 100 unwanted messages go freely into an inbox than to miss a single hot lead, after all.
An alternative to the spam folder in Office 365 and Exchange Online is the quarantine, along with end-user spam notification. They do exactly what they sound like: isolate suspected junk mail and inform the user — in a configurable digest format, so they don’t get as many “You’ve Got Spam!” messages as they would’ve gotten spam in the first place.
Here’s how to configure your mail server to deliver periodic end-user spam notifications.
1. Create a new spam filter
You can edit the default spam filter, but I recommend creating a new one for testing purposes that applies to only you or a select group of beta users.
In your Exchange Admin Center, under Protection, click Spam Filter. Click the plus sign (+) to create a new filter. Name it whatever you like. Set both “Spam” and “High confidence spam” to “Quarantine message.” You’ll ultimately get a red message that advises you to configure end-user spam notifications.
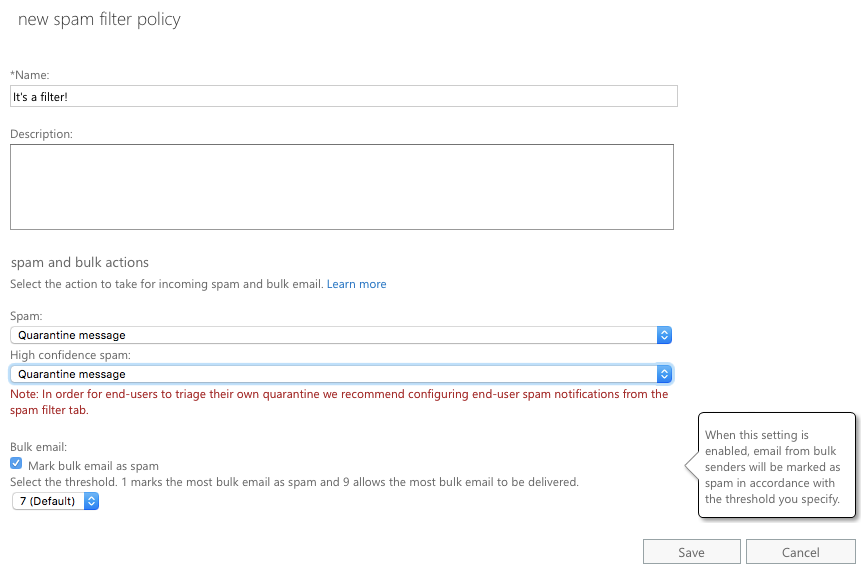
You’ll need to first fill out the rest of the form to your liking, and the “Applied To” section near the bottom is mandatory. You can apply this new spam filter to specific recipients by name, domain, or group membership. You can also add exceptions and additional criteria to your heart’s content before you click Save.
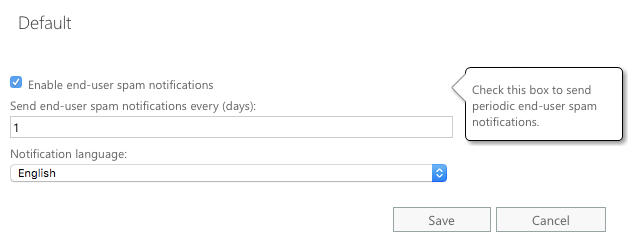
2. Configure end-user spam notification
Turning on notifications is really easy, so Microsoft put the control in a really stupid place to make sure you don’t get bored. You might notice, once you save your new filter, that the pane on the right mentions “End-user spam notifications: Disabled” for that filter. Can you double-click on your new filter and enable them? Of course not.

What you need to do is highlight the Default filter and click “Configure end-user spam notifications…” on the right.

In here, just tick the only box available and fill in a number for however many days you want between notifications. Choose your language and hit Save. Yes, this applies to your custom filters. No, I don’t know why the control is in the Default filter. Yes, your custom filters will still say “End-user spam notifications: Disabled.” Why? Just because.
3. Read the notification emails

After a day has gone by, your test users will receive their first notification email from [email protected]. It’s helpfully subjected “Spam Notification” with the number of messages quarantined.
Each message contains the following elements of each message:
- Sender’s alleged email address
- Email subject line
- Date and time in UTC (Coordinated Universal Time)
- Size in bytes
- “Release to Inbox” link
- “Report as Not Junk” link
The email address is “alleged” because most spammers aren’t using genuine email accounts. It’s trivially easy to forge the Sender field, so it should never be taken as gospel.
The subject line, if my current notifications are at all representative, will likely be something about Gwen Stefani and/or Blake Shelton.
The date and time are shown in UTC, the standard for electronic communications. It’s generally equivalent to Greenwich Mean Time (GMT), so unless your users are in western Africa, Portugal, the British Isles, or Iceland, they’ll need to do some conversion.
The size is just a clue to the message’s legitimacy. A phishing email can be a single sentence with a spoofed email address of a trusted contact, under 10KB, or it could be that person just saying hi. A message over 100KB could be a perfectly safe HTML message with lots of formatting, or it could be an advertisement.
 If you suspect a quarantined message is actually wanted, click the “Release to Inbox” link. That will open a webpage that says, “Spam message was released from quarantine.” It’ll show up in your inbox soon, but will not influence future spam detections. (Occasionally this webpage throws a certificate error or is not found or something. In my experience, the message is usually released anyway.)
The “Report as Not Junk” link tells Microsoft that, well, this message is not junk. It will become one tiny data point in their massive spam-detecting engine but will not automatically be delivered. “Report as Not Junk” and “Release to Inbox” are completely separate.
4. Inform your users
After you set up your notification frequency, spam-detection level, or other criteria, make sure to communicate with your users about these spam-notification emails. You might still need to add senders to allow and block lists on an administrative level, but users will get a summary of quarantined messages right in their inbox. They can even move the actual messages to their inbox.
This solution isn’t right for everyone — that’s why I suggest creating a new spam filter for testing. Since it can be customized by group or individual email address, you can expand and edit it for just the users who want it.
Photo credit: Sean MacEntee


Can the user check quarantined items before the report is sent out if they suspect an email has been wrongly classified.
Colin, I don’t believe so, but an administrator can check for them. That’s admittedly one downside to this approach – the user can’t just click into their own spam folder to see if it’s there. Then again, in my experience most users forget the spam folder’s even there until they’re reminded of it.
Users can login to https://admin.protection.outlook.com/quarantine with their O365 credentials to see their quarantine.
so cool.
Do we have the ability to modify the end-user spam notifications email template?
Users can access their own quarantine items if they visit this url:
https://admin.protection.outlook.com/quarantine
You’re welcome. 😉
What happens when you enable end-user spam notifications and leave the Language as default?
Will it take the Language set on the mailbox owners mailbox?
i.e “en-CA”
The above information about enabling end-user notifications may need updating.
When creating a custom Spam filter, the link to enable end-user notifications is only visible on the right-hand side when you choose to apply it to a “recipient domain” Selecting users or a group will not show the link.
My tenant version:
AdminDisplayVersion IsUpgradingOrganization
——————- ———————–
0.20 (15.20.841.15) False
Is there a way to notify users of what is in Quarantine however not allow them to mark it as a good email? Curious if they can just see what is there and then have the admins release the email if it is good.
I also wondered about this. its great that it lets a user know that a valid email may be in quarantine but I don’t like that by default the user has the power to release an email and/or allow a sender. what if the email was malicious? and they release it to their inbox? its a lot of control to the user.