Public folders in Exchange have been around for a very long time. Over a number of years, the way Microsoft has handled them has changed. In legacy versions, Exchange 2010 as an example, you would create a public folder database that would be stored on one server with no high availability and your public folders would live there. Essentially, it was just another database you had to manage on Exchange and if you had a standard license you were limited to five databases. The pubic folder database was never part of the database availability group (DAG), so when you did failovers, if the server was part of a DAG, then it would be down for the duration of that maintenance window.
Many customers would actually forget they had the public folder database and then it got deleted or corrupted and they ended up with issues when it came time to migrate. Before we dive into the technical side of things, let’s take a look at what public folders were used for.
What are public folders?
Public folders were designed for an easy way to share content in an organization with multiple users and groups. Mostly all users today have access to Outlook, and this essentially would add public folders to their Outlook where they could view a set of folders they were given access to. For example, all finance people could access a certain set of folders whereas the rest of the organization would not even see those folders within Outlook, so they could not access them.
Public folders also had the ability to be mail-enabled. What is that? Well, you could allow a folder to receive mail. They are also assigned an email address (also known as SMTP address). Just like the functionality of a mailbox, you would also allow users to send an email on behalf of that mail-enabled public folder. Now let’s jump into the technical side of things now. How do you create a public folder database in Exchange 2010?
Exchange 2010
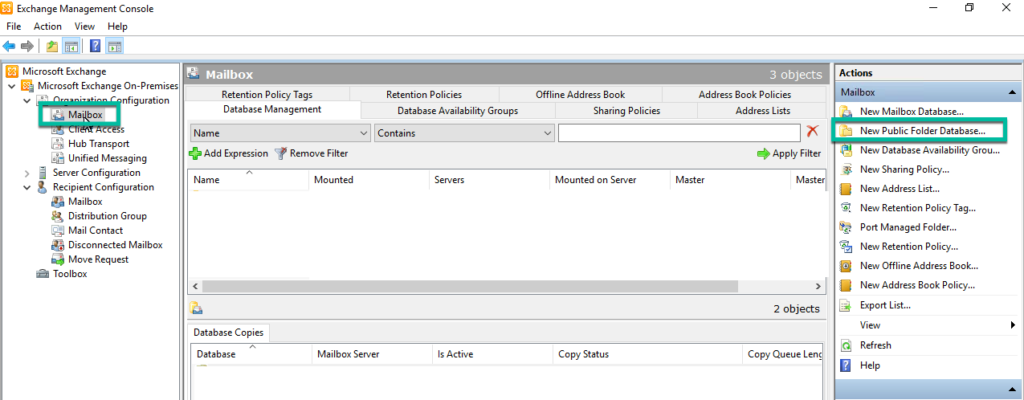
It is straightforward, actually. You log in to the Exchange Management Console (EMC) and expand Organization Configuration and then click on “Mailbox.” On the right-hand side under the actions pane, you can click on “New Public Folder Database…” to launch the wizard.
You then need to enter the following information:
- Name of the public folder database
- Select a Server where the database will be stored.
Once that is complete, you can click “Next” and after you have reviewed the configuration summary you can then click on “New.” When it has finished then you can click “Finish.”
Now that you have created your database, you need to move on to create your public folders. This can be done from the Exchange Management Console or the Exchange Management Shell.
Exchange 2013 and higher
When Microsoft released Exchange 2013, one of the major changes was that public folders were now not a database anymore but just a mailbox in Exchange. This was brilliant news! Why? Because the mailbox was now part of the database in Exchange that is part of a DAG and offers you high availability, so when you are performing maintenance and failover on your database availability group, the public folders will stay online. So how does the creation process work in Exchange 2013 or later versions? In this example, we are looking at an Exchange 2019 Server.
If you launch the Exchange Admin Center (EAC) and scroll down the left-hand pane, you can click on “public folders.”
You are then presented with two tabs. One called public folders and public folder mailboxes. In order to use public folders, you need to create the mailbox first.
Click the Plus (+) icon and enter in the following information:
- Name
- Organizational unit
- Mailbox database (where the mailbox will be stored)
Once done, click the “save” button.
Now that you have a mailbox, you can now proceed to create your public folders. You can create them using the Exchange Admin Center or the Exchange Management Shell (EMS).
Take note that the folder is not mail-enabled by default. You need to enable it.
Exporting public folders
You would think that exporting public folders is like exporting a mailbox? Unfortunately, not. To export a public folder to a PST file, you will need to use Microsoft Outlook and you need to ensure you have the correct permissions to do so.
Launch your Outlook application and click on the “File” button on the top left-hand corner and then click on “File -> Open -> Import.”

A new window will appear and in this window, Select “Export to a file” and click “Next.”

On the next screen, select “Outlook Data file (.PST)” and then click “Next.”

On the next window, select the public folder you want to export and click “Next.” Now choose a location where you want to save the PST file and then click “Finish.” You will be prompted for a password. You can leave it blank and then click OK to let the export start. You will notice that the New-MailboxExportRequest does not support public folders, hence why you have to use Outlook to export it. (The export above is from an Exchange 2010 Server.)
Newer versions of Exchange
In Exchange 2013, you are able to move public folders from one public folder mailbox to another using the PublicfolderMoveRequest set of cmdlets. You are also able to move public folders to different mailbox databases in Exchange. As you can see, it is much easier to manage public folders with Exchange 2013 and higher and you have more resiliency than with earlier versions of Exchange.
One final note: In Exchange 2013 and higher, you can restore your public folders in the following situations. According to Microsoft:
- Soft-deleted public folder restore: The public folder was deleted but is still within the retention period.
- Soft-deleted public folder mailbox restore: The public folder mailbox was deleted and is still within the mailbox retention period.
- Public folder mailbox restore from a recovery database: You can recover an individual public folder mailbox from backup when the deleted mailbox retention period has elapsed. You then extract data from the restored mailbox and copy it to a target folder or merge it with another mailbox.
Third-party tools
Unfortunately, the above methods only support Outlook exports or migrations within Exchange on-premises to on-premises or to Exchange online. There are some third-party tools that can assist you with the exports, but you need to be willing to pay a few dollars for the product. Luckily, some of them give you the option of a trial where you can test the product before buying it.
Featured image: Shutterstock


