I have been using the Hyper-V replica feature within my own organization for quite some time as a tool for mirroring my data and as a business continuity solution in the event that my primary Hyper-V host were to fail. A couple of months ago, I performed a major, long-overdue hardware upgrade on my aging Hyper-V and storage infrastructure. A big part of that upgrade process involved capacity planning. I had to make sure that the new hardware would be able to handle the anticipated demand, but I did not want to needlessly spend money on capacity that would never be used.
As I was working through this process, I discovered a free tool called the Capacity Planner for Hyper-V Replica. This tool, which is provided by Microsoft, provides guidance on the design of the infrastructure required to replicate Hyper-V virtual machines.
Important things to know about Hyper-V replica
Before you download and attempt to use the Capacity Planner for Hyper-V Replica, there are a few important things that you need to know. First and foremost, the tool is a bit dated. It is designed specifically for use on Windows Server 2012 and Windows Server 2012 R2. It will not run on any other version of Windows. Additionally, the tool analyzes the Hyper-V hosts that will be configured to act as replica servers. Those Hyper-V hosts must also be running either Windows Server 2012 or Windows Server 2012 R2.
Another thing that you need to know is that the server on which you run the Capacity Planner for Hyper-V Replica needs to be able to resolve the DNS hostnames of the Hyper-V hosts that it is analyzing. Although not required, I set up a dedicated VM specifically for the purpose of running the capacity planning tool, and then joined that VM to the same domain as the Hyper-V hosts. Once I was done using the tool, I simply removed the capacity planner server from the domain.
Using the Capacity Planner for Hyper-V Replica
The Capacity Planner for Hyper-V Replica consists of a single executable file, and a Microsoft Word document containing the tool’s instructions. Upon running the tool, you will initially be prompted to accept the Microsoft license agreement. Once you get that out of the way, you can move forward with the capacity planning process.
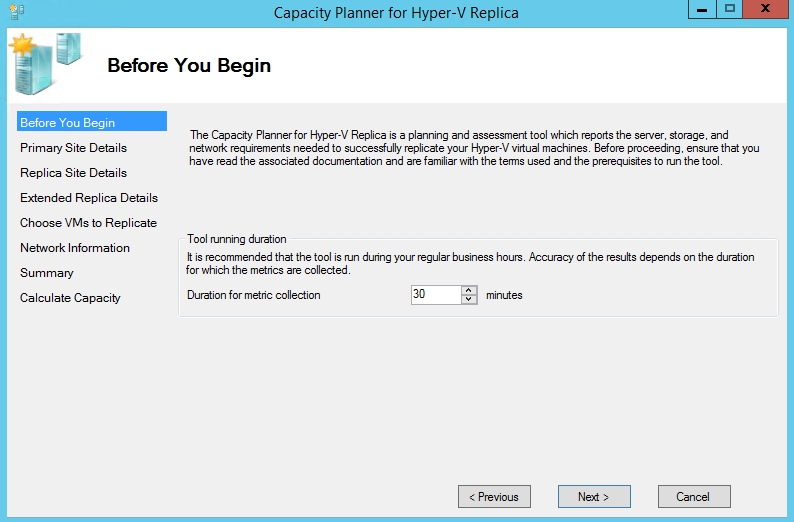
The first step in preparing the tool is to specify a time period for metric collection. The basic idea behind this requirement is that if the tool is to help with capacity planning, then it needs to know what system resources are currently being used. As such, the tool monitors usage for a period of time. As you can see in the figure below, Microsoft recommends that you collect metric data for at least 30 minutes and that the collection be performed during business hours when the resources are under a normal load.

The next step in the process, which you see below is to specify the name of either a standalone Hyper-V host or the name of a host cluster.

Next, specify the name of the Hyper-V replica host or replica host cluster, as shown below. Technically, this is not a required step. You can opt to skip this test. If you opt to perform this test, then the Hyper-V Replica Broker role must exist on the specified server or cluster.

The next screen, which you can see below, gives you the option of testing an extended replica site. Once again, this test is optional. You can skip the test if you decide not to use extended replication or if your extended replica site has not yet been provisioned.

At this point, the capacity planning tool will retrieve a list of virtual machines from the specified Hyper-V host or host cluster. You will need to select the VMs and the virtual hard disks that you eventually plan to replicate.
In some cases, the capacity planning tool may not display all of the VMs that reside on the specified host or host cluster. This can happen if the VMs are turned off, if they are already being replicated, or if the VMs use virtual hard disks that reside on an external SMB share.
Once you have selected the VMs that you want to test, you will be taken to the Network Information screen, which you can see below. As a part of the testing process, the tool creates a temporary VM and attempts to replicate it from the primary site to the secondary site. In most cases, the only thing that you will have to do on the Network Information screen is to estimate your available WAN bandwidth.

Click Next, and you will be taken to a summary screen that outlines your selections. Take a moment to review this information. If everything appears to be correct, then click Next and the tool will begin the analytical process. When this process eventually completes, click the View Report button to view the results.
A few final caveats
The report that is generated by the Capacity Planner for Hyper-V Replica provides information on the expected impact that the replication process will have on the available CPU, network, memory, and storage resources. Keep in mind that these projections are only an estimate and that the estimate was derived from the way that the resources were being used during the monitoring process. As such, running the capacity planning tool during off-peak hours or for an inadequate amount of time is likely to yield inaccurate projections. It is also worth noting that the projections only look at the current demand. They do not examine future demand for resources. If you are contemplating a hardware purchase, then it is important to select hardware that will be able to meet the demand that is anticipated to occur between now and your next hardware refresh.
Featured image: Shutterstock


