Conducting the same routine operations on a regular basis can be a hassle for any person. It is not just tiresome but also frustrating, especially when you have to set up a new virtual machine. You have to go through the same set of motions every time, beginning with the installation of the operating system, enabling important features, applying updates, and getting the right combination of software.
If you want an easier, more streamlined solution to your dilemma, it’s possible. The best part is that you have to do everything just once.
This procedure involves preparing a VM as a base reference, which you can then use later to accommodate new services and applications. Such a reference virtual machine is termed a “VM template,” and it is extremely useful in the long run. Read on to find out how you can easily create a VM template for your Microsoft Hyper-V system.
Use an existing virtual machine
You want a VM template? Just clone the existing virtual machine (and this has nothing to do with that average prequel Star Wars movie made around the turn of the century that had something to do with clones). This is the fastest and easiest method. All you need to do is power on your VM and then copy the whole hard drive. Once you’re done, you just need to store it somewhere. Simple and effective!
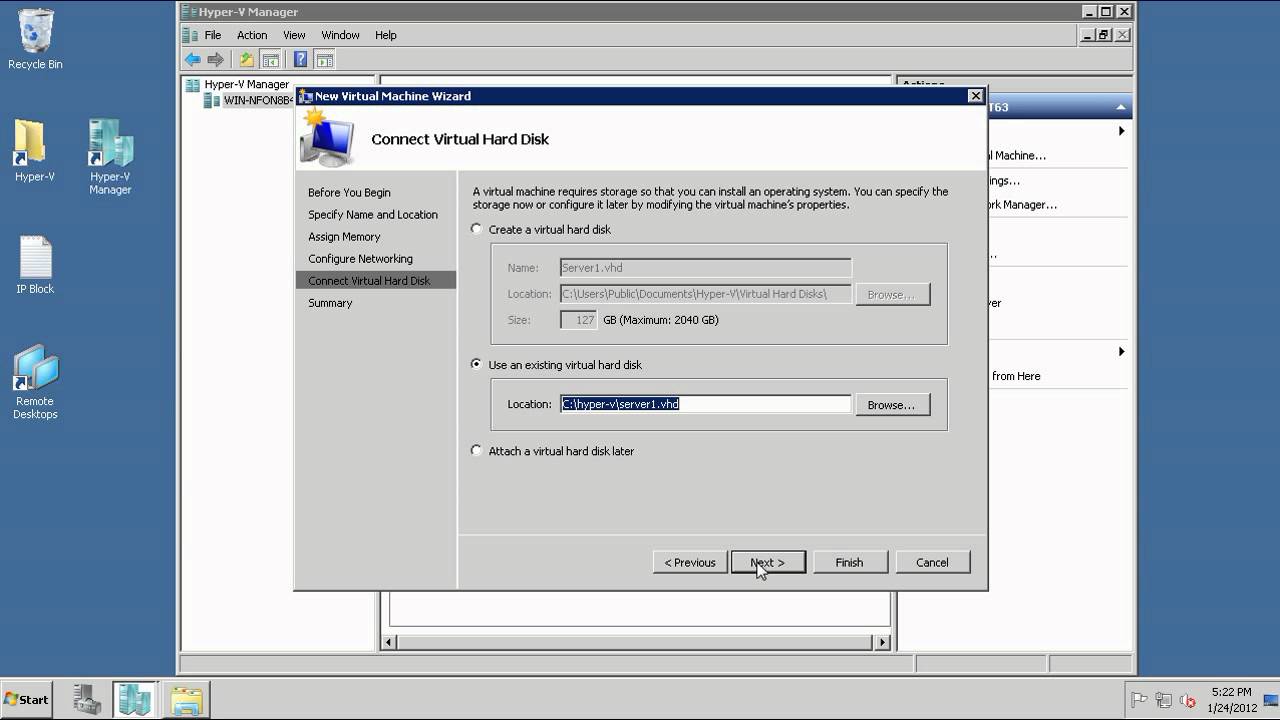
You can now use this manual copy of the virtual hard disk (VHD) to form a new Hyper-V virtual machine at any given time. The next step involves attaching your previously saved VHD to it.
However, you should consider other options before you press the key for this method. Why? What is wrong with this process? Well, for starters, this method of creating a Hyper-V VM template introduces the chances of conflict between the clone VM and the original.
It could be because of network configurations, but problems might also crop up due to the duplicated fully qualified domain name (FQDN) and the NetBIOS names. It is possible to find a feasible solution to the problem, but a few issues may still exist and prevent the applications from working at their optimal level.
Thankfully, you won’t face any problems from a cloned security identifier (SID). But, on the flipside, this is not an ideal delivery mechanism from the perspective of Windows licensing. You might be tempted to purchase a single license and then copy it repeatedly, and this might lead to audit problems in the future, although this auditing luckily has nothing to do with the IRS.
Use SYSPREP to reference image

System preparation tool (SYSPREP) is a notable utility developed by Microsoft. The company had one goal in mind during the programming of this tool – that it would be used for the cloning of Windows OS. So what does it do, and how can you use it to create a Hyper-V VM template?
SYSPREP comes in handy when you’ve got to strip the computer of its SID. The necessary information all gets cleaned up from the system registry, eradicating any traces of system-specific data and Windows activation. The end result is that the OS is perfectly prepped for the purpose of duplication. Hopefully Skynet is not getting any ideas about duplication here and has any plans to start making T-800s!
Keep a couple of things in mind when you’re using SYSPREP.
- If your original virtual machine is joined to a specific domain and then cloned, both the clone as well as the original will possess the same domain SID. This might cause issues later on, and so it’s recommended you don’t join a reference virtual machine to the domain.
- SYSPREP can’t be used as many times as you want. You can reset the Windows activation only up to three times. This is why extra caution is necessary when you’re making alterations to the virtual machine template and SYSPREP needs to be run more frequently.
Now that you understand some of the risks involved, you’re ready to create the Hyper-V virtual machine template. Below you’ll find the necessary steps for completing the clone.
- The first action on your agenda should be to create a reference VM. This starts by installing the guest OS, enabling features and roles, and then applying the latest Windows security hot fixes and patches.
- Now you can run SYSPREP. Choose the “generalize” function to clean up all existing Windows network settings, shell settings, Media Player settings, event logs, and licensing information.
- As soon as you’ve prepped and shut down your virtual machine, you should select the Hyper-V Manager and export it.
- If you’re required to deploy a virtual machine from this template, browse to the folder where you exported the VM, and then copy the VHD to the Hyper-V VM folder.
- Now you’re free to form the new virtual machine and attach the copied virtual hard disk to it.
- Start up your VM and then set it up correctly.
- Configure your user preferences, language, and then select a strong administrator’s password. You’re all done!
This method might be time consuming, but at least it’s a whole lot faster than installing every piece of the VM from scratch. Now you have time to watch Transformers 2 for the 10th time or Sicario for the third time! Or work out a little more on your elliptical machine. Whatever you want!
Other choices
The final option you have if you wish to create a Hyper-V virtual machine template is to use the System Center Virtual Machine Manager (SCVMM). Though this component is not common in smaller Hyper-V infrastructures, it can be rather helpful. Once you’re sure that you have rights to Virtual Machine Manager, you should start maintaining a VM template library and choose the desired options for both Linux and Windows VMs.
The reason why this method is last on the list is because it is extremely complicated and necessitates a more enterprise sort of approach. And no, this has nothing to do with Star Trek.
There’s no doubt that deployments are some of the most tedious and repetitive actions out there, and it’s understandable if you would like to be free of them.
This is the reason why VM templates come in handy. They enable you to maintain a thorough and consistent deployment image, and also have an amazing base that enables you to deploy services and applications to your business to your discretion.
Photo credit: 4sysops.com


