Windows 10 includes a huge number of security settings that can be applied to protect your computers from ransomware, viruses, and other malware. Because Microsoft makes the deployment of these settings available through many different sources and because every business environment is different, these settings are not configured by default. There are many ways to configure these settings: your RMM, System Center, Configuration Manager, Group Policy, PowerShell, Local Policy, Intune, and even simply in Settings. Today, we will look specifically at configuring these settings using Intune. Microsoft now provides Intune in many of the Office 365 subscriptions so it has quickly become the most available method for small and medium-sized businesses, although most will not find this to be a self-service venture and will likely want to pursue professional IT assistance.
When you log into your portal, you’ll quickly find out that Intune has moved into Azure. Honestly, it’s about time. This will go a long way toward bringing Intune into a common set of standards. It’s been a moving target for too long.
Here’s what you need to do to configure Intune to enable Windows 10’s malware protection. The settings that follow can be improved upon or changed to meet your needs but should serve as a nice starting point.
Create a compliance policy for Windows Defender
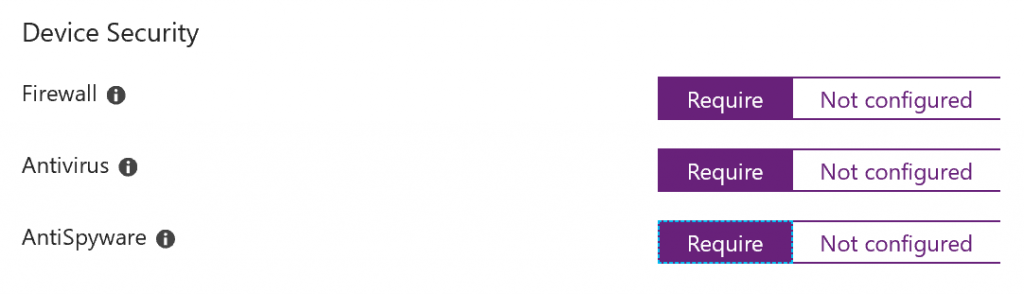
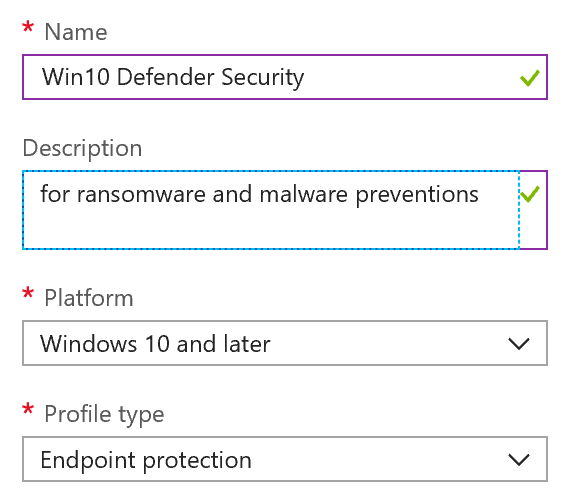
All of the security settings using Windows Defender. So our first step is to make sure that all machines have it enabled. Create a new compliance policy that enables Defender and lets the admin know if any device fails this compliance item.


In this compliance policy, we’ll use the device health settings to let us know if any machines have Defender turned off. Set the firewall, antivirus and antispyware settings to save your compliance policy.
Now we’re ready to create our configuration policies. These policies will set the settings that we want for each of the security features in Defender. Just like in Group Policy the best practice is to keep your policies segregated with obvious names so that later or when troubleshooting you can easily determine which policy you may need to edit.
Create the antivirus policy
Select New configuration policy and for the profile type be sure to select Device restrictions. This is where the security settings are located.

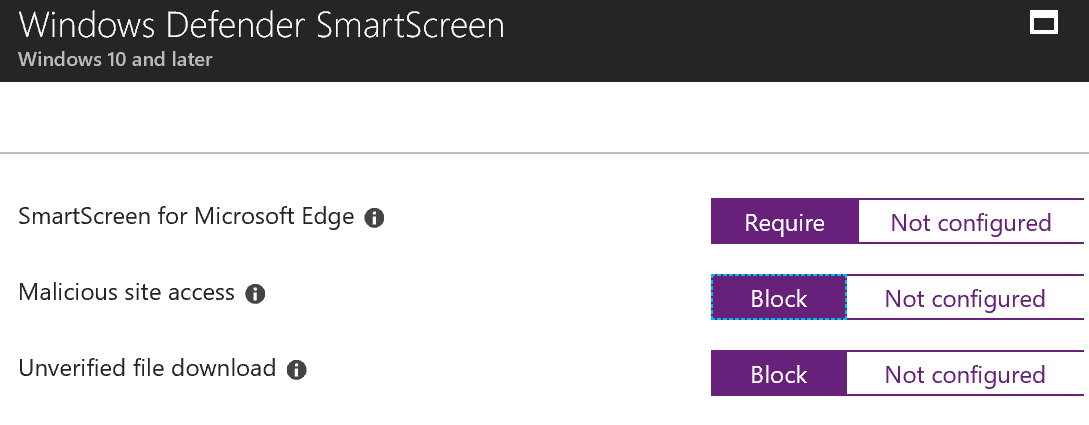
In this policy, we’re going to turn up SmartScreen. You might remember hearing that in Windows 10 SmartScreen is no longer just a browser feature but is now part of the OS and so it can protect all activity not just those within browsers.
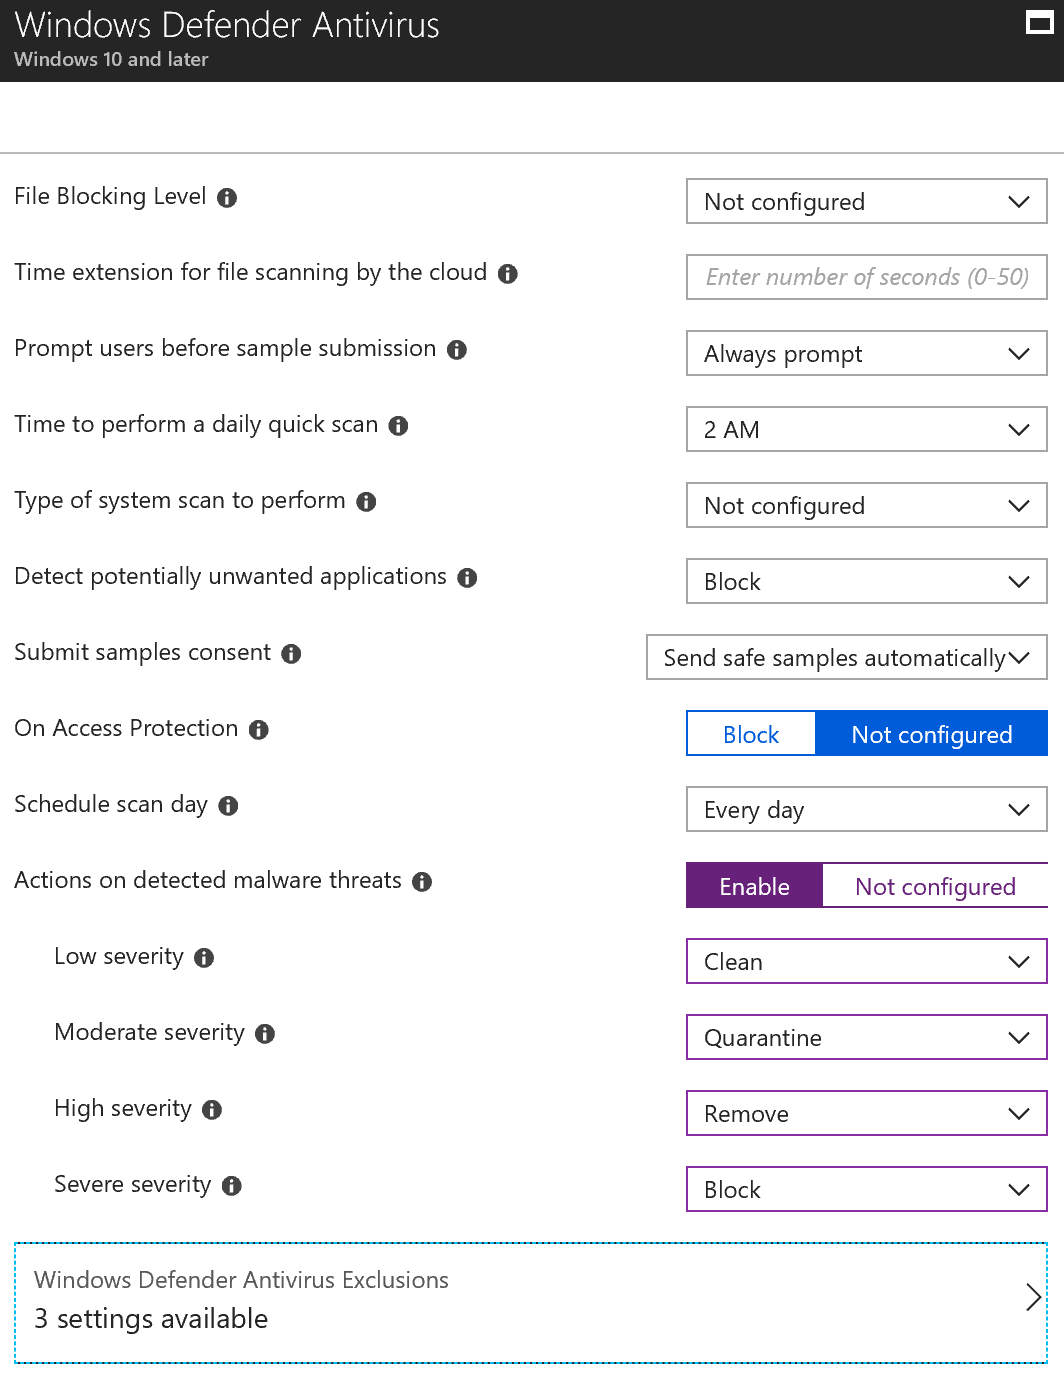
In the antivirus section, there are a bunch of features that you’ll want to enable. See the screenshot below for a view of the ones that I use. At the bottom of the screen don’t forget to set any scanning exclusions that you may need. Generally, it is databases that don’t like to be scanned but you might have others. After you’ve configured the settings, save your policy.

Create OS security policy
Now we will configure endpoint protections. Create a new policy. This policy will include Application Guard, controlled folder access, firewall, attack surface reduction, and more. For this policy, you’ll need to select Endpoint Protection as your profile type.
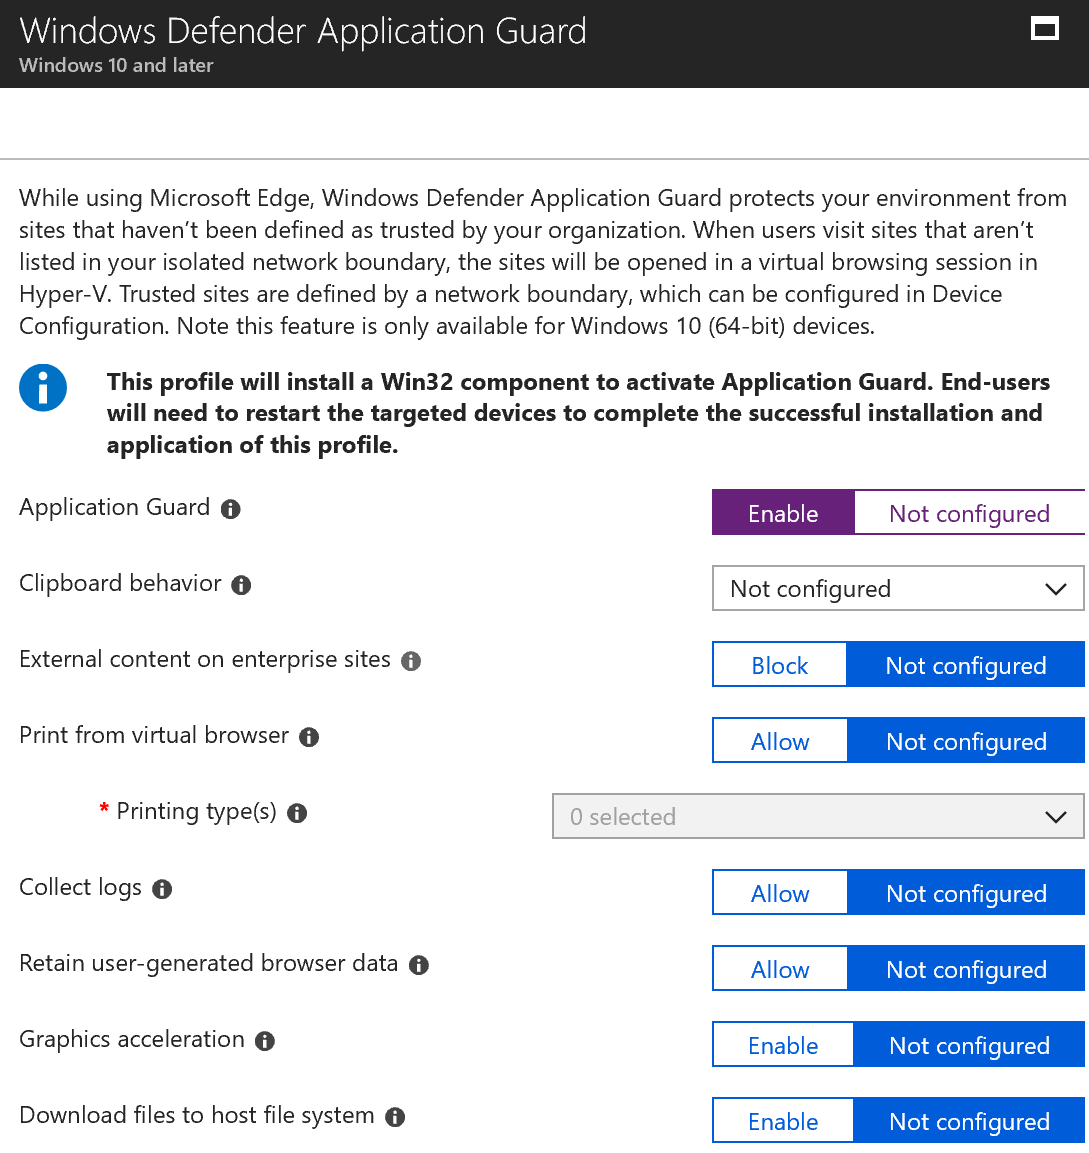
The first setting that we’ll configure is to turn on Application Guard. Application Guard uses Microsoft Graph to intelligently determine what websites are safe and which may not be. Trusted sites will open normally and untrusted site are opened in a protected sandbox environment.
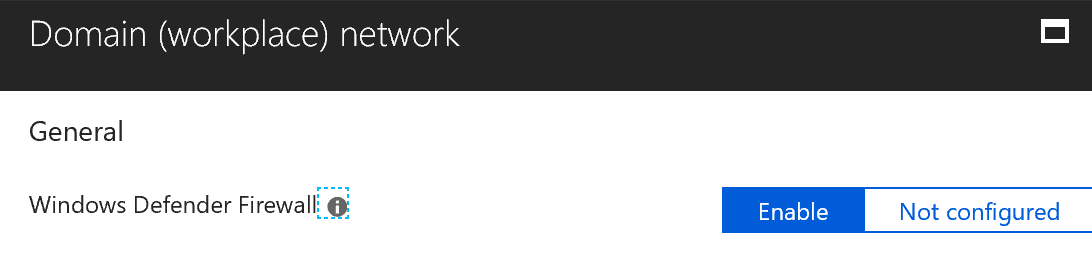
Next, we’ll configure the firewall. Here we want to make sure that our firewall remains on regardless of which network we may be connecting to. In days of old, some administrators would turn off the firewall while the machine was in a trusted location, like the domain. Today we want it on in all locations.

For each profile, domain, public, and private enable the firewall
In the SmartScreen settings, I suggest leaving Unverified File Execution set to not configured. This will allow users to override the file block. I’ve found the block settings to have enough false positives to make it annoying to users. While we want to be secure, we’re always having to walk that line between secure and usable. User education will be required to make sure that your people understand the risk if you choose to follow this suggestion. Choosing Block would be more secure when you’re ready to do so.

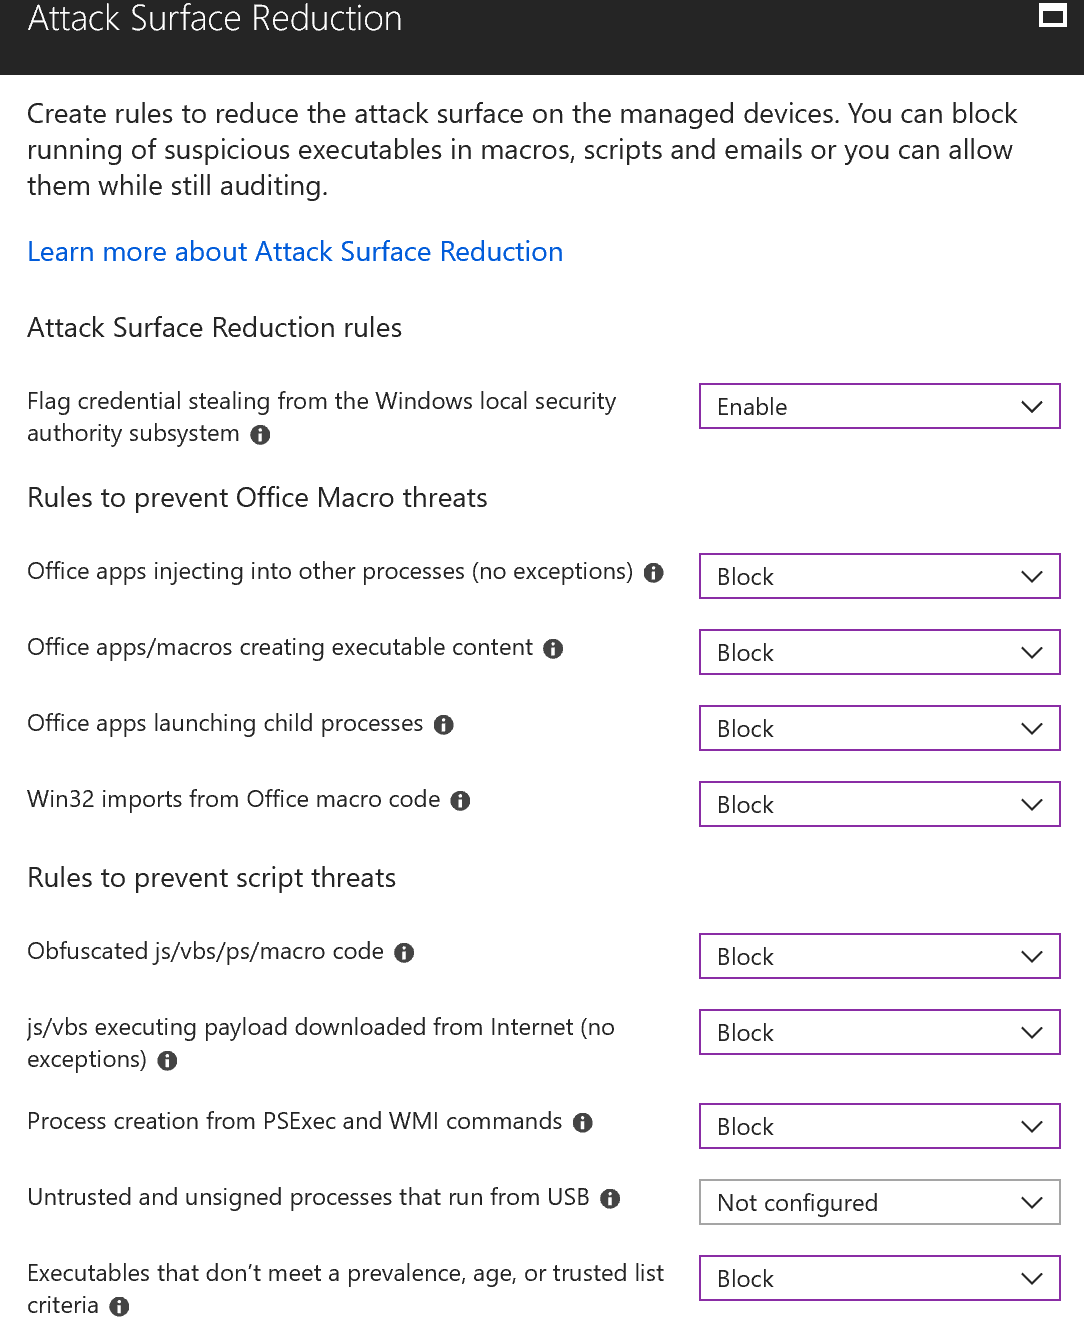
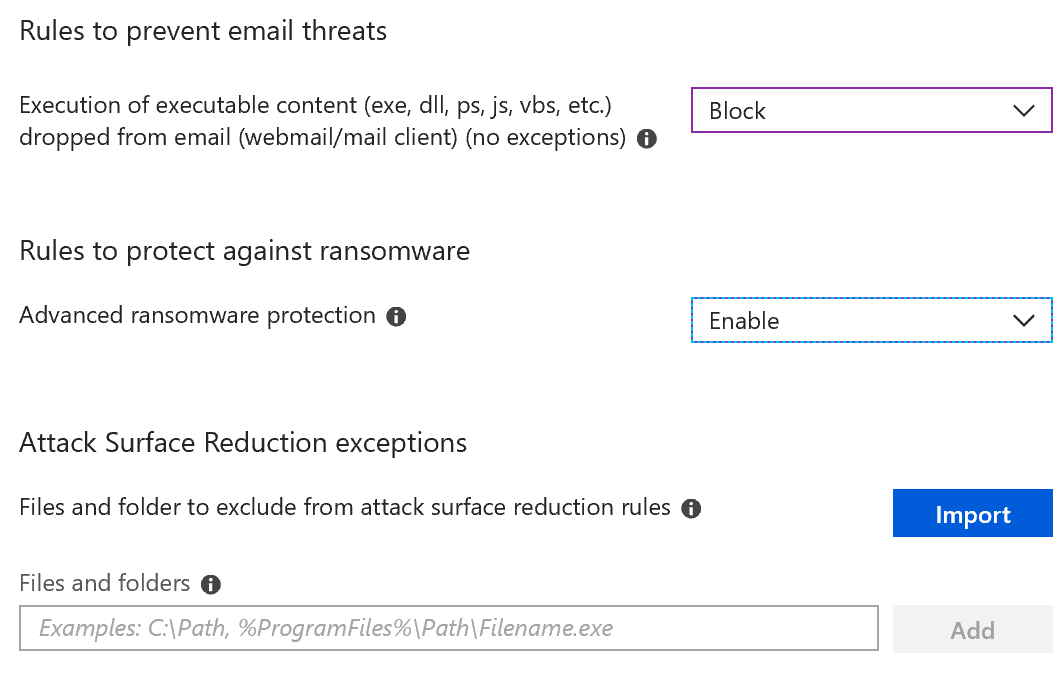
Next up are the Attack Surface Reduction settings. You can test these settings by choosing to audit first before blocking. I’ve not seen much conflict but if you use old file versions from Office then you may find some. Block is where you need to be in order to protect your computer from malware coming from Office files, so if you are testing, be sure to remember to come back and change your settings to block when you’re finished with that phase.
Controlled folder access is a simple setting to block applications, like ransomware, from manipulating files in protected locations within your user profile. In the second screenshot, you will see that you can also add additional locations. I like to add both my OneDrive personal and OneDrive for Business locations. You may add as many additional locations as you need to, however, make sure that each location is going to be unique to the individual that you are applying this policy too. Meaning you don’t want to apply the same network drive to all 100 people that share that folder. This is really meant to protect your personal data.
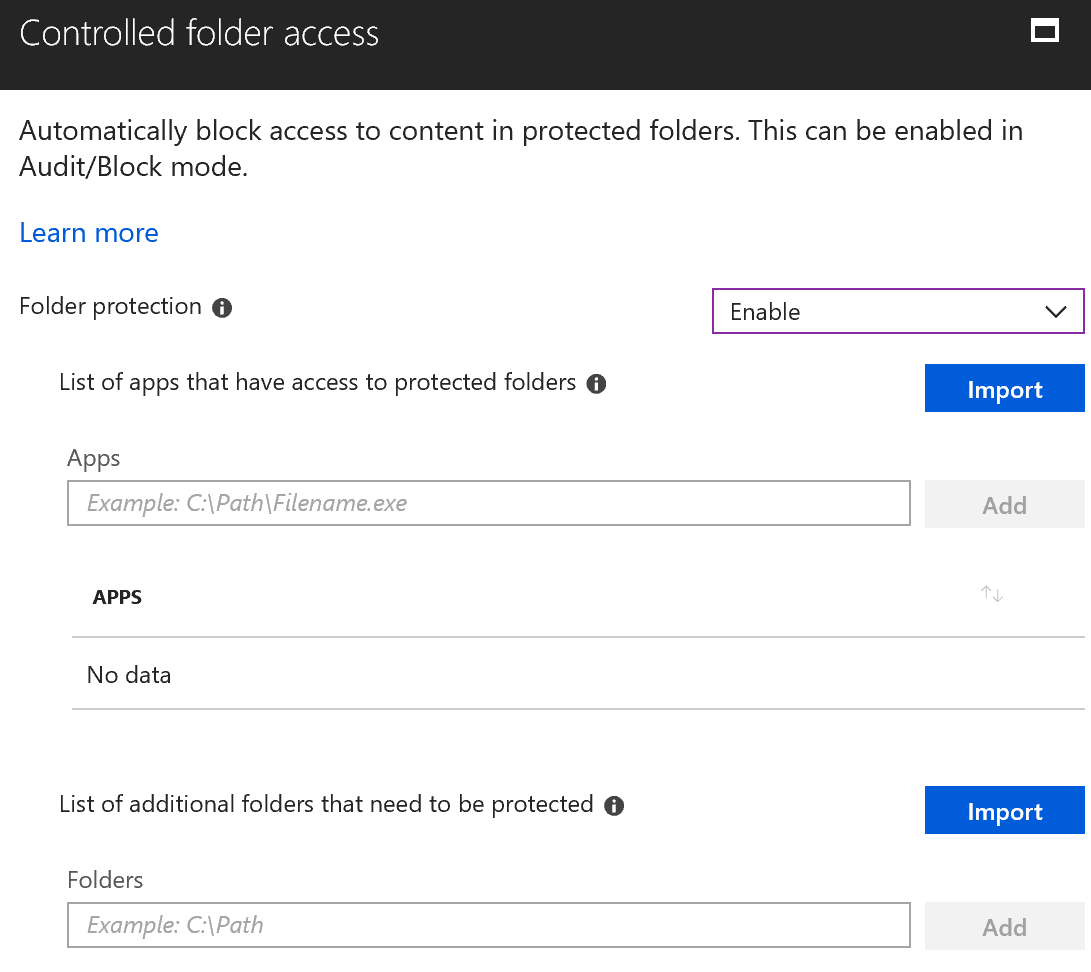

As you see above the additional locations to protect are uploaded via a csv file. This file just needs a single column listing of the locations of your choice.
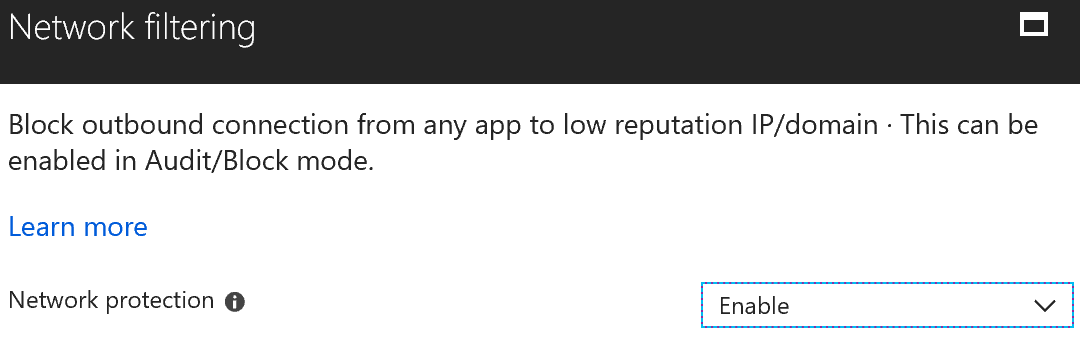
In the Network filtering section, simply enable this feature.
The exploit protection settings require a bit of preparation to implement. First, you will need to go into the exploit protection settings on a windows 10 computer and enable them. Then test the functionality to make sure there are no conflicts. After you are confident that your applications are working fine with these settings enabled you will need to export the XML file and then import it into Intune to configure your policy.
Here are the settings that you’d like to have on your Windows 10 computer. At the bottom, you’ll find the highlighted Export settings link. It’ll put a file called Settings.xml into your downloads folder.


Import that file into the exploit protection section of your Intune policy.

Next, enforce the application control options.

Then enable Credential Guard with the option of your choice.

Now decide how much notification you want your users to see. Not configured means that the notifications will be visible. I like to leave them on with the exception of noncritical notifications. Then finally put in your IT department contact information for your users so they can be your first line of notification should something bad happen.

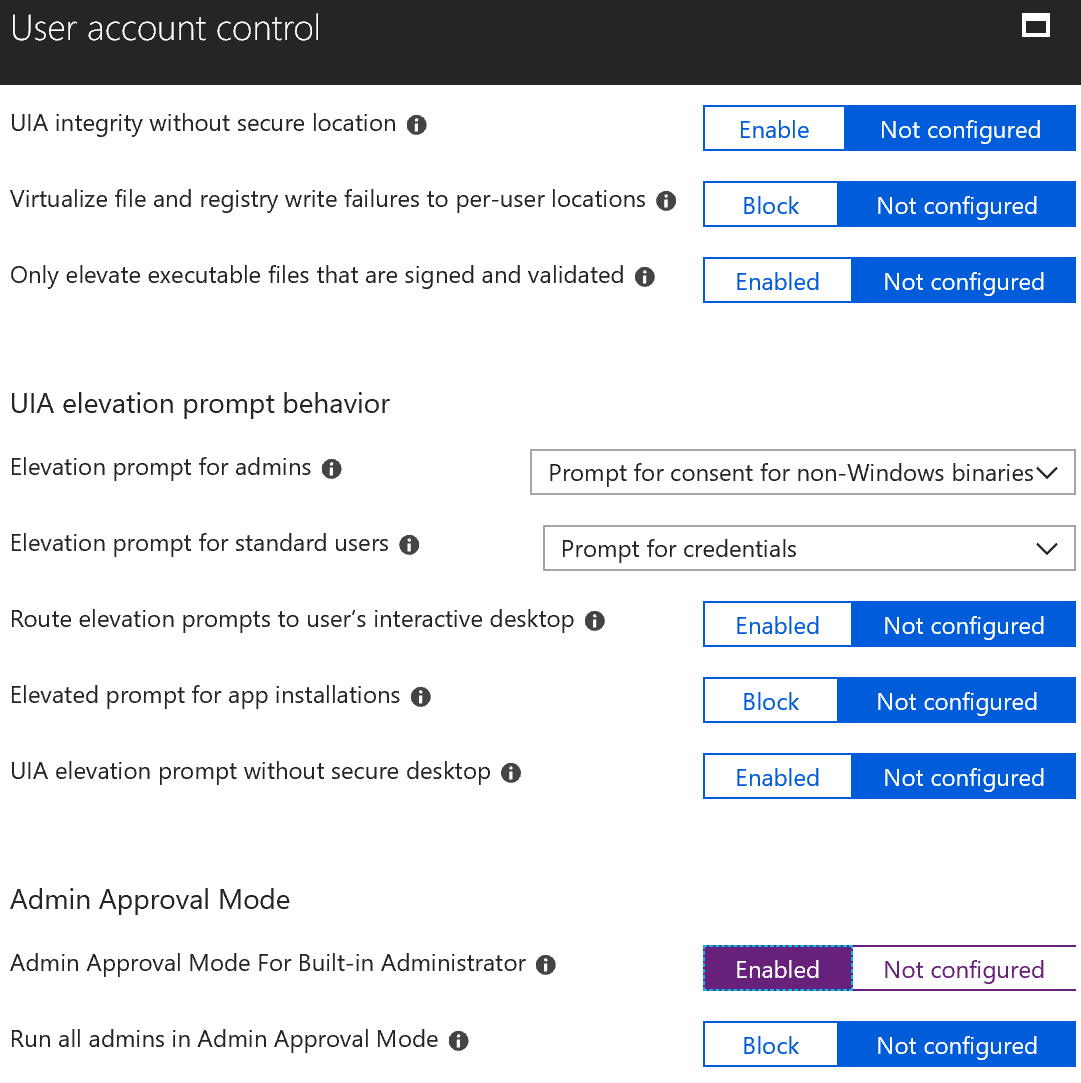
Our last setting is user account control. Much-maligned when it first debuted, it is now fully mature and does most of its work in the background. Several new malware varieties are targeting the local admin account with brute force password guessing. Once obtained on a single machine in your network it then tries those credentials all through your network. Using unique local admin passwords is the ultimate solution to that problem but enabling admin approval mode on the built-in admin account will help.
Assign the policies
Assign to the groups where you want to enforce these policies. You will want to create a test group first before assigning to the general population. You can only assign policies to groups so you may need to create your test group first.
Unlike Group Policy, Intune does not distinguish between users and devices. So you are able to assign these device policies to your user groups. The only devices that will then not get the policy are those devices that are not associated with a user like a kiosk device. For those types of devices, you will need to assign the policy to the device group specifically.
Don’t be intimidated by Intune
Using Intune can be intimidating as much so as Group Policy. However, by following this step-by-step guide, you will get your Windows 10 machines properly configured with the new security options and should also help get you more comfortable with using Intune for management of SMB networks.


A good articel about Intune security settings, Do you know where to set screen save settings lock time? And how to make shoor Windows updates runs?
Daniel, There are a lot of new profile types since I wrote this article. Try Device configuration policy, and for the profile type select device restrictions. If it isn’t there Intune now allows you to import ADMX files from your windows 10 computer.
Is there a way to assign multiple confiugraitons one swoop?
I made a long list of configs and now have to indvidually go in and assign it to groups!
Groups is the best way to do it. At least you don’t have to go computer by computer anymore.
Hi, great article, thank you. However in your very first section you don’t show what Profile type you are using and I can’t seem to spot the same options in our drop down choices. We have 1909, and I know things are changing pretty quickly. It doesn’t help that I’m new to Intune, so it’s a bit confusing.
Roy, there’s no profile to select. This is a Configuration Policy. Then you only need to select the OS type.
Hi, sorry missed your reply, but thank you. Getting the hang of things but a lot to take onboard. I should have said 1903 as 1909 didn’t come out until Oct.
Hi Amy,
I would urge a modicum of caution in the Domain, Private, Public network section, as I have enabled the Firewalls in each network and then (rather zealotically) blocked everything. This managed to switch off my network access entirely and render the machine useless as I then could not re-apply a policy to change things!! After a conversation with MS they informed me that this section was all about restricting access for ‘works’ machines to various networks depending on requirements. It does not mention this fact in the policy information, nor the possibilities of a total mess up as the machine will require a rebuild to get rid of the settings. Very annoying.
Hello Amy , Can i do application control thru Intune for Custom on prem apps
Yes you can. Microsoft has some excellent docs on how to do that