If you would like to read the next part in this article series please go to Mailbox Auto-Mapping in Exchange Server 2010 (Part 2).
Introduction
In this article I want to cover the mailbox auto-mapping feature that was first introduced in Exchange Server 2010 Service Pack 1 and which has recently been enhanced in Exchange Server 2010 Service Pack 2. Essentially, this feature allows additional mailboxes that a user has full access permissions against to be automatically opened in the Outlook client. In this article, the starting point is a multi-role Exchange 2010 server with Service Pack 1 deployed. We will look at the feature as it is in Service Pack 1, then proceed to upgrade the Exchange 2010 server to Service Pack 2 in order to see the differences with the feature in Service Pack 2. Along the way, we’ll look at how the feature actually works via troubleshooting procedures.
Mailbox Auto-Mapping in Service Pack 1
First, let’s take a look at how this feature works in Exchange Server 2010 SP1. The starting point is a simple Outlook 2010 profile configured to open my own mailbox. It’s important to understand that at this point only my own mailbox is being accessed and this is the only mailbox shown in Outlook 2010 when it is opened. Let’s now say that I need to access a shared mailbox, perhaps a mailbox used for incoming sales enquiries. Additionally, I need to respond to sales enquiries by sending messages such that they are seen by the recipient as coming from the sales account and not my own personal account. To do this, I might grant Full Access Permission against the sales shared mailbox using the Manage Full Access Permission option in the Exchange Management Console as you can see from Figure 1-1.

Figure 1-1: Manage Full Access Permission Wizard in Exchange Management Console
In the Manage Full Access Permission wizard, I can grant my mailbox Full Access Permission against the Sales mailbox as you can see from Figure 1-2.

Figure 1-2: Adding Full Access Permission to a Mailbox
I could achieve the same result using the Add-MailboxPermission cmdlet within the Exchange Management Shell. For example, I could run the following command:
Add-MailboxPermission –Identity Sales –User neilhobson\neil –AccessRights FullAccess
Once this has been performed and the permissions assigned, let’s now see what happens when I next load up Outlook 2010. Straight away, I can now see the Sales mailbox within my Outlook client as you can see from Figure 1-3. This mailbox was added as part of the auto-mapping feature first introduced in Exchange Server 2010 Service Pack 1.

Figure 1-3: Sales Mailbox Auto-Mapped in Outlook
Prior to the auto-mapping feature of Exchange Server 2010 SP1, users could have chosen to manually add the additional mailbox. For example, in Outlook they could have chosen the Account Settings option and gone on to add the additional mailbox via the option that you can see in Figure 1-4.

Figure 1-4: Manually Adding an Additional Mailbox in Outlook
It can therefore be argued that the auto-mapping feature simplifies the process of adding an additional mailbox by automatically doing the required work. However, this may be confusing to the users if they are not used to this but more importantly there are performance considerations that could arise. For example, if one particular user has full access permissions to many other different mailboxes, all of those additional mailboxes will need to be mapped and opened when Outlook itself is opened.
Groups and Mailbox Auto-Mapping
If you’ve configured Full Access Permission against another mailbox yet that mailbox does not automatically appear in Outlook, you will need to ensure that you understand the auto-mapping process in order to be able to troubleshoot it.
However, before we get into the troubleshooting aspect, it is important to understand that this auto-mapping process does not work if the Full Access Permission is assigned via membership of a group. For example, suppose that I create a new shared mailbox called Opportunities and a new security group called All Users. I then add my user account into the All Users group and proceed to configure the All Users group with Full Access Permission against the Opportunities mailbox. This succeeds as you can see from Figure 1-5.

Figure 1-5: Granting a Group Full Access Permission
However, when I next load Outlook 2010 and the autodiscover process is invoked, the Opportunities mailbox is not automatically mapped although it is possible to manually add the mailbox through Outlook 2010 as you can see from Figure 1-6. Therefore, it must be remembered that the mailbox auto-mapping feature only works when the full access permission is assigned to an individual mailbox and not a group.

Figure 1-6: Manually Added Mailbox in Outlook
Troubleshooting Mailbox Auto-Mapping : Autodiscover
Details about the shared mailbox that is to be accessed will be returned to the Outlook client by the autodiscover process. This is really handy to know if you are ever in the position where you need to troubleshoot why the auto-mapping feature isn’t working correctly. In this article, I’m using Outlook 2010 but of course the autodiscover process is also available in Outlook 2007. The way to show whether or not the autodiscover process is returning the additional mailbox or mailboxes is to use the Test E-mail AutoConfiguration feature of Outlook 2010. If you’ve ever been involved with troubleshooting the autodiscover service before, I’m sure that you will have already used the Test E-mail AutoConfiguration process. However, I’m going to briefly cover the process here in case it’s a new feature to you but at the same time I also want to show the XML portion of the test process which is something that you may or may not always use in your standard autodiscover troubleshooting procedures.
To use the Test E-mail AutoConfiguration feature, hold down the control key and click the Outlook 2010 icon in the system tray. You will be presented with a menu that includes the option to test the automatic configuration as you can see from Figure 1-7.

Figure 1-7: The Test E-mail AutoConfiguration Option
Once the Test E-mail AutoConfiguration window has opened, you can proceed to enter the email address and password of the mailbox that you wish to test. As we are only interested in the autodiscover process at this time, the Use Guessmart and Secure Guessmart Authentication check boxes can be cleared. Once you’ve done that, click the Test button and you should be presented with a screen similar to the one shown in Figure 1-8.

Figure 1-8: Testing the Autodiscover Process
However, it’s not the results of the autodiscover test on the Results tab that we are interested in for this particular scenario. Rather, click the XML tab once the autodiscover test has executed and you should be presented with a screen similar to the one shown in Figure 1-9. In Figure 1-9, I have highlighted the portion of the XML file that starts with <AlternativeMailbox>. You will see in this portion of the XML file that the Sales mailbox information has been returned by the autodiscover process and that the mailbox type has been specified as a delegate mailbox.

Figure 1-9: Alternative Mailbox Revealed via Autodiscover Process
When troubleshooting the auto-mapping feature, perhaps because a shared mailbox has not been automatically added to the Outlook profile, you can use the autodiscover process to check whether the XML information contains details about additional mailboxes. If a user has been granted Full Access Permission against multiple mailboxes, you will see additional <AlternativeMailbox> sections in the XML file. For example, in Figure 1-10 you can see that an additional mailbox called Info is also returned by the autodiscover process in addition to the Sales shared mailbox that you saw earlier.
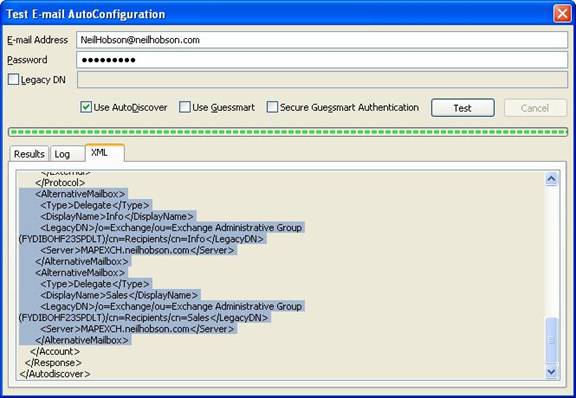
Figure 1-10: Multiple Alternative Mailboxes
Summary
That completes part one of our look at the mailbox auto-mapping feature of Exchange Server 2010 Service Pack 1. In part two, we’ll be looking at what permissions are set when you assign full access permissions against another mailbox and then finishing the article by looking at the changes made to the auto-mapping feature in Exchange Server 2010 Service Pack 2.
If you would like to read the next part in this article series please go to Mailbox Auto-Mapping in Exchange Server 2010 (Part 2).


