Today’s IT pros have flexibility that was previously unheard of. Admins can run workloads on virtual machines that are hosted in-house or those workloads can be run on one of any number of public cloud platforms. As great as it may be to have so many choices, however, the use of so many different platforms can complicate workload management. An administrator may, for instance, have to use one tool for managing workloads that are running on Hyper-V, and another tool for managing workloads that are running in the public cloud. Thankfully, Amazon has attempted to simplify virtual machine management by extending EC2 management capabilities to Microsoft’s System Center Virtual Machine Manager through a tool called AWS System Manager.
AWS System Manager exposes EC2 virtual machines through the Microsoft Virtual Machine Manager Console. Administrators can use the console to perform basic management tasks such as launching, starting, stopping, or rebooting virtual machines. It is even possible to use AWS Systems Manager as a Hyper-V to EC2 migration tool.
Deploying AWS System Manager
Before I explain how to deploy AWS System Manager, I need to point out that the tool is only intended to work with Virtual Machine Manager 2012 SP1 (with the latest update rollup) or with Virtual Machine Manager 2012 R2. While it is possible to deploy AWS System Manager into the Virtual Machine Manager 2016 console, the add-in seems to have trouble authenticating into the Amazon cloud. Hopefully, this is something that Amazon will eventually fix.
The first thing that you will need to do is to download the AWS Systems Manager for Microsoft System Center Virtual Machine Manager. You can find this component here. The add-on that you are downloading is encapsulated in a ZIP file, but as weird as it sounds, you will not need to extract the files from the ZIP file and save them to a folder on your VMM server’s hard disk. Instead, you can work with the ZIP file as it is.
Contrary to what you might expect, installing the AWS Systems Manager add-on does not involve running a setup.exe file or working your way through a Windows Setup wizard. Instead, you will be installing the add-on through the Virtual Machine Manager console. That being said, go ahead and open the console. For the purposes of this article, I will be using System Center 2016 Virtual Machine Manager, but the procedure should be similar for any of the more recent versions.
Once the management console opens, click on the Settings icon to go to the Settings workspace. Now, click on the Import Console Add-In option found on the ribbon. This will cause Windows to display the Select an Add-in window. Click the Browse button, and then browse to the ZIP file that you downloaded earlier. Upon doing so, you may receive a security warning like the one shown in the image below, but you can ignore the warning. Just click on the Continue Installing checkbox and click Next.
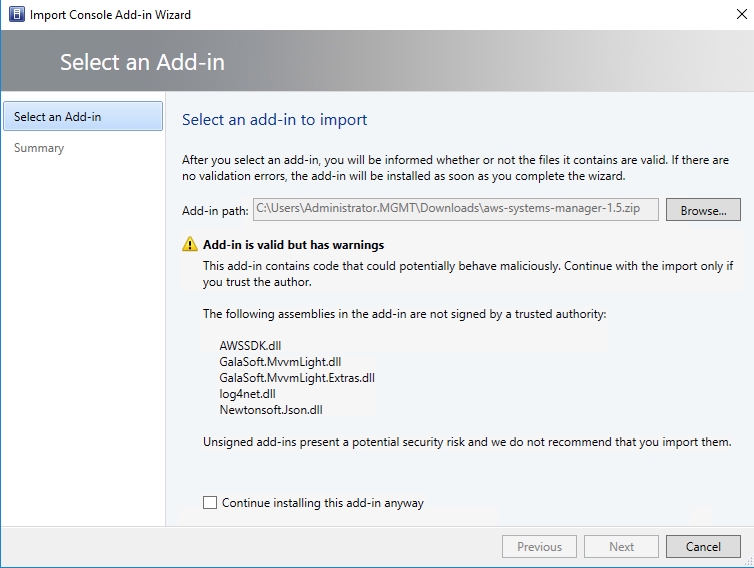
Upon clicking Next, you will see a summary of the add-in that you are importing. There is nothing that you have to do on this screen, aside from clicking Finish. Upon doing so, the Jobs screen will open and should display a successful installation. You will also notice some AWS-related icons have been added to ribbon in the Fabric workspace, as shown below.

Attaching to AWS
Once the AWS System Manager has been installed, some Amazon specific icons will be added to the console’s ribbon. Even so, there is still a bit of work to be done before you will be able to access your AWS resources through System Center Virtual Machine Manager. Specifically, you will need to provide a set of authentication credentials that Virtual Machine Manager can use to communicate with your AWS subscription.
Normally, Virtual Machine Manager uses a Run As account to communicate with external resources. In this case, though, you will instead use an Access Key ID and a secret access key. To get this information, open up a web browser, and log into the AWS console. Next, click on your username, which should appear in the upper right corner of the console. Now, choose the Security Credentials option from the dropdown menu. At this point, you will see a warning message telling you that you are about to access the security credentials page for your AWS account. Click on the Continue to Security Credentials button to clear this warning, and move on to the Security Credentials screen.
The Security Credentials screen includes several different containers, as shown in the image below. You will need to expand the Access Keys section.

This screen may list your previously existing access keys, but Amazon does not provide a way to get the information that you will need from an existing key. If you don’t already know your access key ID and secret key, then you will need to click on the Create New Access Key button.
When you generate a new key, you will need to download the key. This is also your one and only opportunity to view the key from within AWS, but the keys are included inside of the downloadable CSV file. Click on the Show the Key link, but do not close the browser window.
Now, go back to Virtual Machine Manager, open the Fabric workspace, and click on the AWS icon on the Ribbon. As you can see in the image below, there is a place for you to copy and paste the access key ID and the secret access key into Virtual Machine Manager. After doing so, click Save. You should now be able to access EC2 through the Virtual Machine Manager console.

But first, read the manual
Amazon makes it relatively easy to connect AWS System Manager to the Virtual Machine Manager console to manage your EC2 virtual machines. Even so, it is a good idea to review the AWS documentation to make sure that you are aware of all the features and limitations. You can find the documentation here.
Featured image: Shutterstock


