If you would like to read the other parts in this article series please go to:
- Managing Hyper-V From the Command Line (Part 2)
- Managing Hyper-V From the Command Line (Part 3)
- Managing Hyper-V From the Command Line (Part 4)
- Managing Hyper-V From the Command Line (Part 5)
- Managing Hyper-V From the Command Line (Part 6)
- Managing Hyper-V From the Command Line (Part 7)
- Managing Hyper-V From the Command Line (Part 8)
Introduction
One of the things that is conspicuously lacking from Hyper-V is the ability to manage your virtual machines through Windows PowerShell. Although Microsoft plans to offer this ability with Windows Server 8, it is possible to perform virtual machine management from the command line today. In this article, I will show you how.
Acquiring the Hyper-V Management Library
Even though Hyper-V does not provide any native PowerShell management capabilities, there is a PowerShell Management Library that is available for download from CodePlex.
Before I show you how to install this management library, I need to point out that the current release is only designed to work with PowerShell version 2. Back in 2009, David Davis wrote an excellent article for this site that covered the process of installing the Hyper-V management library and a few basic PowerShell commands, check it out here. Although Davis used PowerShell version 2 with his article, the version of the management library that existed at the time was designed to be backward compatible with the original PowerShell release. The version of the management library that I will be discussing is only compatible with PowerShell 2.0 and the installation process is somewhat different from the original version.
Preparing Your System
Before you can install the Hyper-V Management Library, you will need to install Windows PowerShell. The Hyper-V Management Library is designed to work with a standalone Hyper-V server, a Server Core deployment of Hyper-V, or Windows Server 2008 / 2008 R2 Server running Hyper-V as a server role. For the purposes of this article, I will be using a Windows Server 2008 R2 server running the Hyper-V role.
With that said, you can install PowerShell by opening the Server Manager console, selecting the Features container, and clicking on the Add Features link. When you do, the Add Features Wizard will ask you which features you want to install. Choose the Windows PowerShell Integrated Scripting Environment feature and then follow the prompts to complete the installation process.
Installing the Hyper-V Management Library
When you download the Hyper-V Management Library from the link provided above, the download consists of a single ZIP file. This ZIP file contains three things:
Install.cmd – the Hyper-V Management Library’s installer
PC_Console.REG – A file that updates the server’s registry to accommodate the Hyper-V Management library
A HyperV folder – This folder contains the binaries that make up the management library.
With that said, you can begin the installation process by right clicking on the Install.cmd file and choosing the Run as Administrator command from the resulting shortcut menu. When you do, Windows will open a Command Prompt menu and will display a message telling you that the PowerShell Module for Hyper-V needs to ensure that the .NET Framework and Windows PowerShell are both installed on the server. You will be prompted to press a key to continue, but when you do, you will receive a series of error messages like the ones shown in Figure A.
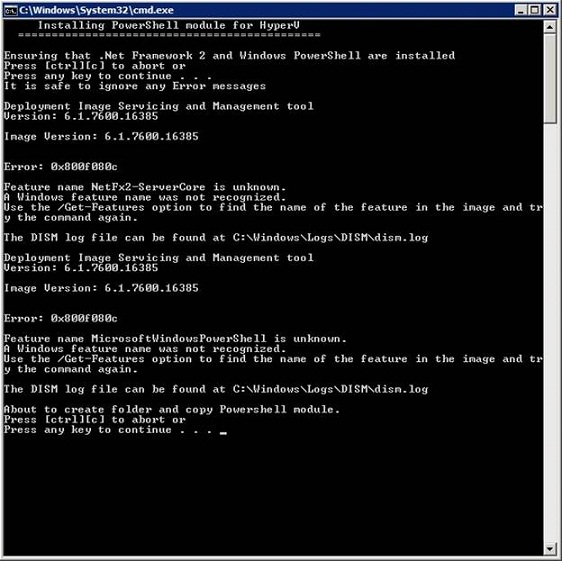
Figure A: The installer displays a series of error messages.
According to the software’s documentation (which must be downloaded separately), these error messages are harmless. The reason why you see them is because the installer was designed for use with Server Core deployments. Even so, the installer is useful for copying the Hyper-V Management Library’s binaries to the correct location. In fact, if you press a key when prompted, the installer will copy all of the binaries for you.
The next prompt that you will see asks you to press a key to update the server’s registry. When you press a key, the installer uses the PS_Console.REG file to update the server’s registry.
The last prompt that you will see asks you to press a key to load PowerShell. When PowerShell loads, you will see a glaring error like the one shown in Figure B, telling you that they Hyper-V module could not be imported. Once again, this error occurs because the installer was designed for Server Core deployments.

Figure B: The installer ends with a PowerShell error.
Although the error shown above is harmless, it does mean that you will have to complete the installation process manually. Fortunately this is relatively easy to do.
A Word About PowerShell Security
Before I show you how to complete the installation process, I need to tell you a little bit about PowerShell security. PowerShell is designed so that it will not run unsigned scripts. This behavior is designed to prevent PowerShell from being used as a tool for malicious scripts.
Having said that, installing the Hyper-V Management Library requires us to run a script. Since the script is unsigned, you can either sign it yourself or you can configure PowerShell to run unsigned scripts. If you want to allow PowerShell to run unsigned scripts, simply enter the following command:
Set-ExecutionPolicy Unrestricted
Importing the Hyper-V Modules
I have to admit that I struggled for hours with importing the Hyper-V modules for PowerShell. According to the software’s documentation you should be able to import the modules by running the following PowerShell command:
Import-Module “C:\Program Files\Modules\Hyperv\Hyperv.psd1”
Although the command listed above is indeed correct, every time I entered it (or any variation of it) I was greeted with a series of PowerShell errors. To make a long story short, simply setting the execution policy to unrestricted is insufficient. You have to run PowerShell as an administrator to be able to import the module.
To run PowerShell as an Administrator, simply right click on the PowerShell icon and choose the Run as Administrator command from the shortcut menu, as shown in Figure C.

Figure C: You must run PowerShell as an Administrator.
Once PowerShell opens, enter the Get-ExecutionPolicy command and verify that PowerShell is running with an unrestricted execution policy. Next, enter the Import-Module command listed above to import the Hyper-V module. You can see how these commands work in Figure D.

Figure D: You are now able to import the Hyper-V module.
What Went Wrong?
If you still receive an error when trying to import the Hyper-V module, the problem could be related to the fact that Windows attempts to block scripts from the Internet. Some people have said that they were unable to import the modules until they unblocked the script files.
You shouldn’t normally have to unblock the scripts, but if you are having problems and want to try it you can do so by opening Windows Explorer and navigating to the C:\Program Files\Modules\Hyperv folder. Now, right click on the first file in the folder and choose the Properties command from the shortcut menu. When the file’s properties sheet appears, click the Unblock button shown in Figure E. Click OK and then repeat the process for each file in the folder.

Figure E: You can unblock a file by clicking the Unblock button.
Using the Hyper-V Management Library
Once you have imported the Hyper-V module there are numerous cmdlets that you can run. I am going to show you some of the more useful cmdlets in the next article in this series. For now though, I wanted to show you one cmdlet in particular. If you enter Show-HyperVMenu you will be presented with a text based management interface for Hyper-V. This interface provides much the same functionality as the Hyper-V Manager. You can see what this interface looks like in Figure F.

Figure F: This utility allows you to manage Hyper-V without needing to memorize the various PowerShell cmdlets.
Conclusion
Now that the Hyper-V Management Library is up and running, I plan to spend Part 2 of this series showing you what you can do with it.
If you would like to read the other parts in this article series please go to:
- Managing Hyper-V From the Command Line (Part 2)
- Managing Hyper-V From the Command Line (Part 3)
- Managing Hyper-V From the Command Line (Part 4)
- Managing Hyper-V From the Command Line (Part 5)
- Managing Hyper-V From the Command Line (Part 6)
- Managing Hyper-V From the Command Line (Part 7)
- Managing Hyper-V From the Command Line (Part 8)


