The peering can be intra-region (the one that we are going to work on in this article) but can also be configured between different regions, also known as Global VNet Peering, which allows any medium to larger enterprise to rely on Azure backbone to connect two distant datacenters anywhere on the globe. If you are planning to take the AZ-300 exam, then you should be acquainted with this topic and be able to create your peering settings using Azure Portal because that exam has lab included
In a distant past, when configuring interoperability among your virtual networks in Azure, the only way to connect them was by using a VPN gateway, which would increase costs and complexity because additional resources and infrastructure were required. Nowadays, Azure offers several options to make a connection between your virtual networks, and Microsoft peering has become the first option because it has a lower cost compared with all other options, it does not require additional resources, and uses Microsoft backbone to transfer data between any given two VNets.
The peering can be intra-region (the one that we are going to work on this article) but can also be configured between different regions, also known as Global VNet Peering, which allows any medium to larger enterprise to rely on Azure backbone to connect two distant datacenters in the globe. If you are planning to take the AZ-300 exam, then you should be acquainted with this topic and be able to create your peering settings using Azure Portal because that exam has lab included.
Microsoft peering: Some critical points to know
Before going to the technical details to get our Microsoft peering working, I would like to highlight some of the critical points about peering, as follows:
- All traffic is private, and it is going through Microsoft backbone to move data between your virtual networks (no additional security controls or worry of data being transferred over the Internet).
- There is no downtime when configuring Microsoft peering at the Virtual Network level.
- We must make sure that there is no IP overlapping, the design of your IP networks is crucial to have Microsoft peering working.
- There is a cost for all ingress and egress traffic that utilizes a virtual network peering.
- We can peer within the region, across regions, and across subscriptions as well.
- You can still take advantage of Gateways, and the peered connections can use that peering to take advantage of the gateway object.
- Peering provides IP connectivity only. It does not contain name resolution. The Cloud Administrator must understand clearly if the machines are being joined to a domain (Active Directory DNS resolution recommended) or if they are going to rely on default Azure name resolution.
- We can leverage NSGs to protect the VNets that are connected through peering to enforce security.
- Peering is a 1-to-1 relationship, and they are intransitive. For example: if you have these following peering connections configured A<>B and A<>C networks, there is no IP connectivity between B and C networks. If there is a need to connect those networks, we would have a couple of options to choose from: first create a peering between (B<>C) them; second, we could enable routing in the A network (using Azure Firewall or a Network Virtual Appliance).
- There is a limit of peering allowed per Virtual Network, as the time of this writing, the limit was 500. Please always check the Microsoft documentation to check the current limitations.
Understanding the scenario
We are going to create a typical design in Azure: the hub and spoke topology. In this scenario, we have a VNet and shared infrastructure, and one or more “spokes,” which could be a specific workload/application, and they will have their VNet as well. All the items in orange will be the ones that we are going to introduce to get Microsoft peering and DNS resolution working among the virtual networks.

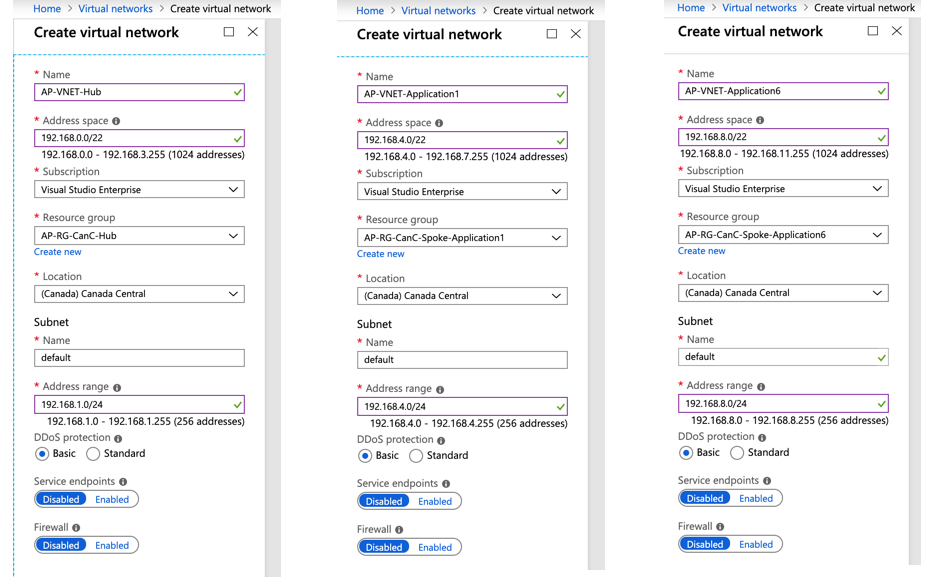
We created three resource groups, one for the hub and two to be used as spoke. A virtual network was created for each spoke and hub. Here is a summary of the virtual networks being used in this article, as well an image showing the VNet creation.
| Address Range | Resource Group | |
| AP-VNet-Hub | 192.168.0.0/22 | AP-RG-CanC-Hub |
| AP-VNet-Application1 | 192.168.4.0/22 | AP-RG- CanC-Spoke-Application1 |
| AP-VNet-Application6 | 192.168.8.0/22 | AP-RG- CanC-Spoke-Application6 |
Peering the networks
Logged on the Azure Portal, click on Virtual Networks, and a list of all VNets in the current subscription will be listed. Select the Hub VNet (in our example is AP-VNet-Hub), and click on Peering located on the left side.
In the new blade, a list of any existent peering will be listed, click on Add to get a new blade that will contain all the required information to create the peering.
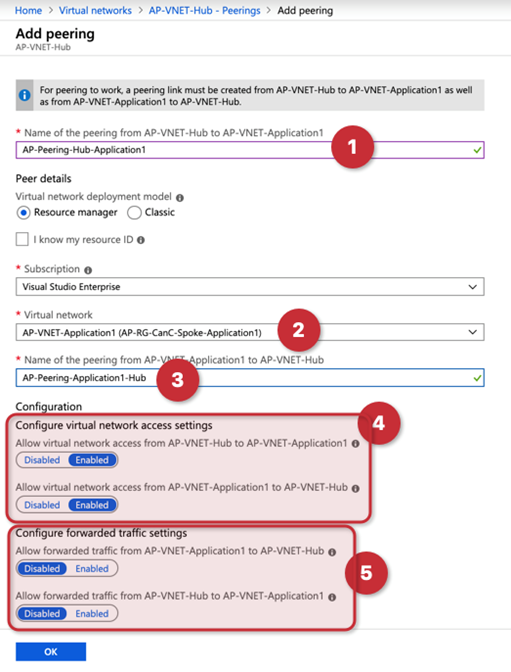
In a single blade, we will be able to configure the Microsoft peering on both sides (source and target). Keep in mind that we are checking properties of the HUB VNet. In the first item (item 1) we define the peering name that will be hosted in our current VNet (AP-VNet-Hub), in the item 3 we describe the name on the other side (from the Application1 VNet to Hub), and that is the reason that we switched the names at the end of the string, because they are based on the source VNet.
In item 2, we select the VNet that we are going to be peering with our existent VNet. Items 4 and 5, give us options to enable the peering and allow forwarded traffic.
Having a VM running on the hub network, we can ping a VM in the Application1 VNet as soon as the peering is established.

Configuring the name resolution
Now that we have the VNet peering working, we need to resolve the name resolution for VMs in different VNetS, we tested, and they can communicate.
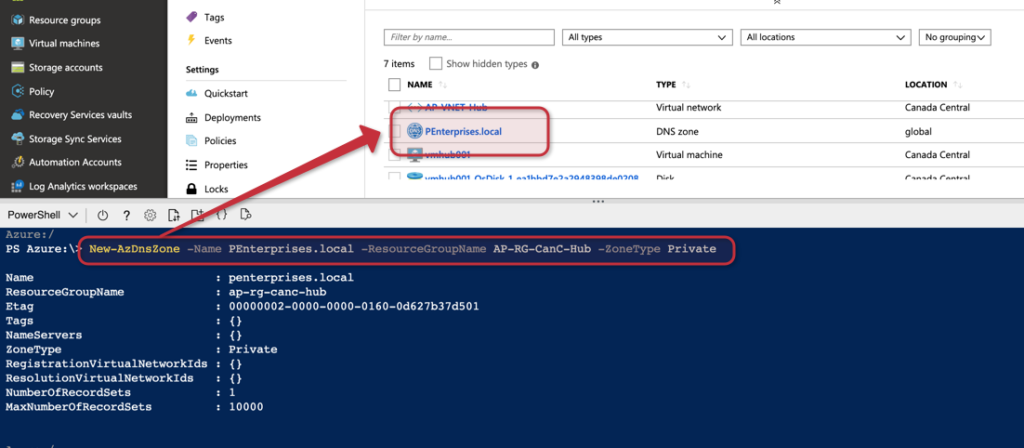
The first step is to create a Private DNS zone, the feature is still in preview, but it is in working conditions for the vast majority of the scenarios. We are going to create an internal zone called PEnterprise.local to place all the VMs in our environment.
The following cmdlet can be used to create the zone, and the result will be a new DNS Zone resource being listed in the Resource Group that we defined during the creation of the DNZ zone.
New-AZDNSZone -Name PEnterprise.local -ResourceGroupName <RGName> -ZoneType Private
We could configure the Private DNS Zone manually. However, we can assign VNet as registration which automatically registers new VMs in the DNS, and resolution where VMs on that VNet can search DNS automatically and retrieve information.
There are some restrictions in the current preview of this feature, as follows:
- A single VNet can be associated to the RegistrationVirtualNetworkIds. Any VM created on that VNet will have the DNS entry generated automatically.
- There is a limit of ten (10) VNets to be related to the ResolutionVirtualNetworkIds parameter.
Note: We are still in preview, and the registration and resolution parameters only work with empty VNets, and at this point, there is no support for existent networks. The team that takes care of the feature is aware of it and working on it.
Although we cannot associate more than a single VNet in the automatic registration feature at this time, we can always add entries in the DNS Zone (if you have time, you can create a RunBook to do just that, I see another topic for an upcoming article).
In the following cmdlets, we are going to associate the Application6 VNet with registering automatically, and the remaining Spoke, and Hub will be associated to the Resolution.
$dns = Get-AzDnsZone -Name <ZoneName> -ResourceGroupName <Resource-Group-Name>
Get-AZVirtualNetwork | fl Name,ID
$dns.RegistrationVirtualNetworkIds.Add(‘VNet-ID’)
$dns.ResolutionVirtualNetworkIds.Add(‘VNet-ID’)
$dns | set-AzDNSZone
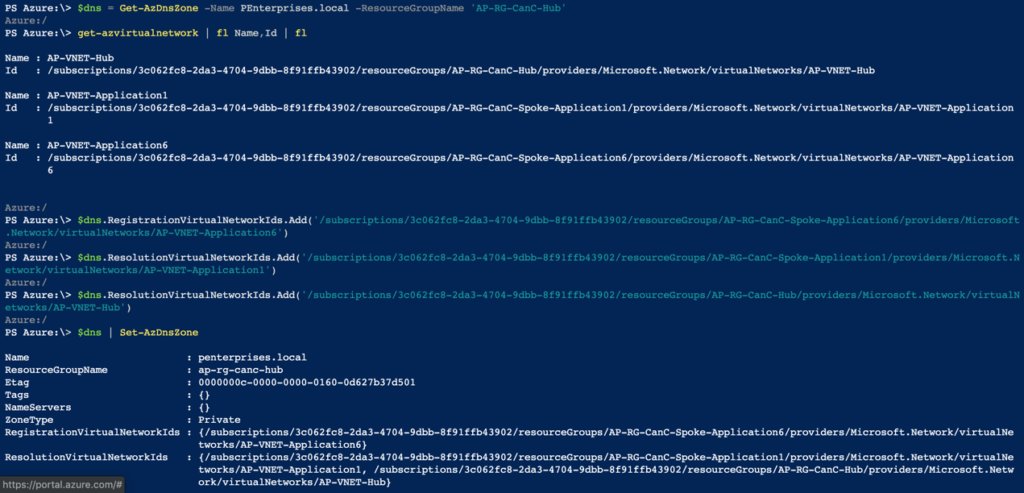
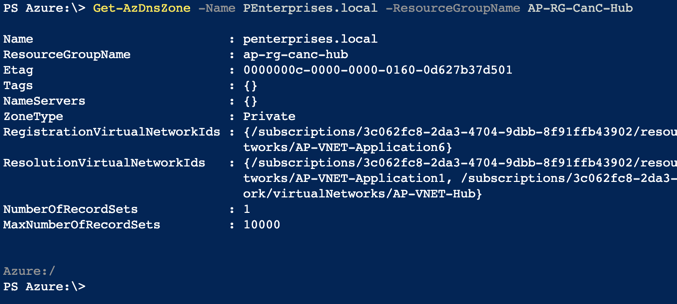
The final result of the DNS Zone properties is depicted in the image below.
Time to test the solution, we are going to create a couple of VMs and associate to our Application6 VNet and Application1 VNet.

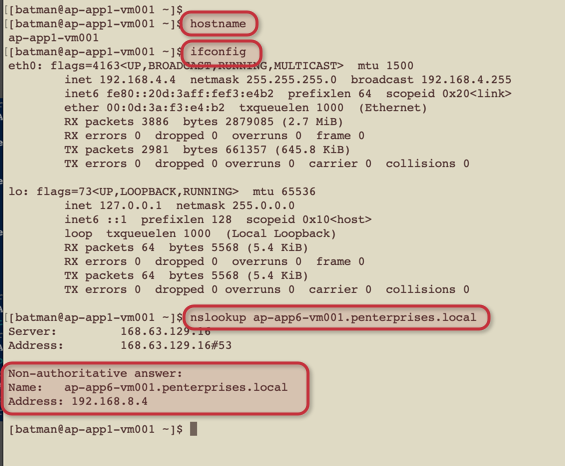
After provisioning the test VMs (the OS doesn’t matter for this exercise), we will try to ping from a VM located in the Application1 to a VM located in the Application6. We can see that the name resolution worked without any manual steps, which means that the automatic registration worked and the resolution parameters worked as expected.
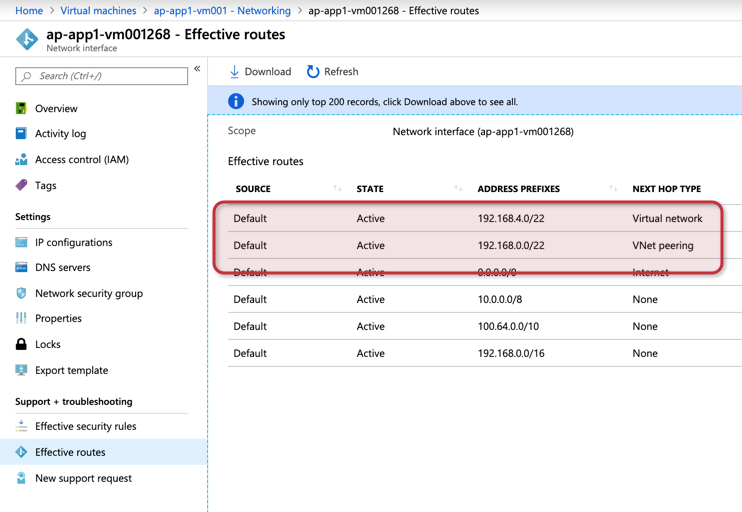
Another way to see the VNet peering in action is by looking at Effective routes at the interface level. We should have an entry for each VNet peering configured with the VNet where the VM resides, as depicted in the image below.
Featured image: Shutterstock


