If you would like to read the other parts in this article series please go to:
- Microsoft System Center Service Manager – Part 1: Introduction and Planning
- Microsoft System Center Service Manager – Part 3: Initial Configuration
- Microsoft System Center Service Manager – Part 4: Initial use of the product
Introduction
Microsoft continually improves the System Center line in their quest to provide IT organizations with one-stop shopping for their service and management needs. As the newest entry to the System Center line, Service Desk fills the end-user void in the company’s management line. In this article, you will learn how to install Service Desk’s base services as well as the product’s data warehouse components.
As a brand new product in Microsoft’s System Center line, Service Manager rounds out Microsoft’s ITIL/MOF-focused architecture by bringing centralized, accessible incident and problem management capabilities to bear. In Part 1 of this series, I discussed in detail the requirements that must be in place before you can install Service Manager. In this part, I’ll walk through the product’s installation step-by-step.
Install the Service Manager Management Server
As is typically the case with a new software installation, you will need to start the process by presenting the Service Manager media to your new server. Either insert the installation DVD or mount the Service Manager ISO on the new server. Once the media has been provided, navigate to the AMD-64 directory and double-click setup.exe. This begins the setup process and results in the screen you see in Figure 1 below. From this screen choose the Install a Service Manager management server option.

Figure 1: The Service Manager installation window
The installation program’s second step involves providing your name, organization name and agreeing to the product license agreement. Click the Next button to continue the process. Figure 2 shows you this window.

Figure 2: Service Manager license agreement
The default installation location for Service Manager is C:\Program Files\Microsoft System Center\Service Manager 2010. If you’d like to choose an alternate location, click the Browse button and identify the location to which you’d like to install Service Manager. The installation location window is shown in Figure 3. Click the Next button to move on with the process.

Figure 3: Choose a Service Manager installation location
At this point, the installation tool verifies that your server meets the requirements. The installer checks the amount of RAM in the system, the processor speed and also checks to see whether or not two prerequisites have been installed. If either of those two prerequisites are missing, a download link will appear in the system check results window. As you can see in Figure 4, my lab system has only 1GB of RAM installed while Microsoft recommends having at least 4GB installed.

Figure 4: Service Manager system check results
The real work starts on the next page of the installation wizard where you’re asked to provide information about the Service Manager database. The primary need here is to specify the name of the database server on which the Service Manager database is to be housed. If you are running a SQL Server instance that is not supported by Service Manager, that instance will not be listed for your use. Once you provide the name of a database server, the other details, including the database name, initial database size and data and log file locations will be filled in automatically. You can change any of these options. In Figure 5, you’ll note that I’ve selected the default options for my Service Manager installation.

Figure 5: Service management database configuration
Like other System Center products including Operations Manager, Service Manager creates a management group that can represent one of a number of different aspects of your company – name, division, department, location or anything else you might like. I’ve decided to create my service manager management group with a name of HQ. Further, you need to tell Service Manager the name of the Active Directory group that contains user accounts allowed to management this management group. In part 1 of this series, I created an Active Directory group named SM-admins and populated it with some user accounts. I’ve specified that Active Directory group name on the management group configuration page shown in Figure 6.

Figure 6: Configure the initial management group
Service Manager’s services can run under the context of the Local System account or under a domain account. For security reasons, the use of a domain account is generally preferred. During the installation process, you can click the Test Account button to make sure that the credentials are correctly configured. In Figure 7, you’ll notice that the account provided was not a member of the Administrators group on the local machine. Once that account was added to the local Administrators group – Figure 8 – the credentials are accepted as valid.

Figure 7: The account is not yet correctly configured

Figure 8: The account is configured correctly
Service Manager routes information using workflows which run under a separate service account. As is the case with the basic Service Manager service account, this account can be either Local System or a domain service account. In Figure 9, you will notice that I’m using the same domain account for both the Service Manager and the Service Manager workflow services.

Figure 9: Service Manager workflow account
With many of their products, Microsoft gathers usage information that can help the company correct any issues that might arise during program use. If you’d like to take part in this Customer Experience Improvement Program, select Yes and click Next.

Figure 10: Customer Experience Improvement Program participation
Software updates keep your new installation protected from flaws that crop up from time to time. Some administrators prefer to handle all updates manually in order to test them in a lab environment before deployment while other simply want updates to be installed as quickly as possible. If you want updates quickly and automatically, choose the Use Microsoft Update option on the next screen of this wizard. Otherwise, select I do not want to use Microsoft Updates option.

Figure 11: Decide how you want to handle software updates
At this point, you’ve made the necessary choices that get Service Manager up and running. On the Installation summary page, click the Install button to commence the installation.

Figure 12: Service Manager installation summary
When the product is finished installing, you’ll get a completion screen like the one shown below in Figure 13.

Figure 13: Service Manager is installed
Install the Data Warehouse Management Server
With the base management server now installed, you can turn your attention to installing the data warehouse management server which manages, as you might guess, Service Manager’s data warehouse components. These components add to System Manager the ability to report against historical data and provides a historical analysis about what’s been going on in your environment.
To get started with installing the data warehouse component, navigate back to the installation location and double-click setup.exe. On the launch page, click Install a Service Manager data warehouse management server. If you’d like a refresher on what this screen looks like, take a look back at Figure 1.
Since a lot of the data warehouse installation is identical to the base Service Manager installation, I’m not going to rehash all of those screens again but will show you what is different.
Before you begin the installation, there is one important configuration step that you must take if you decide to use different SQL servers for the data warehouse components and reporting services. You must make some manual configuration changes to SQL Server Reporting Services in order to enable it to work with Service Manager. Microsoft makes available very clear instructions for this step.
The first screen of the installation wizard that’s of interest is the one on which you configure the data warehouse databases. In Figure 14, you see that there are three default databases created during installation:
- DWstagingAndConfig
- DWRepository
- DWDataMart
As was the case with the main Service Manager product, the data warehouse component’s database needs to be configured. During the installation, you’ll see a window that looks very much like the one shown in Figure 14. Unless you’re in a huge infrastructure, you can use the same database server as you do for Service Manager itself. You can choose different options for different Service Manager databases if you like. You can also name the databases anything you like and choose the storage location for the database files.

Figure 14: Data warehouse default installation options
You might recall that you had to create a Service Manager management group during the earlier installation. With the data warehouse component, you also need to create a management group, but this time for the data warehouse component. In Figure 15, you’ll see that I’ve chosen to use the name DW_EXAMPLE for this article. I’ve also decided to use the same SM-admins group administrators that I used for the Service Manager installation.
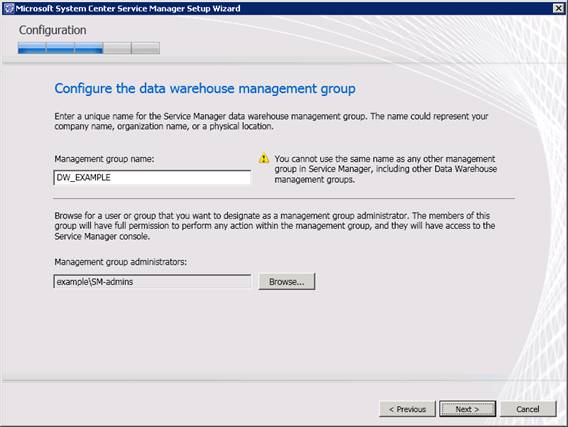
Figure 15: Data warehouse management group
During the installation of SQL Server, you probably didn’t do a whole lot with regard to the configuration of SQL Server Reporting Services (SSRS). SSRS is used heavily by Service Manager’s data warehouse component and needs to be configured. In Figure 17, you can see that I will be using the server named SCSM for the various Service Manager databases as well as for the Service Manager reporting component.

Figure 16: Provide reporting services information
For reporting to work, Service Manager usesa domain account that you configure to generate reports and to read the data warehouse data sources. In the interest of simplicity, I’m using the sm account here that I’ve used for the various service accounts.

Figure 17: Reporting account
Once you’ve run through the various configuration items, the data warehouse installer provides you with an installation summary that you should review. Once you’ve made sure that the selections are correct, click the Install button to proceed with the installation.

Figure 18: Data warehouse installation summary
Summary
So far, in part one of this series, you’ve learned how to handle all of Service Manager’s prerequisites and part two has demonstrated a successful installation process. In the next article in this series, you’ll learn how to start using Service Manager.
If you would like to read the other parts in this article series please go to:


