In this second article in our three-part series on Azure DevOps, we are going to work and optimize our current ARM template and add some intelligence to our release pipeline and automate as much as possible. You can check out Part 1 of the series here.
The high-level overview of this article series is depicted in the diagram below. We are going to use Azure DevOps to work on the ARM template that we define, and after that, deploy the DEV environment located in Canada East and then PROD environment located in Canada Central.
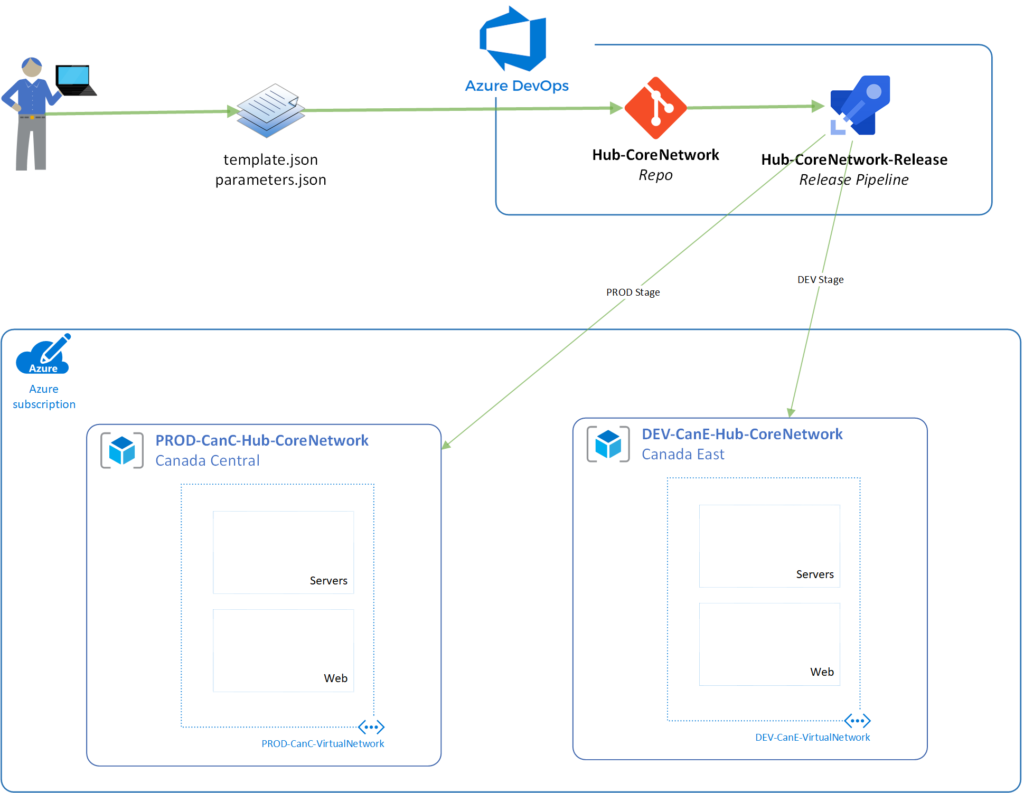
There is no need to use two regions for different environments, but we are going to use it in this article to show the flexibility of the process. Also, in a regular scenario, we would be using two separate subscriptions, and the only change required is to select a different subscription in the tasks of each environment within the Azure pipeline.
Cleaning up the code
The exported template from the resource is functional. However, it has long and complicated variables, and it is not optimized at all. It helps to build the environment as it was, but nothing else.
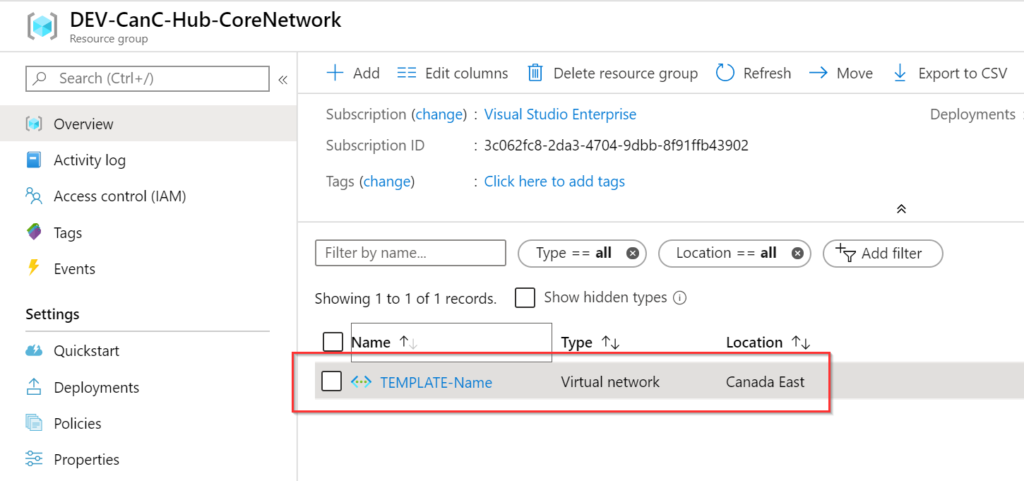
The first thing was to clean up the parameters.json file. We created two variables: pVirtualNetworkName (we renamed this one), which we are going to assign for now TEMPLATE-Name value. The second variable introduced was pLocation, which we are associating for now with Canada East.
{
"$schema": "https://schema.management.azure.com/schemas/2015-01-01/deploymentParameters.json#",
"contentVersion": "1.0.0.0",
"parameters": {
    "pVirtualNetworkName": {
        "value": "TEMPLATE-Name"
    },
    "pLocation":{
        "value": "Canada East"
    }
}
}
In the template.json file, we cleaned up unnecessary lines of code, and the result is shown below. We matched the parameters coming from the previous file, and use those parameters throughout the ARM template.
{
"$schema": "https://schema.management.azure.com/schemas/2015-01-01/deploymentTemplate.json#",
"contentVersion": "1.0.0.0",
"parameters": {
    "pVirtualNetworkName": {
        "type": "string"
    },
    "pLocation":{
        "type": "String"
        }
},
"variables": {},
"resources": [
    {
        "type": "Microsoft.Network/virtualNetworks",
        "apiVersion": "2019-09-01",
        "name": "[parameters(‘pVirtualNetworkName’)]",
        "location": "[parameters(‘pLocation’)]",
        "properties": {
            "addressSpace": {
                "addressPrefixes": [
                    "10.10.0.0/16"
                ]
            },
            "subnets": [
                {
                    "name": "Servers",
                    "properties": {
                        "addressPrefix": "10.10.10.0/24",
                        "delegations": [],
                        "privateEndpointNetworkPolicies": "Enabled",
                        "privateLinkServiceNetworkPolicies": "Enabled"
                    }
                }
            ],
            "virtualNetworkPeerings": [],
            "enableDdosProtection": false,
            "enableVmProtection": false
        }
    }
]
}
After saving and committing the changes to the master, a new release is automatically created and a new virtual network (we are using a different name than we had in the previous article) was created. For now, that is expected, and we will accommodate the changes to match the production environment and create the DEV environment as well.
Improving the release pipeline: First wave of changes
Now that we have a viable product meaning the ARM template files can create a virtual network with the same configuration of the production virtual network. However, we need to improve and make it more dynamic.
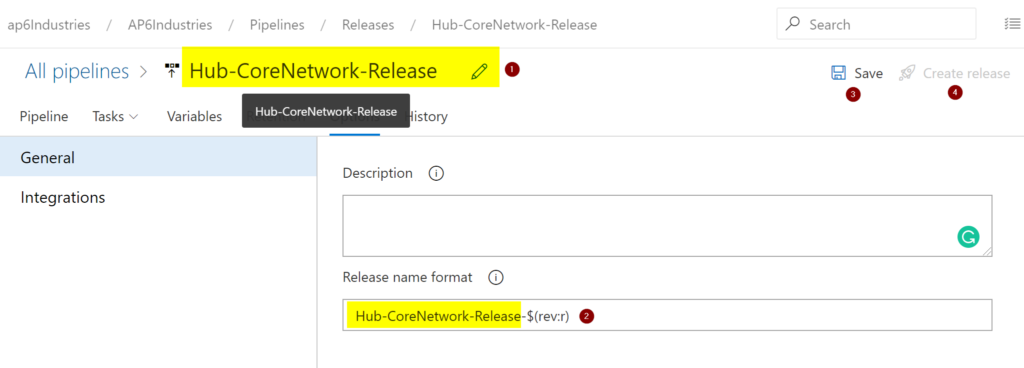
In the Azure DevOps project, click on Pipelines, and then on Releases. Select the release that we created in the previous article and click on Edit. The first step is renaming the current release (Item 1). Click on the pencil icon, and we are going to use the name of the Service/Application-Release as naming convention. The second step is to apply the same naming convention on the release names, which helps to identify the workload anywhere in Azure DevOps.
Last but not least, click on Save (Item 3) to save our current progress. When we want to create a new release without changes in the trigger (in our case, a commit to the master branch), we can always click on Create release (Item 4). Note: They are mutually exclusive when the Save is grayed out, then Create release will be available.
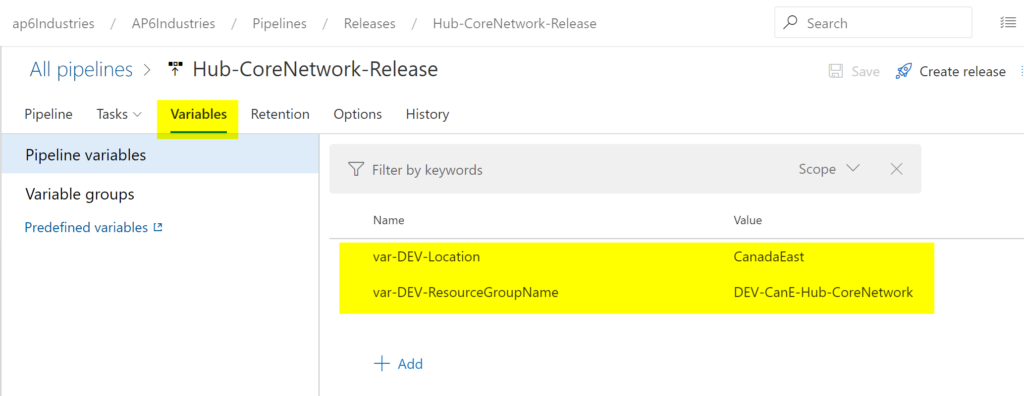
Our next stop is to create variables that will be used to control our pipeline. Click on the Variables tab, and we are going to use the following naming convention var-<EnvironmentCode>-<Parameter>. We are going to start with Location and Resource Group Name. Click on Add, specify the variable name and its value, then click on Save when complete.
Time to start removing static code. We will start by introducing the new variables in the pipeline.
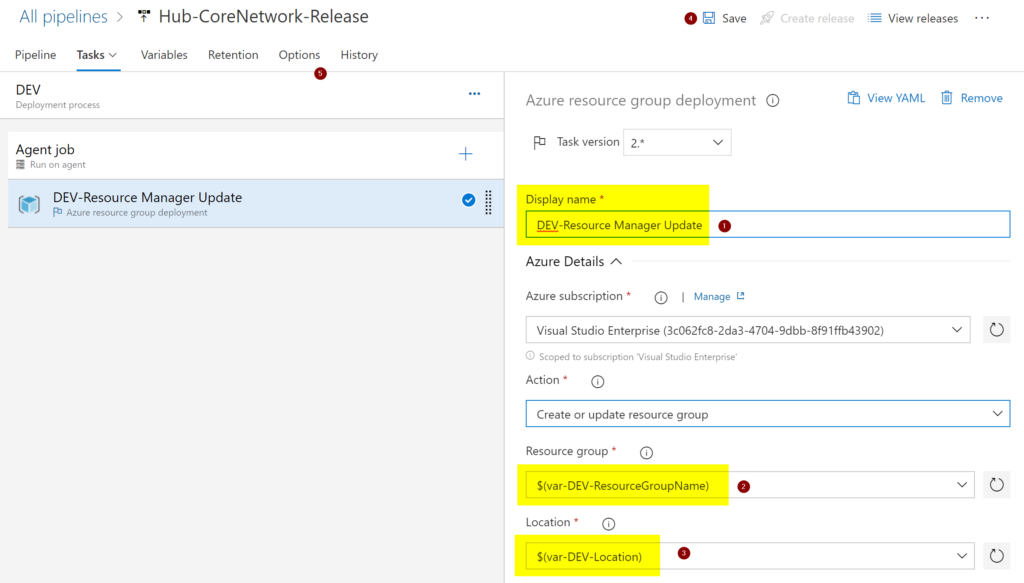
Click on Tasks. (Right now, we have just DEV, but when having more stages, we need to select which stage we want to see the tasks), and we are going to perform some updates on the right side.
The first item to change is the Display Name. We will use the DEV-Resource Manager Update (Item 1) to refer to our DEV environment. In the Resource Group field (Item 2), we will use $(var-DEV-ResourceGroupName), and that is how we use variables in the pipeline. The value defined in the variable will be consumed in this field.
We are going to use the other variable in the location field (Item 3). Click on Save and then Create release to see the changes in the environment. The result is a new resource group name using the value of the variable, located in the Canada East region.
Variable or parameters.json?
We can always use a parameters.json file to provide the information that we want to be deployed in any given environment, and it works great when implementing a single environment. However, how do we solve the problem of deploying the PROD, UAT, and DEV using a single file? Keep in mind that the virtual network will have a different name on each environment.
A possible solution is to create three separate parameters.json files and use each one in a different task within the release pipeline. It does work, but it is not elegant because we will have to manage three separate files.
We will solve this dilemma by creating a new variable called var-DEV-VirtualNetworkName and assign a value of DEV-CanE-VirtualNetwork in the pipeline using the same process that we have just completed in the previous section.
We are going to use the field Override template parameters, and we are going to click on the ellipsis beside of it. A new window will show up with all the parameters defined in the file, and we can provide values. We are going to add a variable that we have just created for the virtual network name and the same variable that we used before to define the location.
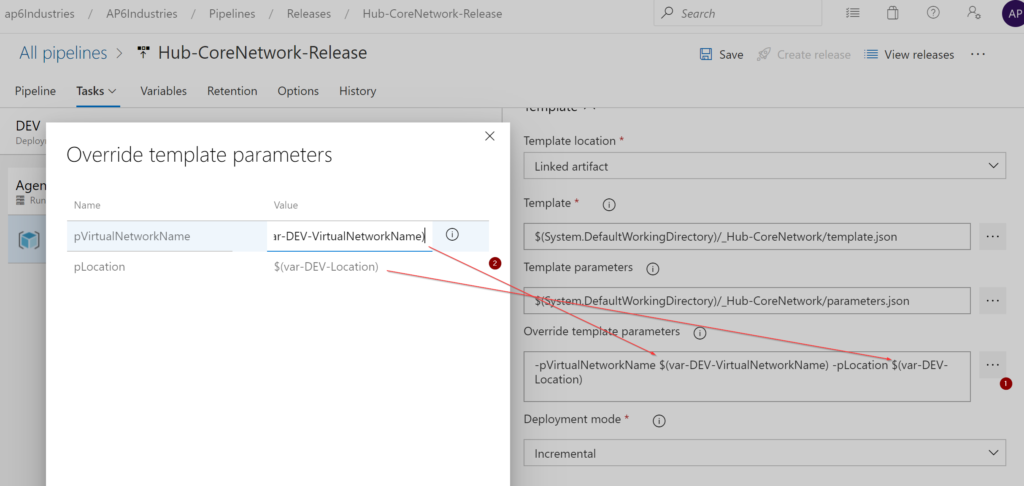
We are going to save the changes and create a new release. The results are a resource group and virtual network in the right region (Canada East), and the name of all resources is correct, and they are coming from the variables. The actual data in the parameter files are being overwritten as part of the pipeline.

When should you use variables? We should use for settings that are common in all environments, such as IP ranges, subnet information, features to be enabled, and so forth. Everything that is unique in any given environment should be managed at the pipeline level.
Azure DevOps: One more stop on our journey
At this point, we have a release pipeline that is triggered when the master branch of our repo receives an update. The virtual network name and region are defined at the pipeline instead of the predefined values of the parameters.json file. In our next article, we are going to add a second environment and check some of the advantages of using DevOps to audit changes.
Featured image: Shutterstock


