Review of NAKIVO
Homepage: click here
Free Trial: click here
By: Kevin Kaminski

We all know that backup and disaster recovery is one of those critical services every datacenter needs, no matter how large or small your environment is.
NAKIVO brings a world of simplicity to this solution space by offering easy-to-implement software for VM backup management – NAKIVO Backup & Replication. Forever-incremental backup combined with tracking of block-level changes and data transfer over storage area networks let this backup solution read and transfer data over Fiber Channel, iSCSI, or Ethernet directly to and from SAN devices.
For off-premise storage, major cloud platforms can be used in addition to local repositories or NAS-built VM backup appliances.
By the end of my testing, I was delighted by how easy NAKIVO Backup & Replication was to implement and configure, and will probably use this product more with my own clients.
NAKIVO Virtual Appliance Core Features
NAKIVO provides a complete VMware, Hyper-V, and AWS EC2 backup and replication solution that can run on Windows, Linux, and NAS. According to their website, they offer “relentless customer satisfaction” and competitive pricing, and while I didn’t have the opportunity to experience their customer support, NAKIVO certainly packs tremendous value into their product.
The primary functions of NAKIVO Backup & Replication are centered around virtual machine backups. For IT managers and IT professionals struggling to identify viable backup solutions for small and large environments or improve their existing ones, NAKIVO Backup & Replication is worth considering.
There are features I would expect from any VM backup solution (e.g., global data deduplication) and then there are some features that are unique to NAKIVO Backup & Replication that make this product truly stand out.
The solution is ideal for multi-tenant environments and flexible enough for service providers to consider using it when hosting multi-customer environments or segregated business units. To make it even more multi-tenant friendly or offload some of the operational work to different IT teams, a self-service portal can be provisioned to make accessing the VM backup service easier for different customers or roles.
One of the most useful features that could influence my own workflow is the ability of NAKIVO Backup & Replication to automate VM backup verification, a monotonous task that I am eager to relinquish manual control of.
As you can imagine, my curiosity was piqued and I set out to put NAKIVO’s “Deploy in 1 minute” claim to the test.
Installation
The product is available as a VMware Virtual Appliance, Windows Installer, Linux Installer and Amazon Machine Image for AWS EC2, or it can run natively on a number of supported NAS devices produced by:
- QNAP
- Synology
- ASUSTOR
- Western Digital
Simply identify the implementation that works in your environment and download the installation files from the NAKIVO website. For this review, I focused on the VMware Virtual Appliance.
NAKIVO is currently offering a Free Trial so that you can kick the tires and experience their product in action.
The full Virtual Appliance is rather slim, at just over half a gigabyte in size.
Once you have downloaded the appropriate files, you can start the installation process by importing the Virtual Appliance. Importing is a snap! Just connect to the console of NAKIVO Backup & Replication and enter the required networking properties as you are prompted throughout the process.
Once the virtual appliance is on the network, there is a simple menu (see Figure 1) to confirm the network settings along with some other high-level configuration options.

For my test lab, I used the default hostname and network settings and only changed my timezone setting. Once the configuration was complete, I connected to the management console of NAKIVO Backup & Replication using the IP address of the virtual appliance in my browser. I had to use the IP address because my lab’s DNS does not automatically register devices that aren’t joined to the domain.
The first step is simple: register the ESXi host.
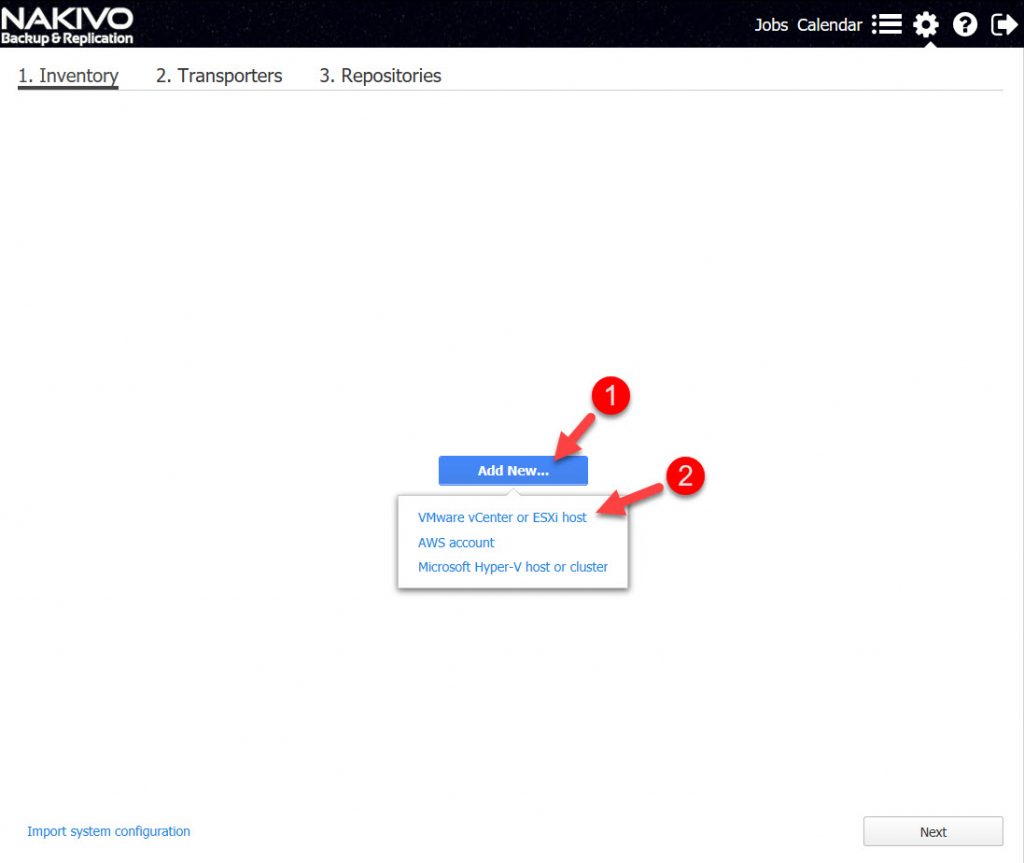
First, you need to access the product Settings for your appliance. The “Inventory” menu is automatically displayed when you connect to the appliance (see Figure 2).
Next, click the “Add New…” button in the middle of the screen and select “VMware vCenter or ESXi host”.
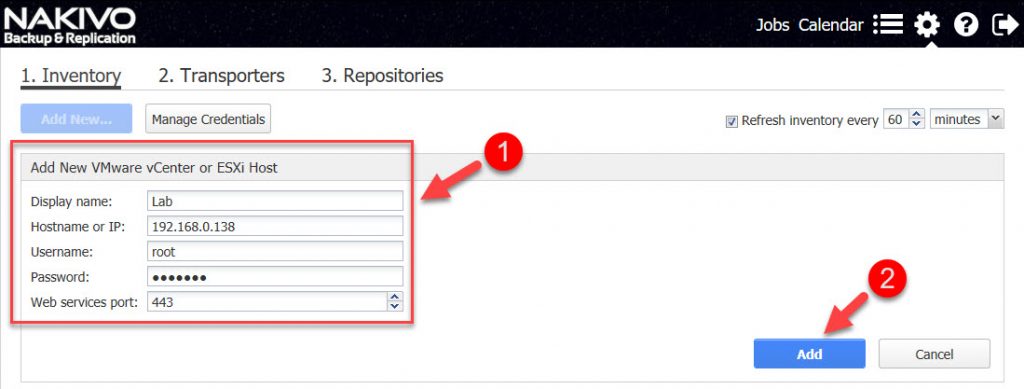
On the next screen (see Figure 3), enter the details of the server and the security credentials that NAKIVO Backup & replication will use to connect to it (1), then click the “Add” button (2).
Once the ESXi host is registered and configured, click the “Next” button at the bottom of the screen (see Figure 4).

On the next screen (see Figure 5), you are given the opportunity to install the various Transporters that you’ll need.
Transporters are the services that perform the backup, recovery and replication jobs. For example, if I wanted to add an AWS Transporter or Hyper-V Transporter, I would do so at this point.
However, since I’m only running a simple lab, I only need the default Transporter that was installed as part of the setup process.
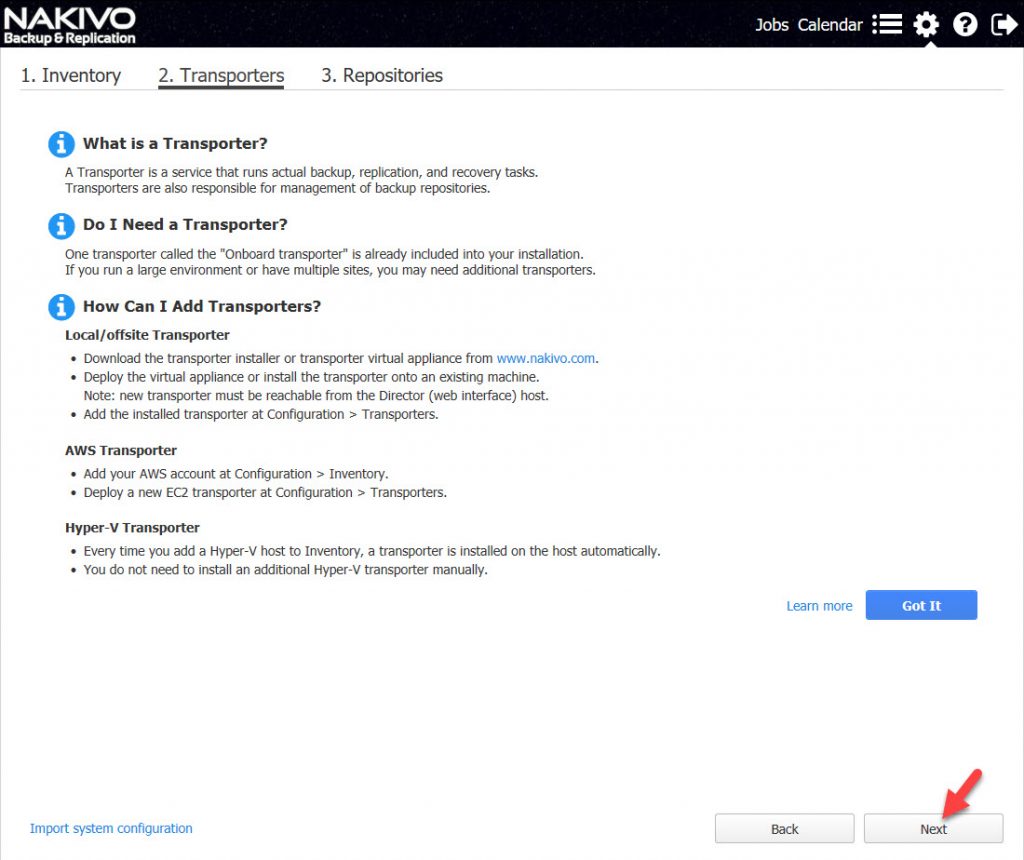
Click the “Next” button to continue.
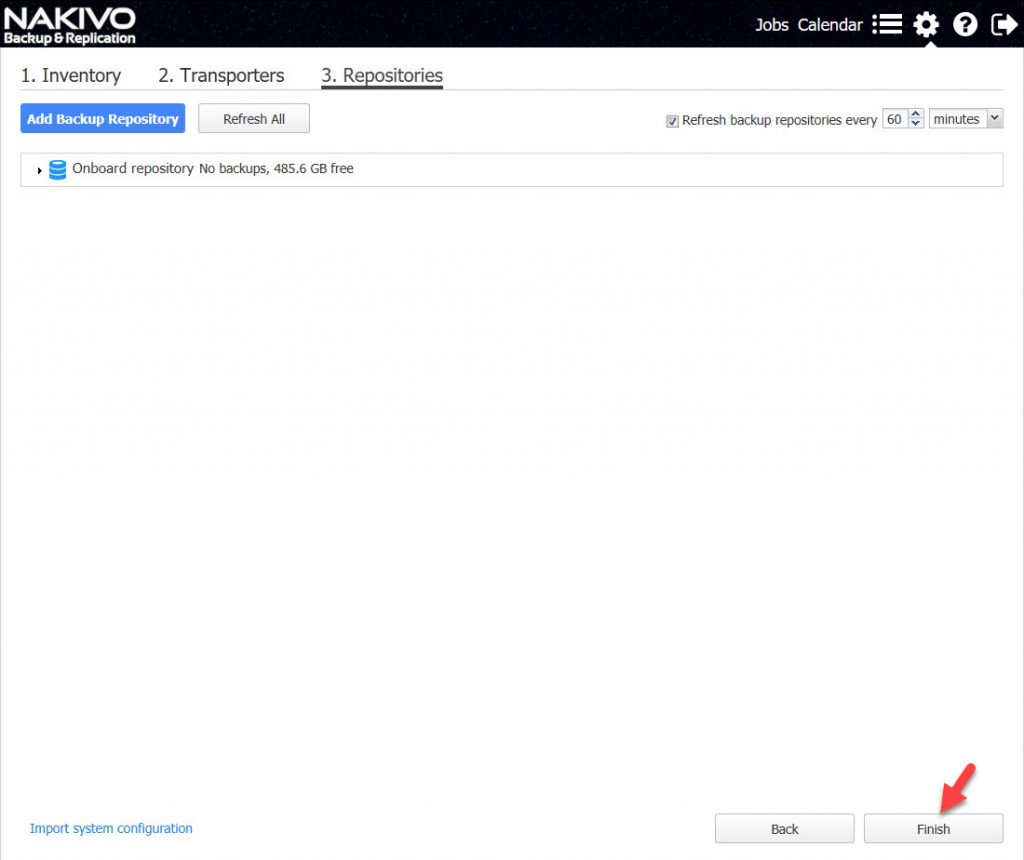
On the final screen (see Figure 6), you can manage the Repositories that NAKIVO Backup & replication uses to back up your data. In my case, I used my local disk.
Click the “Finish” button at the bottom of the screen.
The whole process was incredibly simple to walk through and took just a few minutes to complete. I’ll be honest, I forgot to time it, but it didn’t take much longer than in the video posted by NAKIVO.
Virtual Machine Backup
The backup repositories supported are genuinely flexible, with options ranging from storage directly attached to the NAKIVO appliance to remote CIFS or NFS shares. In addition to backup repositories on the Local Area Network (i.e., an on-premises implementation), NAKIVO Backup & Replication makes it possible to deploy a backup repository to Azure or Amazon EC2, which gives IT staff the flexibility to store VM backup data offsite with minimal effort and planning.
Each backup repository can have different encryption passwords, data compression schemes, and data deduplication settings. The deduplication is repository-wide, which ensures that you achieve the maximum storage savings.
It is important to understand that data compression is one of the biggest factors that affect the speed of backup and recovery. For off-premises backup repositories in the cloud, it is especially important to consider compression from the onset, because data uploading is free, but data downloading for restore is a different matter.
For those companies that move forward with cloud-based repositories, I would recommend opting for higher compression, so that less data is transmitted via the Internet. This is because data egress charges from the cloud can quickly add up, especially when large or frequent restores are needed.
In addition to standard image-based VM backups, incremental backups on VMware are made at the block-level, thus, further accelerating the backup process by transferring only the changed blocks to the backup repository.
Depending on the resources available and the type of data being backed up, overall performance can be tweaked by selecting different levels of compression. If your priority is to reduce the amount of storage space consumed by the backup, then set the compression for the job to high. If you are backing up encrypted data (which does not benefit from compression) or your priority is to improve the speed of the backup rather than reduce the size of the backup, then compression would either not be used or set to low.
If you are looking for a high-performance solution that resides on a dedicated hardware appliance, NAKIVO Backup & Replication can run locally on a number of NAS devices. As mentioned above, the product supports ASUSTOR, Synology, QNAP, and Western Digital devices.
For those IT managers who are responsible for larger, more complex IT environments, NAKIVO’s backup solution is scalable and can support enterprise-scale networks. There are customers using it to support over 7,000 virtual machines in more than 200 locations. The product can scale vertically by adding more resources to a single instance or horizontally by including more instances in your infrastructure in a single or multiple locations.
NAKIVO anticipated having to transport large amounts of data for their solution to scale properly, so they incorporated a network acceleration feature that reduces network traffic by 50%. This technology optimizes results in less-than-ideal network conditions and is a great asset when backing up VMs to the cloud or over a WAN link.
If you happen to have a dedicated storage area network, then the product’s ability to hot add SAN can come in handy when you need to expand your storage to include NAKIVO Backup & Replication.
To further reduce the amount of data stored in each VM backup, NAKIVO implemented a feature that allows you to skip swap files and partitions, because this data serves no purpose when restoring a virtual machine from an offline state.
This feature alone cuts several gigabytes of unnecessary data from every VM backup.
All of the above is moot if your VM backups aren’t being scheduled and managed correctly. I’ve been in a few situations where project work and IT operations failed to coordinate and servers weren’t backed up periodically, despite many of the staff assuming they were. With Automated VM Protection, you can configure resource pools, folders, hosts, and clusters to automatically add themselves to VM backup jobs and eliminate those missteps.
The final piece of the VM backup process normally involves manually verifying backups to ensure that they are usable. It should come as no surprise that NAKIVO Backup & Replication has a built-in verification mechanism to ensure the consistency of a VM backup. It boots up a test instance of the backed up virtual machine, then takes a screenshot of the running VM as proof. Once the verification procedure is complete, the product recycles the test VM.
A report is then emailed to the IT manager with documented proof of the VM backup verification for auditing purposes, without burdening the staff with this monotonous process.
That is a serious boon for resource-strapped IT departments.
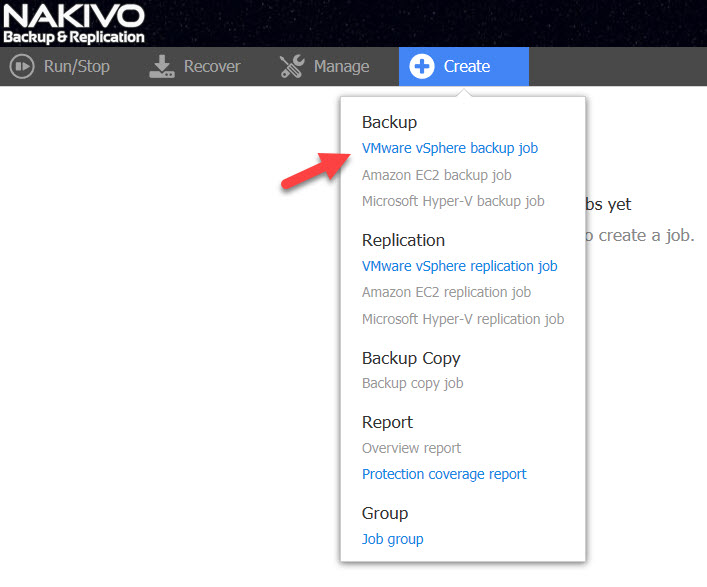
To create a backup job, you need to access the job management screen. Click the “Jobs” link in the top menu bar (see Figure 7).
Next, click the “Create” button in the Jobs sub-menu (see Figure 7).

In my example, I set up a new backup job by selecting “VMware vSphere backup job” under the Backup heading.
Next, select which host(s) you want NAKIVO Backup & Replication to back up by checking the box (1) beside each host you need included (see Figure 9).
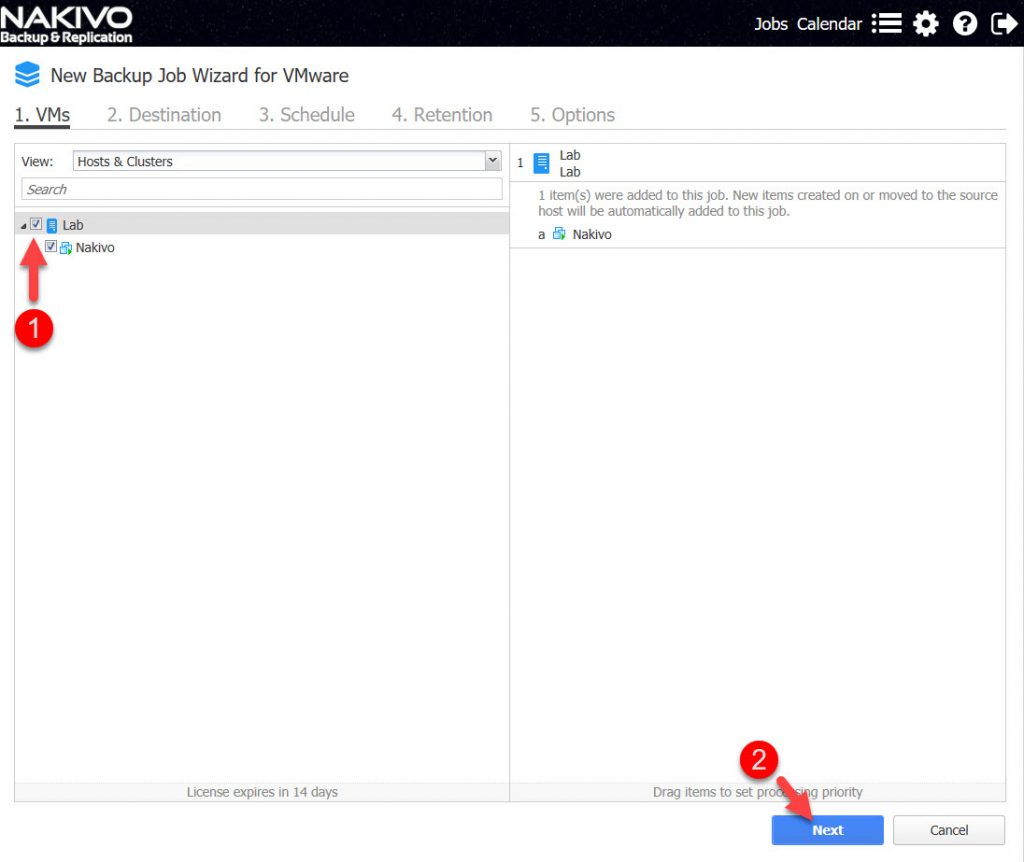
For my test, I selected “Lab”, which means that NAKIVO Backup & Replication will back up all VMs on that host.
When you have selected your host(s), click the “Next” button.
On the Destination management screen (see Figure 10), select which Repository NAKIVO Backup & Replication will use to store the backup job.

For my test, I used the default “Onboard repository”. When you have finished selecting your Repository, click the “Next” button.
On the next screen, the backup job Schedule is configured (see Figure 11).
Although I simply used the default schedule, NAKIVO Backup & Replication makes it easy to add multiple schedules to a backup job if need be.
With the schedule configured, proceed to the backup job Retention settings by clicking the “Next” button.

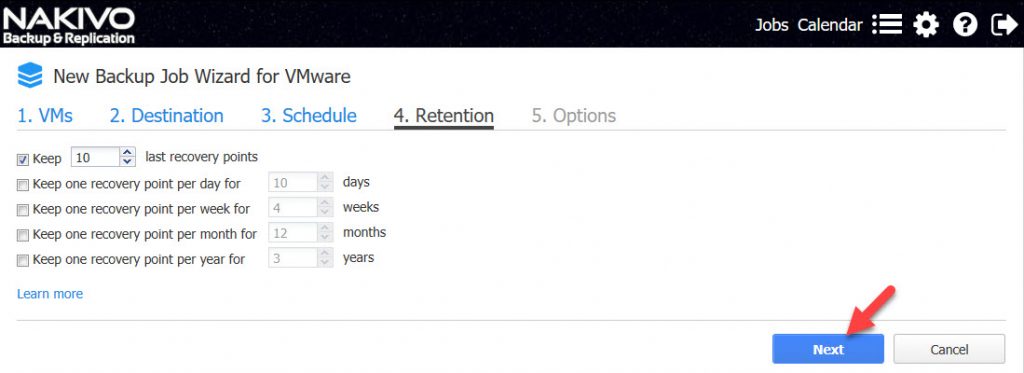
Before activating the backup job, you need to define the recovery point retention settings.
Note. It is important to understand that each backup job has a limit of 30 recovery points per virtual machine.
So, when configuring a backup job’s Retention, don’t get carried away.
Keep track of how many recovery points your backup job uses in a day and how many you want retained during a period of time.
I used the defaults for my test.
When you have defined your recovery points, click the “Next” button.
On the final screen, you can configure the backup job name, along with other advanced properties of the job (see Figure 13).
I expanded the advanced options, which exposed additional settings for SQL and Exchange along with specific data transfer specific settings for the job.
Since my example is a simple backup job, I clicked the “Finish & Run” button to save and execute my job.

Before NAKIVO Backup & Replication runs the job, you are presented with a confirmation prompt (see Figure 14). Click the “Run” button to finally run your backup job.

As soon as the job is saved and executed, you are presented with a backup job dashboard (see Figure 15) where you can review the current activity of NAKIVO Backup & Replication and your backup job.
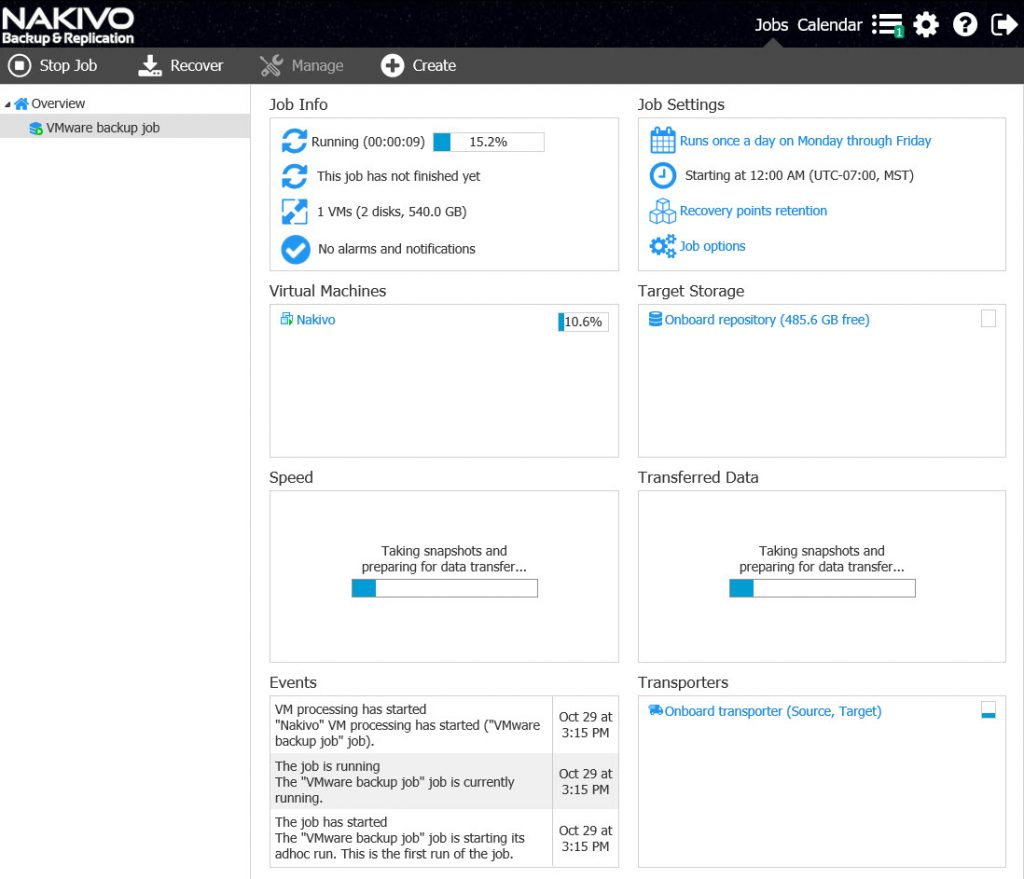
As you can see, the configuration of my backup job was easy and straightforward to implement.
VM Replication
NAKIVO Backup & Replication goes beyond basic VM backups. Virtual machine replication is a service that enterprise-scale customers require from their data protection solutions. When an outage occurs with a critical system, the focus is to get the necessary virtual machines online as fast as possible. Virtual machines can be restored from backups, but VM replication provides cold standby copies of your virtual machines, which can be powered on at any given time.
With VMware, not all implementations of vSphere are licensed for VMware vSphere Replication. Thus, if you’re an IT manager looking for a cheaper alternative to VMware vSphere Replication, you’ll be happy to learn that NAKIVO Backup & Replication comes with its own VM replication feature that creates replicas of your virtual machines and maintains them in an offline state.
In the event that you need to fail over to a VM replica, simply power on the virtual machine(s) that are affected, and they will boot up as if very little had gone wrong.
In addition to VM replication, each VM backup can have up to 30 recovery points, so you can more precisely select the state of the virtual machine you bring back into operation.
Special Workloads
NAKIVO Backup & Replication is able to handle backup workloads that need special attention, such as Active Directory, SQL, and Microsoft Exchange. With these workloads, you have control over what is restored at an object level, which I believe is the preferred approach in a production environment.
For example, a production Active Directory environment integrates thousands of changes per minute from many different sources, and this often produces unexpected results when restoring complete applications. In practice, I’ve found that I’m more interested in specific application objects that may have been deleted accidentally, such as specific users or groups.
For Exchange and SQL backups, NAKIVO Backup & Replication can also truncate transaction logs at the end of the backup process to keep them from bloating. Up until now, transaction log files were notorious for containing entries from previous backups, because they didn’t automatically drop old entries, relying instead on the backup mechanism to perform log truncation.
The great thing about NAKIVO Backup & Replication is that it carries out all of this advanced functionality (and more) in Active Directory, Exchange, and SQL, without the need for agents within the virtual machine.
Automation
One feature that surprised me was the adoption of HTTP APIs, which can be especially handy when you are using external software to serve as a datacenter orchestration solution. Different products have different ways of exposing automation interfaces to automation products, and NAKIVO decided to expose their product APIs in a universally accessible manner – through web requests.
I believe this approach opens up their product to be more accessible to datacenter orchestration solutions, because special management packs or convoluted solutions should not be required, regardless of the product performing the datacenter orchestration.
The APIs cover a number of common operations that IT staff are typically tasked with:
- Backup
- Recovery
- Health Checks
- Job creation
- Replication
- Deletion of old backups
- Report generation
As more and more customers begin to demand support for VM backup automation to reduce operational costs and minimize human error, I expect other vendors will follow NAKIVO’s lead and rollout API-level access in their products, especially those aimed at managing different aspects of a datacenter.
Licensing
NAKIVO offers licensing models that work with traditional customers and service providers who wish to offer VM backup as a service, meaning that their product has a use case for both traditional datacenter environments and modern customers looking to offload disaster recovery to an external service provider.
Service providers gain additional flexibility by using a dynamic pool of licenses that can be re-assigned between customers, making the licensing flexible, based on the customer’s consumption needs.
The Verdict
NAKIVO Backup & Replication is a full-featured solution that scales well to meet the demands of your business. Although I was primarily interested in the VMware aspects of the product, I was thoroughly impressed by the ability of NAKIVO Backup & Replication to support other major hypervisors and architectures.
The solution is a breeze to install and it quickly starts saving you time and bandwidth – not to mention, it can be set up in just a few minutes.
From my perspective, NAKIVO has done an excellent job of designing and building their backup solution so that it’s able to integrate into future scenarios that may include divesting portions of your virtual machine infrastructure, acquiring new virtual machines, or adding/removing customers in a multi-tenant environment.
Backup repositories can be moved to different appliances supported by the product, which ensures that you don’t have to start from scratch when business requirements change.
I give NAKIVO Backup and Replication a 4.9/5, which qualifies it for a TechGenix.com Gold Award.
I’d love to hear your experiences using NAKIVO Backup & Replication, so please leave a comment below.
TechGenix.com Rating 4.9/5

Learn more about NAKIVO or download a free trial.


Good evaluation of this product. It clearly scales up for enterprises, but as a smaller company, we are using the free version of Nakivo to back up our 2 most important VMs running under ESXi 6. The straightforward administrative interface hides the power and sophistication of the underlying product, but the bottom line is — Nakivo is easy to install and set up, has advanced features to manage and schedule backups (including job chaining), and just works when it is time to recover a VM. Backups after the first full backup run rapidly and take little additional space, and Nakivo’s deduplication is effective. Add to that, Nakivo Tech Support responds fast (even to us free version users) and helps solve the problem.
We know we will outgrow the Nakivo free version. We won’t mind paying for it when that happens.