Most of us who have worked with computers for any length of time have probably been conditioned to think of a drive as a letter that has been mapped to a physical or logical storage device. In PowerShell, however, the concept of a drive is a little bit different from what you might expect. While you can certainly access your C: drive and mapped network drives through PowerShell, you can do other things as well. In addition to supporting file system drives, PowerShell also supports the use of registry drives and even certificate drives. Let’s take a look at how this works.
The Windows operating system has always performed some default drive mappings. The C: drive, for example, is usually the machine’s primary hard drive. In most cases though, C: isn’t going to be the only drive that is seen by PowerShell. If you enter the Get-PSDrive cmdlet, you will see PowerShell’s current drive mappings as shown in the figure below.
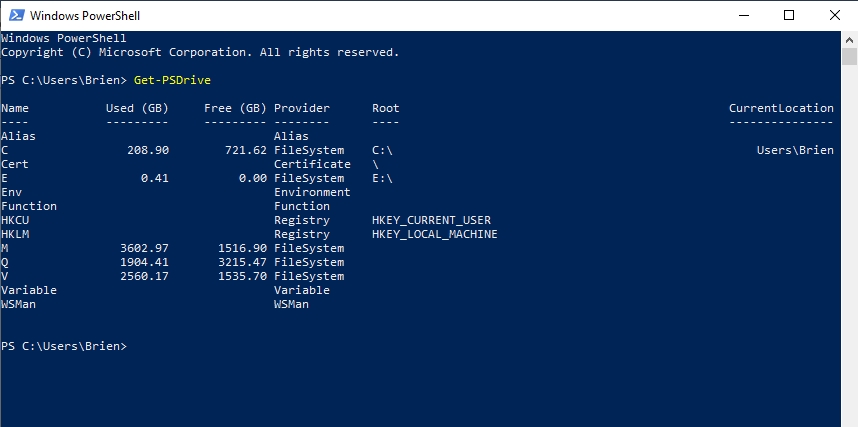
As you look at the screenshot above, you can see that PowerShell lists some traditional file-system drive mappings, but there are several other things that are also listed including certificate and registry. So how can you access these locations?
As I am sure you probably know, PowerShell allows you to switch between file system drives by simply entering the drive letter followed by a colon. For example, you would enter C: to switch to the C: drive. This functionality is a leftover from the days of DOS. However, Microsoft does not allow this same method to be used for navigating other types of drives. You cannot, for example, enter HKLM: to go to the HKEY_LOCAL_MACHINE portion of the registry.
Navigating drives with PowerShell: Odd, but useful
I will be the first to admit that the methods used to navigate the registry and other drives through PowerShell is a bit odd. Registry navigation is based around the CD command. CD is another old DOS command. Back in the day, CD was short for Change Directory. If for example, you were currently at the root of C: and you wanted to navigate to C:\Temp, you would enter CD Temp.
The thing about the CD command is that using it typically required you to already be in the drive in which the desired destination resided. If for example you were in the root of C: and wanted to switch to D:\Data, you could not just type CD Data, because the Data folder resided on a different drive. Even so, this is exactly how Microsoft enables registry navigation through PowerShell. You can navigate the registry with the CD command without first switching over to the registry by using something like HKLM: If you want to go to HKEY_LOCAL_MACHINE then just type CD HKLM:
Once you have arrived at HKLM, you can use other standard DOS or PowerShell commands to navigate the registry in exactly the same way that you would navigate a file system. In the days of DOS, for example, the DIR command was used to list the files within the current folder. In PowerShell uses the Get-ChildItem cmdlet to do the same thing. Both of these commands can be used to list registry contents. It is worth noting, however, that PowerShell will display an error if there are sections of the registry that it does not have access to. You can see an example of this in the figure below.

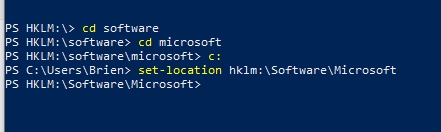
Because PowerShell does allow you to use the CD command to navigate the registry and other drive types, you could access a specific registry location using a series of CD commands. If for example, you wanted to access HKLM\Software\Microsoft then you could type these commands:
Cd hklm:
Cd software
Cd Microsoft
The disadvantage to using this method is that if you have to get to a location deep within the registry the process can be tedious. As an alternative, you can use PowerShell’s Location cmdlets to shortcut the navigation process. To show you what I mean, let’s revisit the previous example in which we need to access HKLM\Software\Microsoft. Rather than using a series of CD commands, we could do something like this instead:
Set-Location hklm:\Software\Microsoft
You can see an example of both the CD method and the Set location method in the next figure.
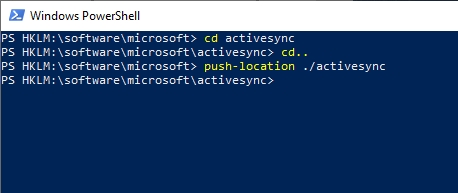
So let’s suppose that I am at HKLM:\Software\Microsoft and I want to get to HKLM:\Software\Microsoft\ActiveSync. In all honesty, the easiest thing to do would probably be to type CD ActiveSync. Doing so is certainly a viable option. If you want to stick to using Location commands, however, you could instead use a command like this:
Push-Location .\ActiveSync
If you look at the screenshot below, you can see that I first used the CD command to access the ActiveSync folder. I then used CD .. to drop back down a level in the hierarchy and return to HKLM:\Software\Microsoft. From there, I used the Push-Location cmdlet to access the ActiveSync container.
Navigate any PowerShell drive
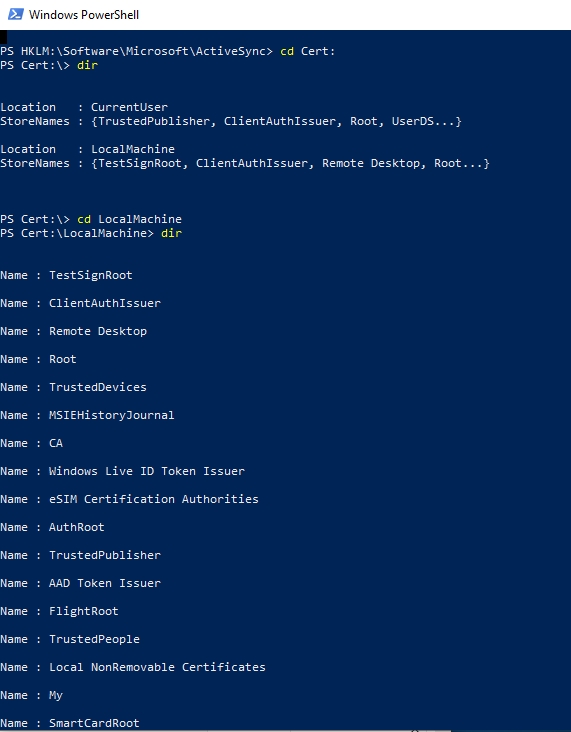
Throughout this article, I have used the Windows registry to demonstrate PowerShell’s ability to navigate nontraditional drives. As I mentioned early on however, the registry is not the only drive type exposed through PowerShell. You can use similar techniques to navigate any PowerShell drive type. If for example, you wanted to access the Windows certificate store, you could do so by typing CD Cert:
It is also important to keep in mind that the file system, registry, and certificate store are not the only resources that PowerShell exposes as drives. If you look back at the first screenshot, you can see that Windows also treats aliases, environment variables, functions, WSMan, and variables as drives. It is definitely worth taking some time to explore these drives. You might be surprised by what you can find.
Featured image: Pixabay


Your post and all the others I’ve found so far, fail to tell me how to change to a network drive directly, so so far I’m a little befuddled!
If I map a network drive and use the regular CMD prompt I can change drives amongst different network drives at will, but using PowerShell I can not. If I use GET-PSDrive command the drives are not visible. Why not? And why can’t you provide a solution or method so they do appear?