Starting with Windows Server 2016, Microsoft made it possible to enable nested virtualization for Hyper-V. This meant that it was possible to run Hyper-V inside of a virtual machine. Initially, nested virtualization could only be enabled through Windows PowerShell, but starting with build 1801, Microsoft added nested virtualization support to System Center Virtual Machine Manager. In this article, I will show you how it works.
Before you begin
Before I get started, I need to point out that this article assumes that you have a few things already in place. Here is what you will need:
- A Hyper-V host that is running Windows Server 2016 or higher. This VM should ideally be running the Datacenter edition of Windows Server.
- A Hyper-V VM that is of configuration version 8.0 or higher, and running Windows Server 2016 or higher as the guest OS
- System Center Virtual Machine Manager 1801 or higher
- An Intel CPU with VT-X and EPT enabled
Although not an absolute requirement, I strongly recommend allocating plenty of memory and CPU resources to the VM. Remember, this VM will act as a Hyper-V host and will, therefore, need sufficient resources to allow it to host virtual machines. It’s also a good idea to attach a second virtual hard disk to the VM. You can use this second disk to store the virtual machines. For this article, I am creating a VM with 128GB of RAM and eight virtual processors. You can see my VM’s configuration in the screenshot below.
 Enabling nested virtualization
Once you have created the necessary virtual machine, the next thing that you will need to do is to shut it down. You won’t be able to complete the remaining steps if the VM is running.
Open the Virtual Machine Manager console, and then locate the virtual machine that you want to turn into a nested virtualization host. Select the VM, and then click on the Properties button found on the console’s toolbar. This will cause the virtual machine’s properties sheet to open.
Now, make sure that the properties sheet’s General tab is selected, and then select the Enable Nested Virtualization checkbox, which you can see in the figure below. Click OK to complete the process.

Preparing the Windows firewall
Technically, nested virtualization is now enabled, but there are still some things that you have to do before you can host any virtual machines inside of the VM that you have created. For example, you may need to join the VM to a domain or enable a local VMM agent. You will also need to configure some firewall rules.
To get started, boot the virtual machine and then log into the guest operating system. Once you have logged in, open the server’s Control Panel and then click on System and Security, followed by Windows Firewall. Now, click on Advanced Settings, followed by Inbound Rules.
You will need to enable the following inbound rules:
- File and Printer Sharing
- Windows Remote Management (HTTP in)
- Windows Management Instrumentation
You will also need to enable these outbound rules:
- File and Printer Sharing
- Windows Management Instrumentation (WMI-Out)
To enable a rule, just double-click on the rule, and then select the Enable checkbox, and then click OK. Keep in mind that the rules listed above are general descriptions rather than literal rule names. File and Printer Sharing, for instance, represents roughly about a dozen individual rules related to file and printer sharing.
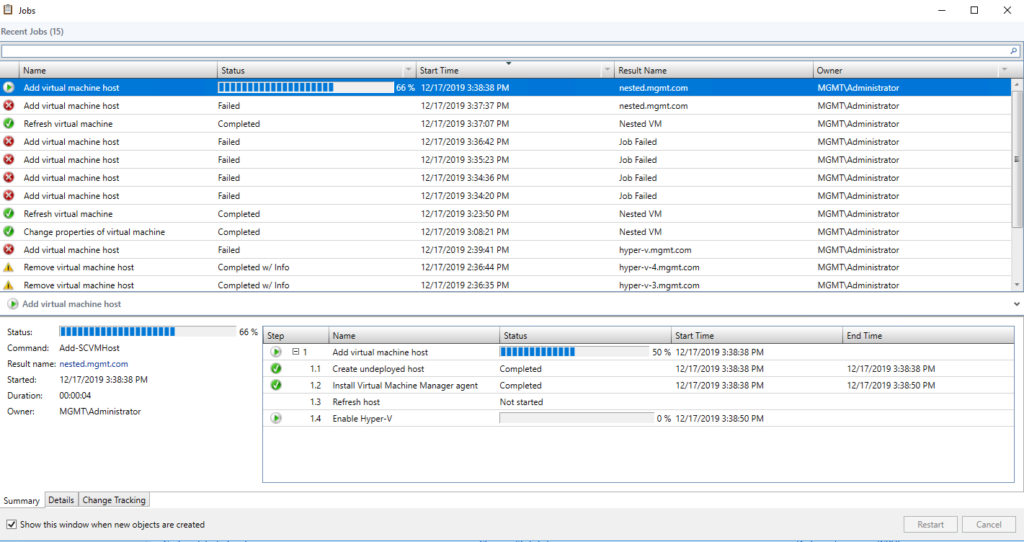
The next thing that you will need to do is to configure the VM as a host. To do so, go back to the Virtualization Manager console, right-click on the VM, and choose the Configure as Host command from the shortcut menu. This will cause VMM to launch the Add Resource Wizard. This is the same wizard that is used to add a Hyper-V server to the VMM console. So far we haven’t installed Hyper-V, but if you look at the last step (step 1.4) in the Jobs window shown below, you can see that VMM installs Hyper-V as a part of the process.
Once this process is complete, your nested Hyper-V server is ready to use. If you look at the figure below, you can see Hyper-V running inside of a Hyper-V VM.

Troubleshooting
It is worth noting that I created the screen capture shown above purely as a way of demonstrating that a Hyper-V VM was running inside of another Hyper-V VM. Although I based the screen capture on the Hyper-V Manager, I strongly recommend that you only use the Virtual Machine Manager console for managing your virtual machines. The reason for this is that I have seen situations in which the Virtual Machine Manager console gets confused if you make virtual machine modifications through the Hyper-V Manager. Most of the time, refreshing the display or refreshing the virtual machine inventory will correct the problem, but not always. Sticking to a single management tool will help you to minimize the issues that you encounter with your virtual machines.
The issue that I have encountered most often concerning the use of multiple management tools is that of VMs created with Hyper-V Manager not showing up in the Virtual Machine Management console, even after the virtual machine inventory is refreshed. The easiest way to fix this problem is to right-click on the host and choose the Remove command. This removes it from the host group. You can then go back and re-add the host. Just be sure to select the checkbox to reassociate the host with the VMM environment.
Nested virtualization: Easy if you remember the prerequisites
As you can see, it is relatively easy to configure nested virtualization within System Center Virtual Machine Manager. Before you enable nested virtualization in your production environment however, it is important to think about issues such as virtual host management, backups, and high availability. All of the same issues that apply to managing your physical Hyper-V hosts also apply to virtual hosts.
Featured image: Shutterstock


