One of the subjects that Microsoft took the time to discuss during one of the keynotes at the recent Ignite conference was nested virtual machines in Microsoft Azure. This capability means that it is now possible to run Hyper-V and a series of Hyper-V virtual machines inside of an Azure virtual machine. In this article, I will show you how nested virtualization in Microsoft Azure is done.
The first step in the process is to log into the Azure portal, go to the Virtual Machines blade, and then click on the Add icon. Doing so will bring up a screen that asks you to choose the type of virtual machine that you want to create. Your choices range from Windows Server to Linux, with a wide variety of other options available. For the purposes of this article, I am going with the Windows Server 2016 Datacenter Edition option. After making your selection, choose a resource model, and click Create.
The next screen that you will see asks you to enter some basic information for the VM. Here you will need to enter things such as your preferred username and password and specify whether or not you already have a Windows Server license.
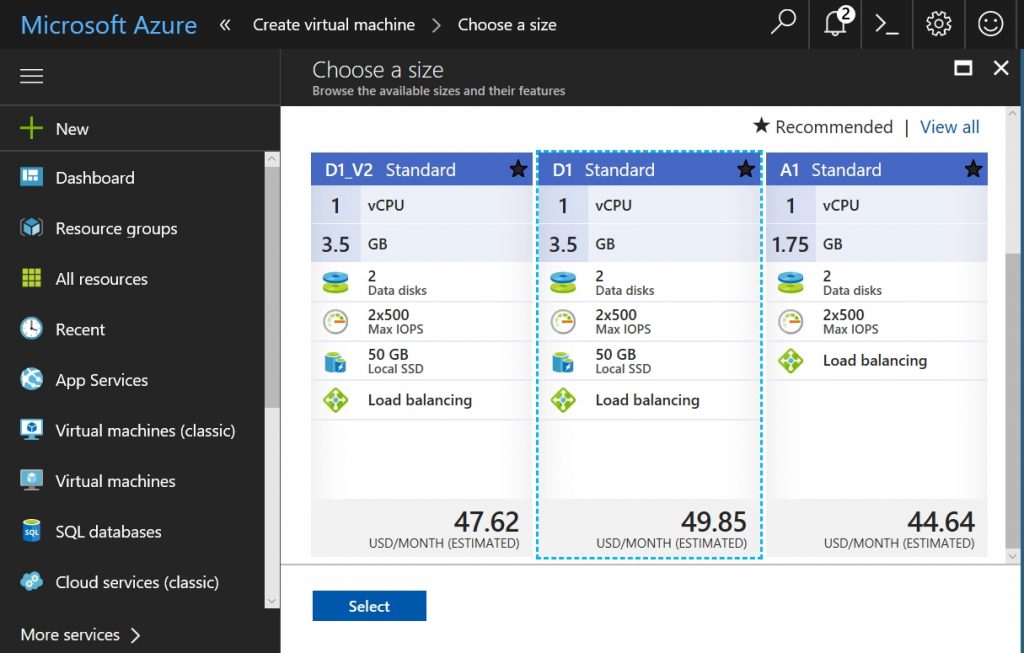
The next screen that you will see asks you to choose the virtual machine type that you want to use, as seen below. You will need to make sure that the Azure VM type that you select has a sufficient amount of memory and virtual hard disk space to accommodate your VMs. Azure VMs that will act as Hyper-V hosts typically also need multiple virtual processors. Because there is a cost associated with each VM, however, you will want to balance your hardware requirements with the estimated monthly cost of running the VM. While all of these factors should definitely be considered, it is also important to note that right now Microsoft only supports virtual machine nesting on D class and E class virtual machines. Furthermore, these virtual machines must be version 3. For this article, for example, I used a D4S_V3 virtual machine. The fact that this number starts with a D means that this is a D class VM, and the _V3 portion of the name indicates that this is a version 3 virtual machine.
After making your selection, click Select. The next screen that you will see asks you a few more basic questions about your VM requirements. For example, you will be asked if the VM requires high availability or any extensions. For those who might not be all that familiar with building Azure VMs, extensions generally refer to add-on software that can be installed into a VM.
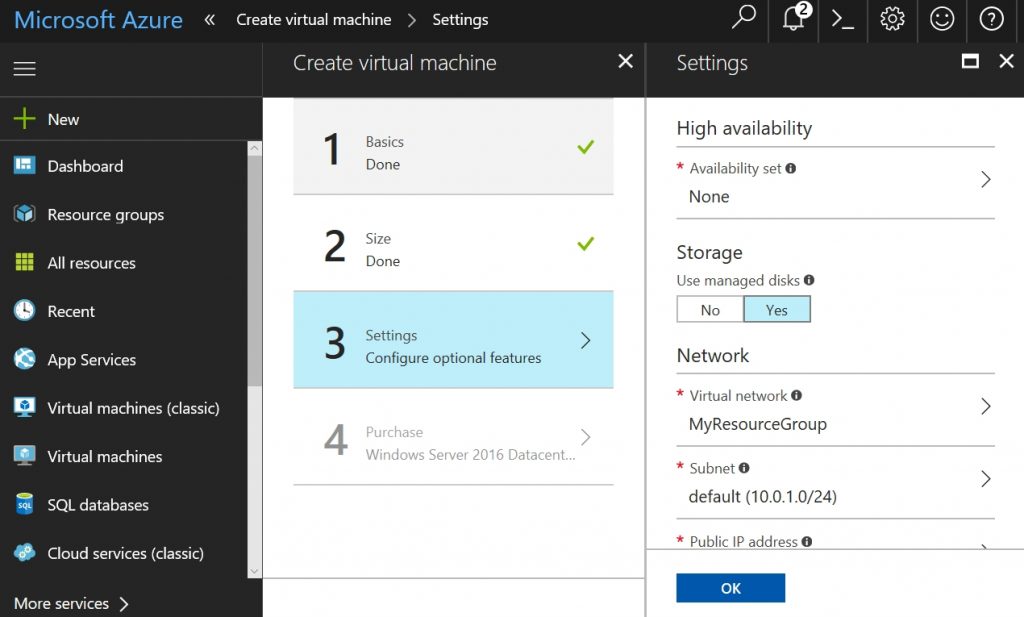
Click OK, and you will be taken to a screen that allows you to review your selected options, as well as the hourly cost for running the VM. Take a moment to make sure that everything appears to be correct, and then click OK to create the VM.
It takes a few minutes to create the virtual machine, but once the VM has been fully provisioned, you can click the Connect button to open a Remote Desktop Protocol session and log in to the VM.
One thing that tends to trip up those who are new to Azure is that the RDP window will ask for a password to access the VM. If you enter the password that you specified when you created the VM, you will probably get an Access Denied message. The reason why this happens is because the RDP session attempts to use the account name that you used when you logged into the Azure console, rather than using the username that you assigned to the Azure VM. In my case, for example, the RDP session attempts to log me into the VM using my Microsoft account, rather than the account that I assigned to the virtual machine. The fix is to simply tell RDP that you wish to use a different account, and then use the account that you specified when you created the virtual machine.
Setting up nested virtualization in Microsoft Azure
Once you have logged into the VM, it is time to begin setting up nested virtualization in Microsoft Azure. There is quite a bit of contradictory information on the Internet regarding how this can be accomplished. Some sites incorrectly report that it is necessary to use PowerShell to enable nested virtualization. This step is required for an on-premises deployment but is not required for nested virtualization in Microsoft Azure. Even Microsoft reports the need for using a complex script. I am assuming that this requirement was valid at one time, but the script is no longer required.
I’m sure that you will be happy to know that once you have a version 3 D or E class Azure VM up and running, you do not have to do anything to enable nested virtualization in Microsoft Azure. It’s already enabled. All you have to do is to open Server Manager and install the Hyper-V role. Once Hyper-V is installed, reboot the Azure VM and start creating virtual machines within Hyper-V.
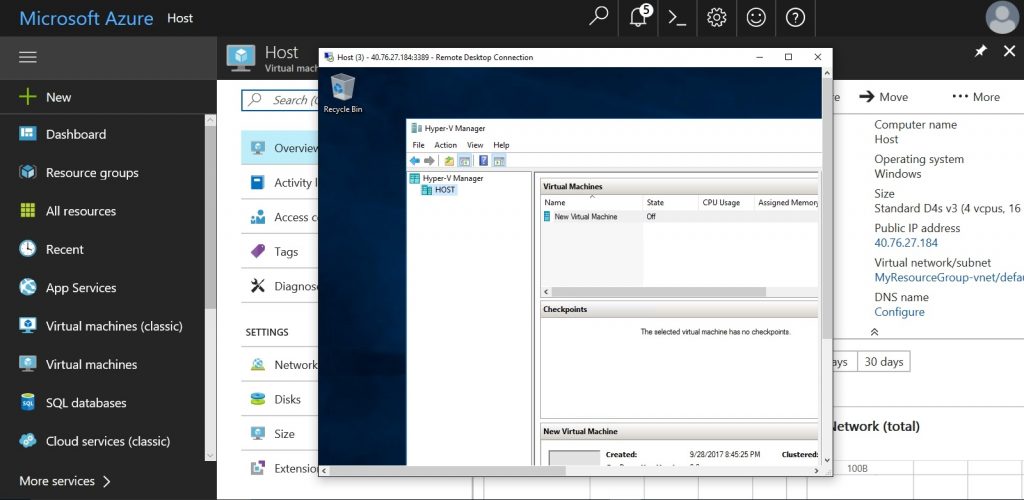
You can see what the whole thing looks like in the figure below. The Azure console reports that the VM’s IP address is 40.76.27.184. If you look at the RDP window, you can see that this is the same address that the RDP session is connected to. Within the RDP window, you will see that Hyper-V Manager is open and that I have created a Hyper-V virtual machine on top of an Azure virtual machine.
Potential game changer
There are lots of use cases for running nested virtualization in Microsoft Azure. I applaud Microsoft for making it so easy to begin taking advantage of nested virtualization within the Microsoft cloud. The ease of doing so has the potential to be a game changer for those who like the idea of using the public cloud, but who require the granular management capabilities of an on-premises environment.


Hi Brien,
My research into Azure Site Recovery (ASR) as an alternative to a Hyper-V replica DR solution suggests it is problematic. Do you think nested virtualisation may offer a feasible DR option for using the Azure Hyper-V VM host as a Hyper-V Replica target? Ideally we’d want to run a minimal spec VM as the replica, with the ability to scale up its spec in a DR situation.
I haven’t actually tried it myself, but from what I hear it can be done. The only real trick is going to be setting up a gateway to allow replication traffic to pass to Azure.