If you would like to read the other parts in this article series please go to:
- Planning deployment for Windows Server 2012 (Part 1) – Installation Options
- Planning deployment for Windows Server 2012 (Part 3) – Installing Features in an Offline VHD
- Planning deployment for Windows Server 2012 (Part 4) – Remote Management
Introduction
Windows Server 2012 includes a lot of new features and enhancements that will make migrating to this platform appealing to many organizations. Successful deployment starts with good planning, and it’s never too early to begin planning changes in your IT environment. And that’s what this series of articles is about.
Note:
This article was written using the Beta release of Windows Server 2012 and will be updated later if any changes are needed when the product reaches RTM.
Understanding Features on Demand
In the previous version Windows Server 2008 R2 you could choose between two different installation options: Full or Server Core. The Server Core installation option had a somewhat smaller footprint than the Full installation because it lacked a GUI and supported only a limited number of server roles and features. And once installed, a Server Core installation could not be converted to a Full one or vice versa, so you had to make your decision before deploying your servers. But as described in the first article of this series, beginning with Windows Server 2012 you can also switch between GUI (the new name for Full) and Server Core installations after deploying your servers by using the Uninstall-WindowsFeature PowerShell cmdlet. And now there’s a third installation option called Minimal Server Interface which is only available post-deployment using PowerShell.
A key benefit of the Server Core installation option in Windows Server 2008 R2 is that fewer installable server roles and features means fewer binaries on the server, which means less patch management (fewer applicable software updates). The same benefit applies to Windows Server 2012, but there’s a difference because with Windows Server 2012 you can now remove the binaries of any server roles and features that you don’t need to install on your server. For example, let’s say you want to deploy a dedicated DHCP server in your environment. Since the Server Core installation option supports this role, you deploy Windows Server 2012 using the Server Core option and you add the DHCP Server role to your installation together with any additional features needed on the server. Now, since you don’t ever plan on installing the DNS Server role on this server, you can completely remove the binaries for that role from the server. The same goes for the Active Directory Domain Services role, the Print And Document Services role, and so on.
What’s the advantage of removing unneeded binaries like this? Basically there are three benefits:
- Improved security – Fewer binaries means less attack surface.
- Simplified maintenance – Even if a role or feature isn’t installed, if the binaries for that role or feature are present and a software update is released that applies to those binaries, the update will need to be applied. So by removing unneeded binaries you can reduce the number of patches that your server will need over its lifetime.
- Smaller footprint – The binaries of unneeded roles and features take up space on your server’s system drive, so removing them helps reduce the footprint of your server. This can be especially helpful when you are deploying server workloads in a virtual machine environment as it can enable you to consolidate more workloads per virtualization host.
This new capability in Windows Server 2012 to completely remove the binaries of installable roles and features is known as Features on Demand. Let’s take a look now at this capability in action.
Walkthrough of using Features on Demand
The binaries for installing Windows roles and features are located in the side-by-side component store which is the C:\Windows\WinSxS folder on a computer running Windows Vista, Windows Server 2008 or later. For a good explanation of what the WinSxS folder is all about, see this post on the Ask The Core Team blog on TechNet.
Figure 1 shows the contents of the WinSxS folder on a Windows Server 2012 installation on my test network. Note that it says in the bottom left corner of the Explorer window that there are currently 12,467 items (files or folders) presently in this folder:
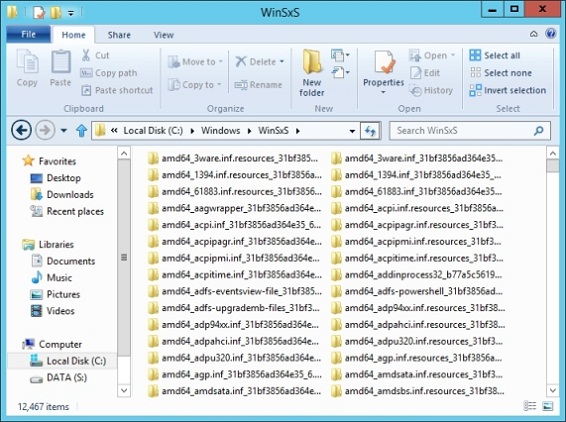
Figure 1: The WinSxS folder on this server currently has 12,467 items in it.
Let’s install the Windows Server Backup feature on this server by launching the Add Roles And Features Wizard from Server Manager:

Figure 2: Installing the Windows Server Backup feature
Now let’s switch over to Windows PowerShell for the rest of this article. Understanding PowerShell is key for being able to effectively manage servers running Windows Server 2012. That’s because Windows Server 2012 is Microsoft’s next-generation platform for cloud computing, and managing private clouds requires automation which is where PowerShell excels. For a list of all PowerShell cmdlets supported on Windows Server 2012, see this link.
We’ll begin by using the Get-WindowsFeature cmdlet to determine whether we’ve successfully installed the Windows Server Backup feature on the server. As you can see from the next screenshot, the Install State for this feature is Installed:

Figure 3: The Install State of the Windows Server Backup feature is Installed.
Now let’s use the Uninstall-WindowsFeature cmdlet to uninstall the Windows Server Backup feature from the server:

Figure 4: Uninstalling the Windows Server Backup feature.
Once we’ve rebooted the system and logged on again, running the Get-WindowsFeature cmdlet shows that the Install State for the Windows Server Backup feature has changed from Installed to Available:

Figure 5: The Install State of the Windows Server Backup feature is Available.
The Available state means that the binaries are available in case you want to install the feature. But let’s say that we don’t plan on installing the Windows Server Backup feature on this server, for example because we’re using a third-party backup solution. In that case, we can run the Uninstall-WindowsFeature cmdlet again, this time with the -Remove parameter included, which will completely remove the binaries for this feature from the component store on the server:
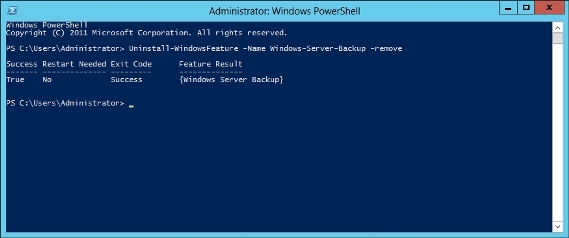
Figure 6: Removing the binaries for the Windows Server Backup feature.
Now when we run the Get-WindowsFeature cmdlet we see that the Install State for the Windows Server Backup feature is displayed as Removed:

Figure 7: The Install State of the Windows Server Backup feature is Removed.
Let’s switch back to Explorer and look at the WinSxS folder again. Note that there are now only 12,454 items in this folder, which means that 13 items have been deleted from the folder. These 13 items are the binaries for the Windows Server Backup feature, which we’ve decided will no longer be needed on this server:

Figure 8: The WinSxS folder on this server now has only 12,454 items in it
To find out what binaries were removed, you can do the following:
Before removing the binaries for the Windows Server Backup feature, open a command prompt and type dir /b C:\Windows\WinSxS> before.txt to save a list of the files in the component store.
After removing the binaries for the Windows Server Backup feature, open a command prompt and type dir /b C:\Windows\WinSxS> after.txt to save a list of the files in the component store.
Then use the fc command to compare the before and after directory listings for the WinSxS folder as shown here:

Figure 9: Using the fc command to compare the contents of the WinSxS folder before and after removing the binaries for the Windows Server Backup feature.
A rather more elegant way to compare these two directory listings is to use the Compare-Object PowerShell cmdlet as shown here:

Figure 10: Using the Compare-Object cmdlet to compare the contents of the WinSxS folder before and after removing the binaries for the Windows Server Backup feature.
That one example should be enough to motivate you to want to learn PowerShell if you haven’t begun doing so already!
Now let’s see what happens when we try to use the Install-WindowsFeature cmdlet to reinstall the Windows Server Backup feature on our server after having removed the binaries for this feature. But first, before doing this, be sure to disconnect the server from the Internet for reasons I’ll explain in a moment:
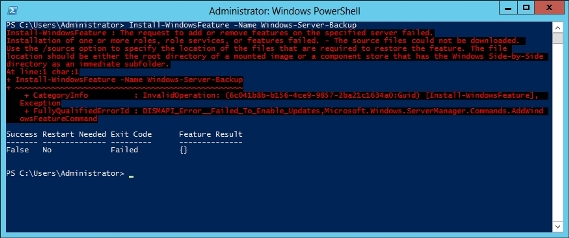
Figure 11: The binaries for installing the Windows Server Backup feature are not available.
As you can see from the above screenshot, if the binaries for a role or feature have been removed from the server AND the server is disconnected from the Internet, then any attempt to install that role or feature will fail. Why did I insist that we disconnect the server from the Internet? Because installing the role or feature will SUCCEED if Internet connectivity is available, even if the binaries for that role or feature are not locally present on the server’s component store. That’s because the Install-WindowsFeature cmdlet will download the missing binaries from Windows Update. Microsoft says you can configure your server so that it won’t try to download missing binaries from Windows Update, which of course would be a good idea as far as security goes, but as of the time of writing this article this functionality has not yet been documented (I’ll update the article when this information becomes available).
Let’s say for a moment however that your server has already been configured to not download missing binaries when the Install-WindowsFeature cmdlet is run. What if you decide later on that you actually did want to install the Windows Server Backup feature after you’ve already removed the feature’s binaries from the server’s component store? In that case you need to use the -Source parameter with your Install-WindowsFeature cmdlet to specify a Windows image file or existing Windows installation where the needed binaries are available.
For example, I could copy the Install.wim install image from the \Sources folder of my Windows Server 2012 product media to a folder on my server’s system drive. Then I can have the -Source parameter point to this WIM file when I run the Install-WindowsFeature cmdlet to re-install the Windows Server Backup feature:

Figure 12: Using the -Source parameter of the Install-WindowsFeature cmdlet to point to a local WIM file.
Alternatively, I could share out the WinSxS folder on a different server running Windows Server 2012 and then have the -Source parameter point to the UNC path to the shared folder:

Figure 13: Using the -Source parameter of the Install-WindowsFeature cmdlet to point to the shared WinSxS folder on a different server.
There are other cool things you can do with Features on Demand, and we’ll examine these in a future article in this series.
If you would like to read the other parts in this article series please go to:


