Microsoft Azure has excellent built-in tools to protect the security of your cloud environment. One of Microsoft Azure’s advantages, when compared with other cloud providers, is the integration of your on-premises Active Directory with the Azure Active Directory, which allows you to use the same credentials to assign permissions to your resources in Microsoft Azure. Privileged Identity Management adds an extra layer of security by providing just-in-time access to either Azure AD or Azure resources. The process to grant a user has several capabilities, such as time for the access to work, approval process, justification may be required, including or not a ticket number on top of all that we can enforce multifactor authentication and receive a notification.
Another great feature that comes with PIM is the ability to perform access review and perform an audit of all transactions conducted, which is helpful for any auditing that your business may be required to do. In this article, we are going to cover the initial steps to enable the feature and the permissions that are introduced when the feature is in use.
Basic security and roles
Before PIM, all users were static, and if they were assigned to a resource group (either directly or being a member of a group), they would stay there forever. This type of assignment is called permanent in the PIM universe.
One of the main features of PIM is to make users eligible, which means that the user has the right to ask for the privilege. When the user makes a request, we can evaluate it and enforce the level of security that we want to implement to grant access.
PIM relies on three roles, and they are essential. PIM provides a wizard to manage and protect these key roles, as follows:
- Privilege role administrator allows its members to manage PIM, which is the key component of the security solution. This role can manage role assignments in Azure Active Directory as well.
- Security administrator this role can manage all security-related features in the Microsoft Cloud realm. Including reading access to PIM (read all information available), Azure AD Identity Protection, Office 365 (Security Center), and Azure Information Protection.
- Global administrator: This role has to be protected at all costs. This role can assign other roles, reset passwords, and can manage Azure AD and any service that uses Azure AD identities.
Getting the Active Directory license
The first step is the license requirement. To take advantage of the PIM feature, we need the Azure AD Premium P2 license associated with our tenant. The Azure AD Premium P2 license has all the bells and whistles available in the platform and has unique features in the identity governance and identity protection areas.
Here’s how to do that: Logged on to your Azure Portal, click on Azure AD, click on Licenses item on the left side. In the License – All products blade, click on All products, and a list of all existing licenses associated with your tenant will be shown.
If you don’t see Azure AD Premium P2, don’t worry, you can apply for a 30-day trial (the trial includes 100 licenses). Click on Try/Buy, expand Azure AD Premium P2, and click on Activate. Wait a couple of minutes to give time for the activation to complete.

Getting starting with Privileged Identity Management
There is a procedure that has to be performed before we start the PIM configuration. We need to authenticate using MFA and configure the consent. A global administrator is required to complete the tasks in this section, and that account will be added automatically to the privileged role administrator role.
The first step is to search for PIM in the search and click on the Privileged Identity Management results. In the new blade, click on Consent to PIM.
If your current user is not configured to use MFA, the following error will be displayed (Verify my identity), and the cloud administrator must configure the MFA before continuing with the consent process. If you are using MFA, then the message should be similar to the one displayed in the picture below (“Status check completed. Please click ‘Consent’ button to consent to the Privileged Identity Management service”)
Click on Consent, and on the new dialogue box, click on Yes to confirm.

Onboarding Azure resources into PIM
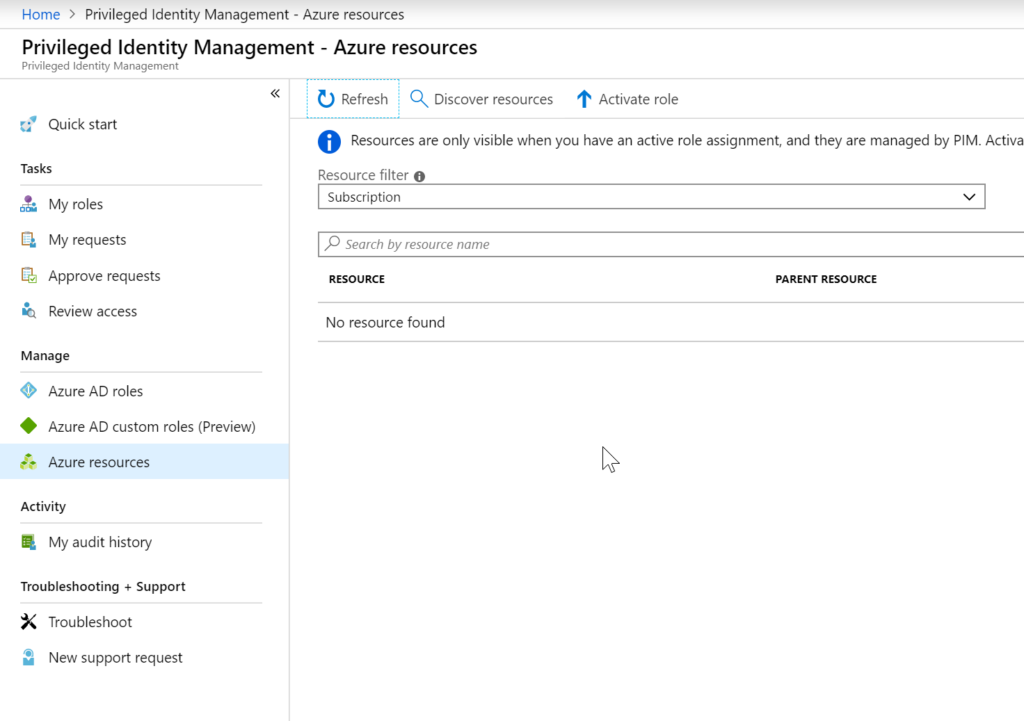
Now that we have the PIM fully operational, our next logical step is to start onboarding resources. Using PIM, we can manage Azure AD roles, Azure resources and Azure AD custom roles (preview).
Let’s start with Azure resources onboarding. Click on Azure Resources, select the type of resource that you are about to discover (the default is subscription), then click on Discover resources. In this area, we can control permissions at several levels, such as subscriptions, resource groups, management groups, and even resources.
The discovery process will run, and all discovered resources will be listed. In our example below, a subscription was found. Select one or more entries from the list (Item 1), click on Manage resource (Item 2), and click on Yes to confirm the onboarding process.
When onboarding resources like a subscription, all child objects underneath the resource will be managed by PIM. There is no need to perform a discover of Resource Groups when a subscription is selected.

Coming attractions
In this article, we went through the process of understanding the benefits of Privileged Identity Management in Microsoft Azure. We covered the steps required to enable it on your tenant and to start onboarding your resources into PIM. In our next article, which will be published here on TechGenix soon, we will go even further with PIM.
Featured image: Freepik / slidesgo


