When planning and designing your strategy to save costs in Microsoft Azure, one of the first items is to understand what you have and your options moving forward. To address the gathering of information and crunch the numbers to help the decision-making process, I have created a script and a spreadsheet that will give you an overview of your current environment. You can draft your new standard to place all your VMs in specific family sizes and you can create an action plan for every single VM. Before you get started, download both files (script and spreadsheet). They are available at my GitHub, and you can find them by clicking here (flexibility groups script) and here (template spreadsheet).
The first step (Item 1) is to run the script, which is called RIFlexibilityGroupInfo.ps1, and the script will generate eight CSV files (Item 2), which we are going to use as a source to load information into our spreadsheet.
The script has a variable to define the region — if you are not in Canada Central, make sure that you update that before running. The region is essential for the VM sizes, which are not available equally among Azure regions.

The spreadsheet file I made available does not have any data. The idea is for you to load the information we are going to start with the table labeled as Current–Flexibility Group Info located in the first sheet (Current Numbers).
The name of the table will match the CSV generated by the script. We can start by listing all existing CSV files generated by our script (Item 1). In our case, we will get the information using Get-Content FlexInfo.csv (Item 2). Then, we are going to copy the valid information (not the headers) from the output (Items 3 and 4).

We are using tables in the spreadsheet, and they don’t allow us to paste the information directly. The workaround is to find a space outside of the desired table to import the data, then copy from the temporary spot and paste it into the final table.
For the Current–Flexibility Group info table, we know that we need two columns of real estate for the swap operation. We can select the A31 cell, for instance, click on the arrow pointing down in the Paste button (Item 1), and then click on Use Text Import Wizard… (Item 2)

A new wizard will be displayed. Make sure to select Comma in Step 2 of 3. The result will be the content from our CSV file in that area in Excel. The final step is to copy (Ctrl + C) those new cells that, by default, are automatically selected and paste (Ctrl + V) at the first position of the table.

We need to repeat the same procedure that we have described for these following tables and sheets.
| Source File generated by the script | Destination Sheet / Table (if applicable) |
| FlexInfo.CSV | Current Numbers (sheet) Current – Flexibility Group Info (Table in blue) |
| VMSizeInfo.CSV | Current Numbers (sheet) Current – VM Size Info (Table in blue) |
| Official-VMTypes.csv | Official-VMTypes (sheet) |
| Official-FlexibilityGroups.csv | Official-FlexibilityGroups (Sheet) |
| VMReport.csv | Current VMs (sheet) Paste the information in the blue side of the table. Select the cell A2 |
Important note: We must change the column order on the Official-VMFlexibilityGroups sheet. The first column must be ArmSkuName, the second InstanceSizeFlexibilityGroup, and then Ratio. The main reason is that we are doing a lot of VLookups in Excel, and we need to switch those columns. The order of the first column must be ascendant as well.
At this moment, you have a good idea of your numbers, and you have a list of all VMs. The next step is to define a standard with a little bit of research and then define the action plan (if any) to apply to your existing VMs.
Defining a family standard for your subscription
The process here is manual because my Excel skills are not that great, but I think I can describe the process in four easy steps.
First, we will look at all flexibility groups that are currently in use in our organization. We will choose one or two to be part of our proposed standard. We will take into consideration VM sizes and the cost of the VMs on that group if you can simplify all your environment in a single-family even better. I like to make my VM family name bold to help in the next task (Item 1).
In the second step, we will go to the Official-FlexibilityGroups sheet and we will copy just the ArmSkuName column values of all VM Types of the family that I selected in the previous step (Item 2).
The third step is the easiest one, and we will rename the vertical cell (column I) to match the name (Item 3).
The final step is to paste the content copied from the tasks performed in the second step (item 4). You may have to play with Merge & Center, background color, and shift some cells around to make sure that the formatting is easy on the eye and consistent.
You will have to repeat the process for every single VM family that you want to incorporate in your standard.
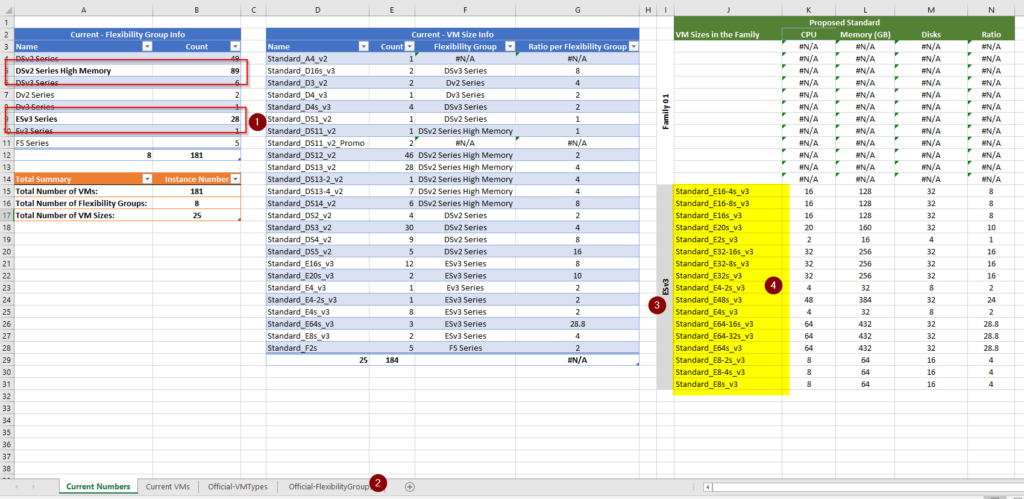
The results will be a Current Numbers sheet with my initial suggestions for a corporate/subscription standard (Item 1). In that same area, we can see all VMs available, including CPU, memory, data disks and their ratio. We also have a summary of the total numbers (Item 2), and we can use Excel to perform a couple of simple math to find out how many instances need to be changed if we decide to apply the current proposal.

Planning transition of your reserved instances
Now that we have a good grasp on the existing environment and a proposed new standard to consolidate flexibility groups and make few reserved instances, we can start planning what to do with the existing environment. Use the current standard as a baseline to evaluate your individual VMs and see the options available based on your criteria.
When consolidating the family of VMs, the vast majority of customers use some key indicators to define the action to be taken to any given VM that will have a new VM size applied. These are the most common variables used to define the logic:
- Use CPU, and a VM size change requires at least the same amount of CPU available to the VM.
- Use memory, and a VM size change requires at least the same amount of memory available to the VM.
- Use cost, the price of the new VM must be lower than the existing one.
In the Current VMs is where we are going to track the type of change. Keep in mind that the columns on Item 1 were already loaded at the beginning of this article. The only necessary changes that we have to do is on those two columns highlighted in Item 2.
The Action column is a visual indicator, type 1 for an upgrade, 5 for no changes, and 10 for downgrade of the existing VM instance. In the New Size column, enter the VM size, and all other calculations will be done automatically.

At the end of this exercise, you can quickly identify how many VMs need to be changed to accommodate your new standards and the number of credits/ratio required to run your infrastructure.
Featured image: Designed by Freepik


