So you’ve rolled out email, yay! But have you enabled your users to send secure encrypted email? It is a very underused feature among small- and medium-sized businesses. This makes me kind of sad because every business sends some personal data that should be protected. Quotes, bids, specifications, drawings, credit card information, health questions, benefits, or employment information, if sent via email should be sent in a secure manner. Whether it’s protecting other people’s Personally Identifiable Information (PII), required protection of credit card data (PCIDSS), or your businesses’ secrets, encrypted email use is a must.
The encrypted email feature is included in the Office 365 E3, E4, E5, and K1 plans. If you don’t have one of those plans, you can add Azure Rights Management Service (RMS) or Enterprise Mobility & Security (EMS) to your plan.
Enable Office 365 Message Encryption
It’s not at all difficult to implement message encryption. I’ve tried the GUI method of enabling the message encryption with mixed results so I’m going to recommend that you skip it and use PowerShell instead. It’s not complex. Just punch in the following commands.
$UserCredential = Get-Credential

$Session = New-PSSession -ConfigurationName Microsoft.Exchange -ConnectionUri https://outlook.office365.com/powershell-liveid/ -Credential $UserCredential -Authentication Basic -AllowRedirection

Import-PSSession $Session

Set-IRMConfiguration -ClientAccessServerEnabled $True
You might want to wait a couple of hours to give the command time to take effect. This is Microsoft’s recommendation for any feature on/off request. I’ve found, though, that this feature seems to happen nearly instantly. You can verify that you’ve got it turned on by using the following command to check the status:
Get-IRMConfiguration
Configuring encryption rules
The next step is to let Office 365 know when you want a message to be sent securely. This is done by setting up rules in Exchange Online. The GUI is flexible enough to allow you to tailor these rules to your businesses’ needs. I’ll show you how to allow the users to decide when to send an encrypted email and then how to configure a rule that will scan for content in a message and encrypt when it detects that it contains that data.
Configuring a manual encryption rule
If you’ve used encrypted email before, then it’s probably been a manual encryption process. By that I mean that when you are ready to send an email you have to tell the system that you want to send it with encryption. Office 365 Message Encryption does this, too, but it also has automated super powers that I’ll show you later. Let’s get encryption going by enabling our users to decide if a message should be encrypted:

We’ll set up a rule that says if the subject line contains the word SecureMail, then apply message encryption to it. Here’s how:
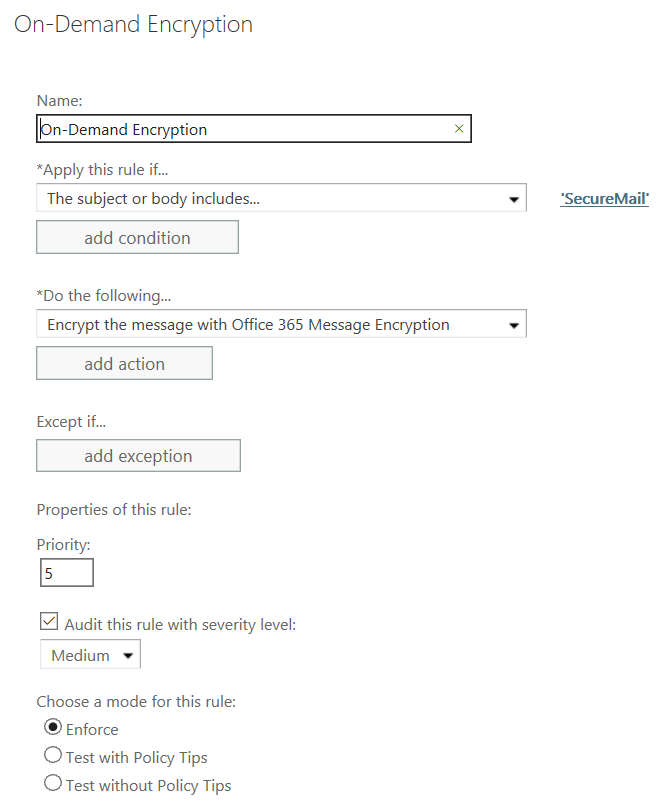
- Click the + to add a new rule
- In the Name field type a name for the rule
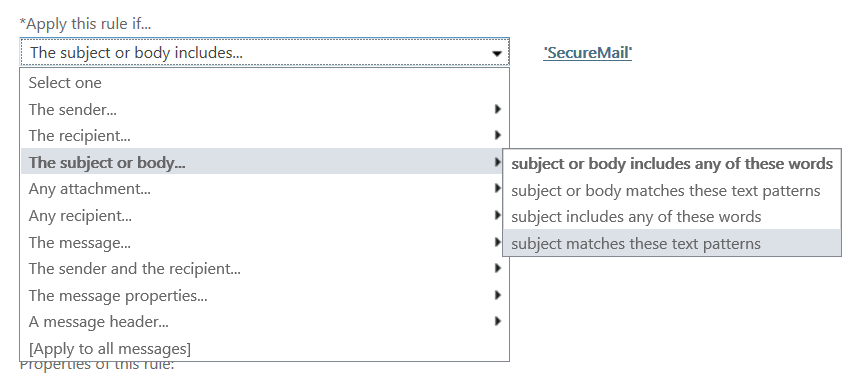
- Under Apply this rule if…click the arrow and choose The subject or body, then subject matches these text patterns. For the text pattern type SecureMail or some other term that your users will type to indicate that the message should be encrypted.
- Check the box to Audit this rule and choose a level. This is optional, of course, but I like to have a record of when the rule was triggered in the logs.
- Finally, select the Enforce or Test options and click OK to enable the rule.
Configuring an automatic encryption rule
Now it’s time to put the super powers to work. Let’s say that we want to make sure that any email containing a Social Security number is automatically sent using message encryption. Because protecting PII is a regulation to which most businesses are subject to, we don’t want to depend on our users remembering to add the word SecureMail to the subject line. If they do, great! But if they forget, the rule we’re about to create will do it for them.
You’ll start to configure your rule in the Exchange Admin Center by going to mail flow, and clicking the + sign to create a new rule. Under Apply this rule if…The message contains any of these sensitive information types… You’ll be presented with a list according to country information types. Pick the ones that if contained in an email you want to encrypt.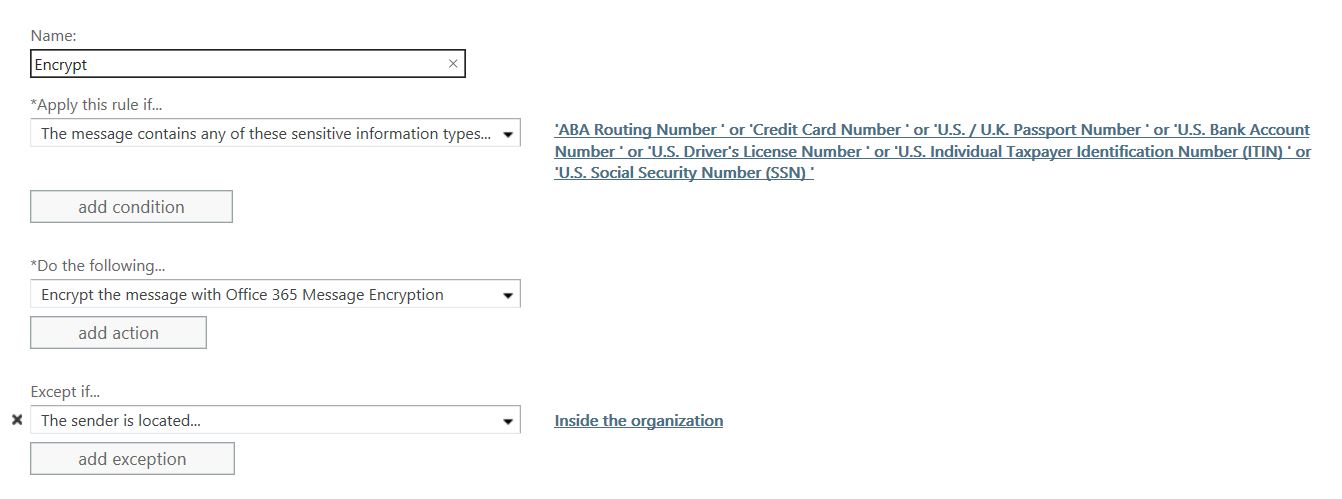 Resist the temptation to add another condition because I’ve found that doing so results in a hit-or-miss implementation. Under Do the Following, pick Modify the message security… and pick Apply Office 365 Message Encryption from the menu. Now set an exception for messages sent internally. In Except if…choose The sender is located…and pick Inside the organization
Your finished rule will automatically catch outgoing sensitive data and encrypt it.
Customizing the portal and email messaging
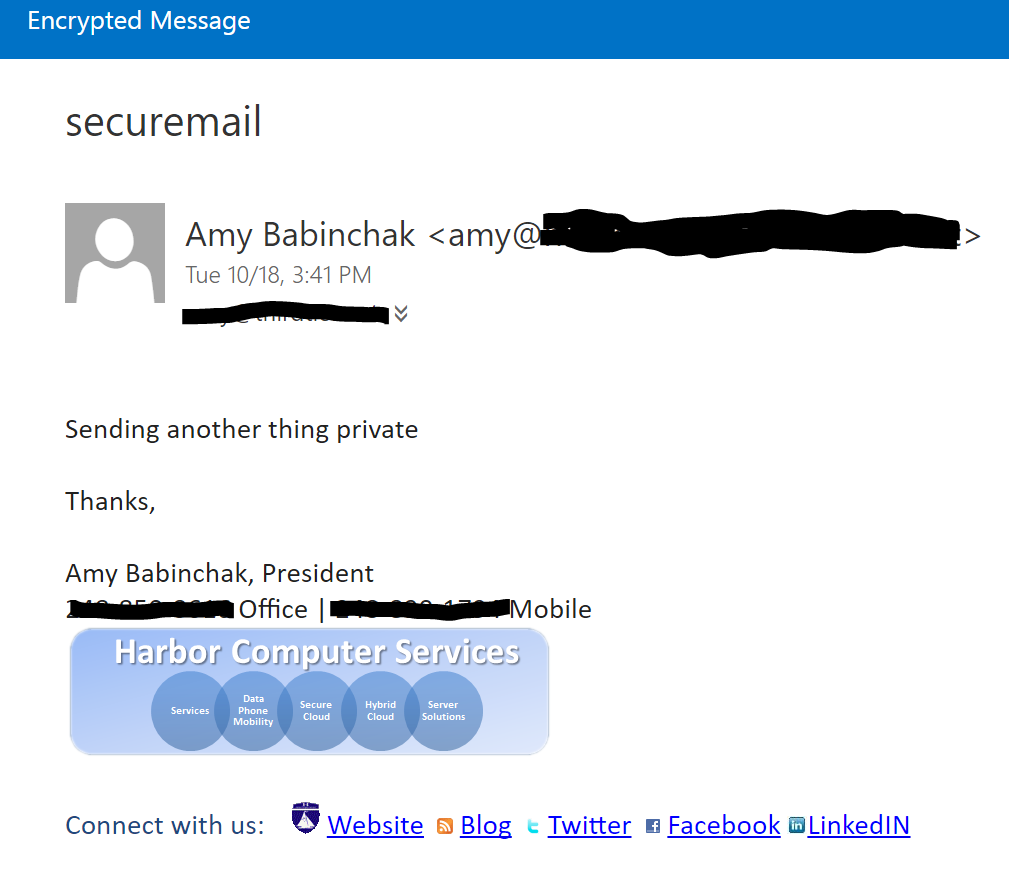
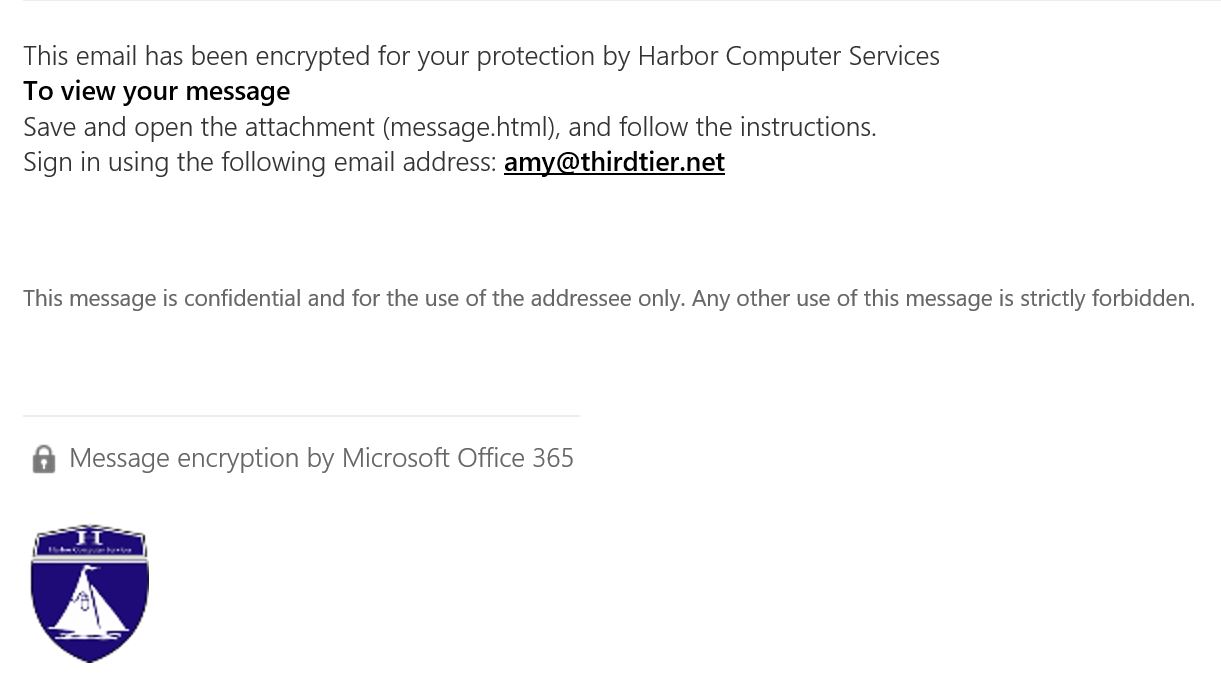
By default the email message is pretty bland and I think it looks suspicious. Email recipients are wary these days so you’ll want to give them a signal that it’s OK to click on the attachment. Customization is the way to let the reader know that this email from you is legitimate. You can do that by adding your logo, customizing the disclaimer text to match your corporate standard and including some standard messaging that will let the recipient know that this email is indeed from you.
The process to do this is another set of straight forward PowerShell commands. I’ve included them here because as is often the case with PowerShell commands they aren’t readily discoverable. Why would you look for commands related to IRM under OME?
Here is what the portal looks like by default and after I’ve applied PowerShell commands. Notice that after applying the changes the top bar now includes my company name. There are also PowerShell commands that allow us to add a logo, which we’ll do below.

Here are the PowerShell commands that you need to apply branding to your encrypted email, including adding your logo.
| This command customizes the portal from which the recipient will read your email. |
Set-OMEConfiguration -Identity <OMEConfigurationIdParameter> -PortalText “<text for your portal, string of up to 128 characters>” Example: Set-OMEConfiguration -Identity “OME Configuration” -PortalText “ContosoPharma secure email portal” |
| This command adds your logo to the email and the portal. Note that despite the example your logo path must point to an Internet accessible location. |
Set-OMEConfiguration -Identity <OMEConfigurationIdParameter> -Image <Byte[]> Example: Set-OMEConfiguration -Identity “OME configuration” -Image (Get-Content “C:\Temp\contosologo.png” -Encoding byte) Supported file formats: .png, .jpg, .bmp, or .tiff Optimal size of logo file: less than 40 KB Optimal size of logo image: 170×70 pixels |
I can further customize the encrypted message by adding my own disclaimer statement and instructions.
| This command lets you add a note to the email above the instructions for viewing encrypted messages |
Set-OMEConfiguration -Identity <OMEConfigurationIdParameter> -EmailText “<string of up to 1024 characters>” Example: Set-OMEConfiguration -Identity “OME Configuration” -EmailText “Encrypted message from ContosoPharma secure messaging system” |
| This command customizes the disclaimer statement in the email |
Set-OMEConfiguration -Identity <OMEConfigurationIdParameter> DisclaimerText “<your disclaimer statement, string of up to 1024 characters>” Example: Set-OMEConfiguration -Identity “OME Configuration” -DisclaimerText “This message is confidential for the use of the addressee only” |
All of the above PowerShell commands are documented in TechNet here.
This is what the text now looks like after my changes. Notice that the name of the portal has been changed to Harbor Computer Services secure email portal and our logo is present at the bottom of the page. Our branding of the portal will give the viewer more confidence in the process of viewing the encrypted message.
What happens when a reply comes in?
When someone replies to an encrypted message that you’ve sent or forwards that message to another party, the encryption is maintained. The user experience is just like Outlook Web Access so it’s a simple click of Reply, Reply all or Forward to respond to your message. When you receive a reply to your message you’ll be directed to read it in your secure email portal. However, you do have the option of applying an unencryption rule to incoming replies. This would save your staff a step but may not be acceptable in some compliance scenarios.
Next steps
Office 365 contains many options for protecting your information. Secure messaging is just the beginning. If you’re a consultant, you’ll find that configuring this feature for your clients will open up new opportunities. Microsoft has loaded Office 365 with security features with compliance as a main differentiation point. You’ll do well to exploit this feature set.


If 365 complains about licensing when creating the transport rule, follow this article:
https://technet.microsoft.com/en-us/library/dn569291.aspx#activatewarm
Pingback: How to enable email encryption in Office 365
Hi there-
This is a fabulous article. Thank you for writing it.
One quick correction. The call to Get-Content when uploading a logo image requires one to pass a local file rather than a URL. That’s what worked for me.
Thanks much!
I have Office 365 Business Premium with Azure Rights enabled. We have been able to successfully set a rule to encrypt email automatically, but how do you “manually” choose to send an email with encryption?
Alecia – It’s in the article. The manual method is the part where you setup a key word and when that word is present the email is sent encrypted. You must put in that specific word for the email to encrypt.
Thanks for the article! I did this and the SecureMail rule worked great! I have not been able to get the pattern matching rule to work however. The wording on the rules UI is slightly different in 7/18 than it was in 12/16 but not so much that it doesn’t correlate. I used “The subject or body matches these text patterns” and ‘U.S. Individual Taxpayer Identification Number (ITIN)’ or ‘U.S. Driver’s License Number’ or ‘U.S. Bank Account Number’ or ‘U.S. / U.K. Passport Number’ or ‘Credit Card Number’ or ‘ABA Routing Number’ as the patterns. I’m stumped.
John, I have found these somewhat unreliable too. However, there are some new options available in the advanced cloud security if you have that in your subscription that seem to be doing a better job. I was thinking of writing a different article covering this individually.
I have a question about e-mail encryption and delegates. Is it possible to have the email encryption not decrypt the message if there is a delegate that has access to the users mailbox. For example we have executives that sometimes send sensitive data and might not want their assistants to see the message even though they have full access to their mailboxes. IS there a way to do with an O365 license?
Todd, I have not tested this but I would think it possible using an exception on the rule.