You used to know this product as Intune, but now Microsoft has combined Intune and Configuration Manager and called it Endpoint Manager. Intune has been around for a long time, and it got a well-deserved bad reputation for being difficult to use and not feature-rich enough. Things have changed, the product has matured, and it’s ready to not only replace Group Policy but, more important, modernize the way you manage endpoints.
Before you start jumping in and failing at creating policies to secure devices, you have to get the portal set up for success.
Tenant administration
The Endpoint Manager portal is found at this Microsoft site. This is where you’ll manage all of your devices. This includes Android, iOS, Mac, and Windows devices of all shapes and sizes.
The first area that you want to go into is tenant administration. Click Customization.
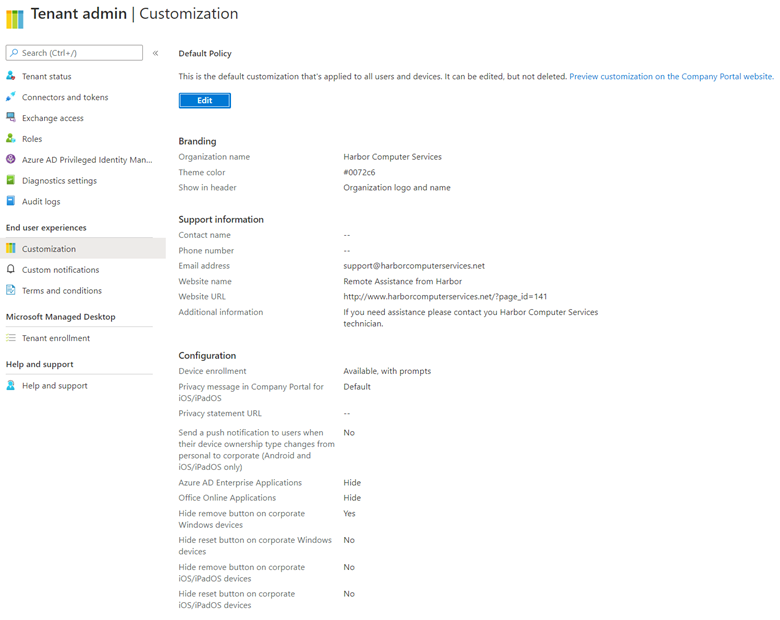
This is where you’re going to set up branding, support contact information, and some basic portal viewing settings in case your end-users end up in the portal, which they might if they are performing self-service to register their device into Endpoint Manager. At the bottom of this same page, you can set up policies based on these settings to provide different groups with different settings.
Upload terms and conditions
Next, click on terms and conditions in the main endpoint manager menu. Click the + to create a policy. Here you will paste in your terms and conditions to alert end-users to specific policies. Alternatively, you can also use the Azure Active Directory terms of use feature (requires Azure AD P1). The Azure AD terms of use feature uses conditional access and has better branding, while the Endpoint Manager one is pretty basic. Choose the one that is best for your company.

Create device groups
Endpoint Manager is all about managing devices, and you’ll want to apply the policies you’re going to create to specific groups of devices. Most likely by OS type but quite possibly also by department or other groupings. Before you create any policies, you’ll need to create Azure AD groups.
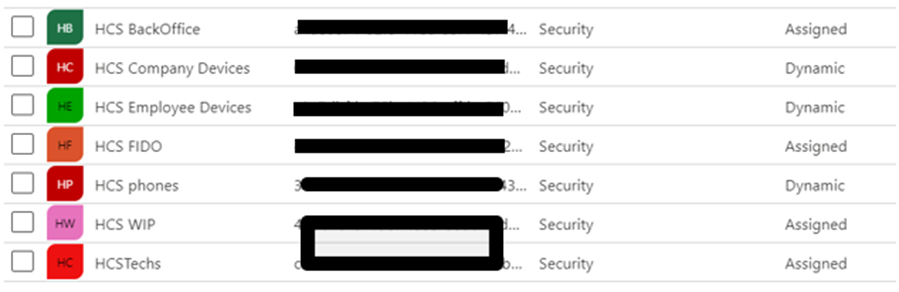
In my standard set of device groups for clients, I create one for Windows laptops, Windows desktops, iOS phones, Android phones, employee-owned devices, and phones, breaking them down into different operating systems as necessary. For my own company, we are standardized on mobile devices and iOS phones only, so our list is much shorter.
Connectors and tokens: Microsoft Store for Business
The next item of setup to address is the connectors and tokens. There is likely a minimum of 2-3 that you’ll need to configure here. The first one to consider is the Microsoft Store for Business. This is where Intune gets the list of applications that you want to push for corporate use. You’ll “buy” applications in the store and then create policies to deploy them. This can include Office 365 applications.

Click to enable the Microsoft Store and then run through the wizard to get it connected to your portal. It’s not too involved or difficult.
Connectors and tokens: Microsoft Defender ATP
If you are licensed for Defender ATP, this is where you’ll connect that into Endpoint Manager. This will allow you to set policies that include the ATP risk level of the device. An important feature that will block risk devices from gaining access.

Mobile Device Management (MDM) gives you some choices to make on which device types you want to connect. But do also notice the link at the bottom of the page that directs you to create the configuration policy that deploys the ATP sensor to those devices.
First, provide a description and name for the deployment policy.

Then assign the device group that it will apply to.

Finally, decide if you need to specify within that device group which operating systems specifically this should be deployed to. Be sure to note that these rules are additive. This means what you put in here, the members would meet all of the criteria. When finished, save the policy.

There’s a quick report you can view here to see which of your device do not have the sensor deployed. You’ll find this link at the very bottom of the connectors and tokens Microsoft Defender ATP page.
![]()
Other types of connectors
Depending on your environment, you can continue down the menu and configure additional connections. Apple VPP, Google Play Store, and sideloading are likely to be popular options.

Azure AD device registration or join
There are two options for your devices to associate with Azure AD. They can be joined, or they can be registered.
When a device is registered (below left), your management control is Mobile Application Management (MAM) and some conditional access policies. Device registration is meant for BYOD scenarios where you do not own the device and therefore can’t configure it. You’ll just be managing the corporate data and applications.

When your device is joined (above right), your management control is endpoint configuration, device management, hello, SSO, and conditional access. This option lets you fully configure the device.
You should know that you can’t Azure AD join MAC, Android, or iOS devices. These will always be registered devices, so be sure that your Mobile Application Management strategy is robust.
Enroll devices
Click into Windows enrollment to start with. There is a handy link that will help you get DNS setup so that when a device connects to Azure AD that it will also enroll itself into Endpoint Manager.
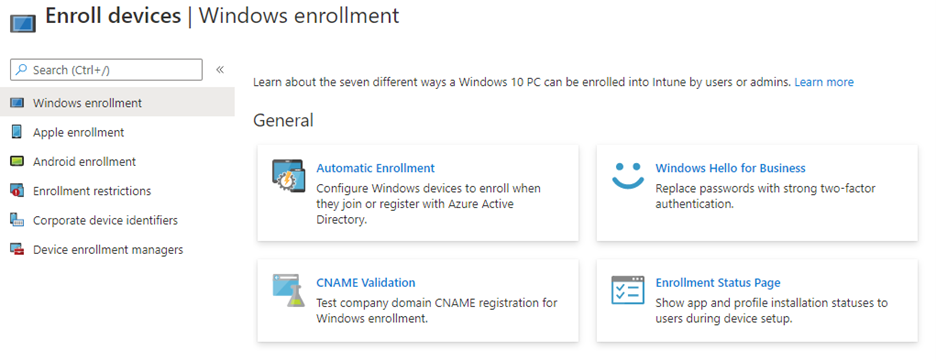
Inside the Automatic Enrollment button, you’ll flip both MDM and Mobile Application Management to “all” to capture all devices into Endpoint Manager.
CNAME validation will check if your DNS is correctly configured to enable enrollment. It presents a place for you to enter your domain name, and then it validated your DNS settings. If they are incorrect, you’ll go to the main Microsoft 365 admin portal to set up and get the correct DNS settings in the domain setup.
The Enrollment Status Page on this tab is where you need to create a policy to allow your end-users to see whether their device is enrolled or in some other state indicating failure. You will want to click in and create a policy here. You’ll need it for troubleshooting.
Devices: Apple enrollment

For Apple enrollments, you’ll need to get an MDM Push Certificate. This certificate expires annually. Basically, it allows Endpoint Manager to push a management configuration profile to the Apple devices. When they enroll, they’ll be prompted to accept and install the certificate and then the management profile. The process to create an Apple push certificate is not unlike any other certificate process, except that you’ll need an Apple ID for the corporation. When you create that Apple ID, save it in a secure location as you’ll need it once a year to renew this certificate.

The Enrollment targeting preview is a new feature that allows users to select which ownership type they are enrolling the device under. It is either corporate-owned or personal. Apple has new policy restrictions based on the enrolled management type that will then be enforced. You can read more about those here.

To enable this, you will create a policy and select either type of enrollment you want for all phones or have the users pick the device ownership when they enroll.
Devices: Android
With Android, the connection process is similar, except no certificate is required to validate that the management of the device is coming from your Endpoint Manager portal. You only need to connect to the Google Play Store.

Android has a variety of device configuration enrollment options. You’ll create policies to enroll devices as personal, corporate, or kiosk. And then, finally, at the bottom, you can connect in Android Enterprise manager. The wording hasn’t been updated on that button, but it will take you to the correct location.

As we’ve seen here, there are a lot of steps to setting up Endpoint Manager. Many administrators skip over this long list of prerequisites, but you really want to go through each and every one of them. Doing so will make the application management and device management policy that you will configure both here and in conditional access work as expected.
Featured image: Designed by Rawpixel.com / Freepik


