If you would like to read the other parts in this article series please go to:
- System Center 2012 Virtual Machine Manager (Part 1) – Introduction
- System Center 2012 Virtual Machine Manager (Part 2) – Installation
- System Center 2012 Virtual Machine Manager (Part 3) – Introduction to the Console – Segment A
- System Center 2012 Virtual Machine Manager (Part 4) – Introduction to the Console – Segment B
- System Center 2012 Virtual Machine Manager (Part 5) – Introduction to the Console – Segment C
- System Center 2012 Virtual Machine Manager (Part 5) – Introduction to the Console – Segment D
- System Center 2012 Virtual Machine Manager (Part 8) – Introduction to the Console – Segment F
- System Center 2012 Virtual Machine Manager (Part 9) – Introduction to the Console – Segment G
- System Center 2012 Virtual Machine Manager (Part 10) – Introduction to the Console – Segment H
- System Center 2012 Virtual Machine Manager (Part 11) – Introduction to the Console – Segment I
Introduction
In the previous few articles in this series, we started to investigate all of the options that are available in the System Center 2012 Virtual Machine Manager console. In this part of the series, we’ll continue our tour; we will fully explore the Networking node in the Fabric wunderbar.
Quick recap
Before we get started, let’s do a quick recap to gain our bearings. In Figure 1, you can see the main window that is seen when you start the VMM 2012 console. We’re working with the Fabric workspace and, in this article we’ll start looking at the items on the Virtual Machines tab. In previous parts of this series, we fully covered the general console as well as the items available in the VMs and Services areas.

Figure 1: The big picture
Home tab: Networking (Fabric)
Networks are a critical part of a virtual environment. In order to maintain security and access controls, hypervisor administrators need to make sure that virtual machines are accessible only from where they should be. Further, as virtual machines are created, they need additional resources, such as IP addresses and more. These resources are a part of the environmental fabric and, as such, are managed from the Fabric wunderbar. The Fabric Networking ribbon is shown below.

Figure 2: The Fabric ribbon
Create Logical Network
Logical networks are used in VMM 2012 to simplify administration of the environment. You might create separate logical networks for the front-end network, the storage network, a backend network and so on. Think of a logical network in VMM as a network segment in the real world.
Create IP Pool
You don’t have to create at static IP address pool in VMM 2012, but doing so brings into this centralized management tool the ability to assign IP addresses to hosts when converting a bare-metal computer to a Hyper-V host and to Windows virtual machines running inside the VMM-managed environment. In the figure below, you can see the results of creating an IP pool. In this pool, I’ve chosen to use only a subset of the IP addresses available in my home lab’s /16 address space. Note that the IP pool creation process includes asking for default gateway, DNS and WINS information. Also note that, while VMM 2012 supports both IPv4 and IPv6 IP address pools, you can’t mix them in a single pool.

Figure 3: A new IP address pool has been created
If you choose not to create IP address pools in VMM 2012, remember that you will need to manage IP resources outside VMM just as you normally would.
Create MAC Pool
VMM 2012 ships with two default MAC address pools, shown below in Figure 4. If necessary, you can add new MAC address pools by clicking the Create MAC Pool button near the left side of the ribbon.
Note that MAC address pools are used only if you choose to create a new virtual machine that uses static MAC addresses. If you choose to use dynamic MAC addresses, the hypervisor itself—rather than VMM—is responsible for handling MAC address assignment.
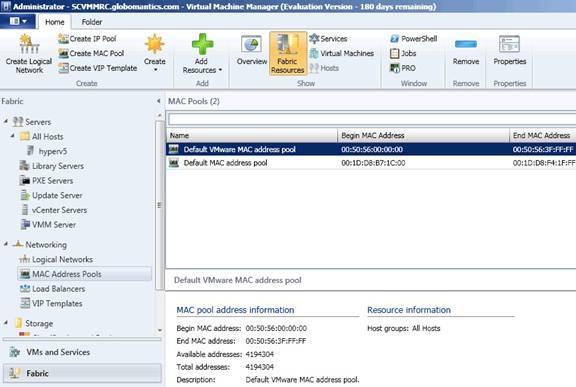
Figure 4: There are two default MAC pools in VMM 2012
If you decide to create a new MAC pool, you need to specify a name for the pool and associated it with a host group. You also need to supply the creation wizard with beginning and ending MAC addresses.

Figure 5: Creating a new MAC address pool
Create VIP Template
Don’t be fooled into thinking that this is a way that you can create some kind of a template for Very Important People. Rather, the VIP here stands for Virtual IP and is, frankly, an unfortunate acronym choice.
VIP templates are used as a part of VMM 2012’s support for load balancers, which are useful, for example, when you are creating a full service application tier that requires high availability. Again, the inclusion of this network element enables centralized administrator of all or most of the components that are necessary to support an application or tier.

Figure 6: VMM 2012 supports a number of load balancing options
Create
The Create button provides you with the opportunity to create a new Fabric resource that can be used in VMM. In Figure 7, note that you can create clusters, services, virtual machines, networking objects and storage objects. In VMM’s context, you can create virtual resources, but you add physical resources, which we’ll see next.

Figure 7: Create a virtual Fabric service
Add Resources
You may find it necessary to add a physical resource to your VMM environment, such as a Hyper-V server, a vCenter server, a load balancer or a storage device. In Figure 8, you’ll see that this outcome can be achieved by choosing the Add Resource button in the ribbon.

Figure 8: Add a physical resource for use by VMM
Overview
The Overview button is really handy as it gives you a single-pane view of where things stand with regard to networking resource usage. Here you can see how many IP addresses you have remaining in any IP address pools you may have created, the status of MAC address usage information about load balancers and more.

Figure 9: An overview of networking resource usage
Fabric Resources
You’ve already seen the Fabric Resources button in use earlier in this article, but for completion, it’s included again. Here, you see all of the resources present that are related to the selected node.

Figure 10: A list of Load Balancer-related resources
Services
If you have created services—discussed earlier in this series—and those services are using networking resources, those services will appear here.
Virtual Machines
Likewise, if you have a virtual machine using any of the defined networking resources, those virtual machines will appear here. As you can see in Figure 11, the virtual machine named COURSE-WSUS is using the logical network named Local Area Connection. When you select the virtual machine—and you can tell that you have the virtual machine object selected since there is a ‘VM’ in the Type column—information about the virtual machine appears in the details pane below.

Figure 11: Virtual machines using Logical Network resources
Hosts
When you choose the Hosts item, you will see network resources available in your hsosts and how they relate to the virtual objects present in VMM.

Figure 12: The hosts item
PowerShell
A few years ago, Microsoft released PowerShell and has extended this scripting language to just about all of their new products. PowerShell allows administrators to write scripts that can automate administrative functions. Click the PowerShell icon on the Home tab to open a PowerShell command window.
Jobs
VMM works by creating jobs that are carried out with the results eventually reported to the administrator. In Figure 7, you can see what happens when you click the Jobs button. It does exactly what it should!

Figure 13: A list of currently running and recently run jobs
PRO
If you’ve enabled Performance and Resource Optimization (PRO) in VMM 2012, then you’ve successfully connected your VMM implementation with a running System Center 2012 Operations Manager instance to unlock additional capabilities. With earlier versions of VMM and SCOM, PRO was necessary to perform what many would consider basic operations, particularly those that come from VMware. In VMM 2012, when PRO is configured, you’ll see PRO tips that help you do things better.
View Dependent Resources
I like this one… when you have an object selected in VMM and click the View Dependent Resources button, you can see which other objects are using that resource. This becomes particularly useful when you need to make changes to your environment.

Figure 14: Items dependent on a default Logical Network
Remove
If you want to remove an object you can, but if there are still dependencies, you’ll get an error like the one below.

Figure 15: Can’t remove resources that have dependencies
Properties
As always, you can view the Properties page for an object to get additional information about that object, as shown in Figure 16.

Figure 16: Properties for a virtual machine
Summary
This continued our journey of the Fabric wunderbar in System Center 2012 Virtual Machine Manager. In the next part of this series, we’ll move on to explore the Library area in VMM. For now, we will skip the Storage area in Fabric until I have a better storage device in my lab.
If you would like to read the other parts in this article series please go to:
- System Center 2012 Virtual Machine Manager (Part 1) – Introduction
- System Center 2012 Virtual Machine Manager (Part 2) – Installation
- System Center 2012 Virtual Machine Manager (Part 3) – Introduction to the Console – Segment A
- System Center 2012 Virtual Machine Manager (Part 4) – Introduction to the Console – Segment B
- System Center 2012 Virtual Machine Manager (Part 5) – Introduction to the Console – Segment C
- System Center 2012 Virtual Machine Manager (Part 5) – Introduction to the Console – Segment D
- System Center 2012 Virtual Machine Manager (Part 8) – Introduction to the Console – Segment F
- System Center 2012 Virtual Machine Manager (Part 9) – Introduction to the Console – Segment G
- System Center 2012 Virtual Machine Manager (Part 10) – Introduction to the Console – Segment H
- System Center 2012 Virtual Machine Manager (Part 11) – Introduction to the Console – Segment I


