When server virtualization first went mainstream, one of the things that administrators often struggled with was high availability. Prior to the introduction of virtualization, high availability was commonly achieved at the application level. Microsoft Exchange Server, for example, utilizes database availability groups as a mechanism for ensuring high availability in the event that an Exchange mailbox server were to go offline. In the virtual world, high availability can be implemented at the host level, allowing virtual machines to fail over to another host in the event of a problem. However, administrators still needed a way of coping with existing highly available applications.
The solution to the problem was to implement guest clusters. A guest cluster is essentially just an application-level cluster based on the use of virtual machines rather than physical servers. Unfortunately, guest clusters presented a number of challenges, not the least of which was storage connectivity.
Many highly available applications require the use of shared storage. In other words, the cluster nodes all connect to a common disk so that each node has access to the same data. This proved to be tough to do on Hyper-V without resorting to the use of virtual SAN or disk passthrough. In Windows Server 2012 R2, however, Microsoft embedded support for shared VHDX files into Hyper-V. For the first time, it became easy to build Hyper-V guest clusters. All of the virtual machines making up the guest cluster could connect to a single VHDX file, which could be shared among the nodes.
Although the shared VHDX feature worked really well, it had some major limitations. For example, you couldn’t use the Hyper-V replication feature with a shared VHDX file, nor could you resize a shared VHDX file while the cluster nodes were online. Those particular limitations, while bothersome, probably weren’t deal breakers for most people. After all, I am guessing that most Hyper-V admins were just happy to have an easier way of building guest clusters.
Unfortunately, there was one limitation to the use of shared VHDX files that was something of a deal breaker for some organizations. Host-level backups are not supported for VMs that use shared VHDX files. Over the last several years, host level backups have become the standard way of backing up virtualized environments, and yet VMs utilizing shared VHDX files had to resort to backing up those VMs at the guest level.
Thankfully, in Windows Server 2016, Microsoft came up with a better way of providing storage to guest clusters — VHD sets. VHD sets overcome the limitations of shared VHDX environments. There is, however, one significant limitation to the use of VHD sets. VHD sets are not compatible with operating systems older than Windows 10.
Making the transition to VHD sets
If your Hyper-V infrastructure and your guest operating systems are running Windows Server 2016 or higher, then any new guest clusters that you create should ideally be based on VHD sets (just make sure that high speed and reliable connectivity is available between the nodes).
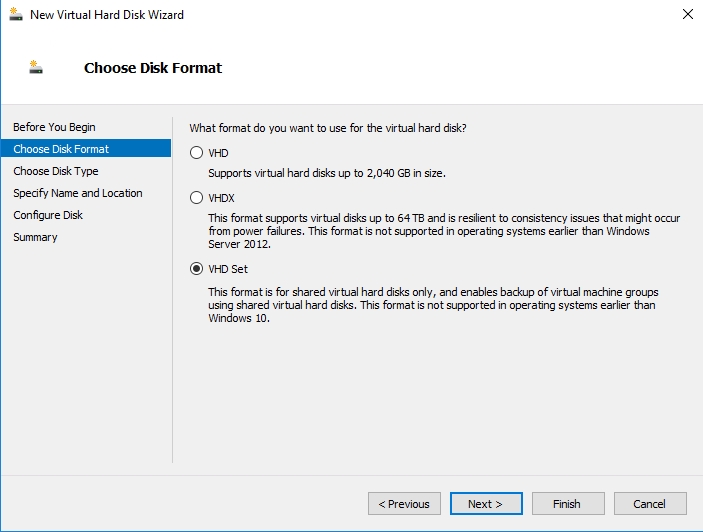
Creating a VHD set is a simple process. From within the Hyper-V Manager, click on New, followed by Hard Disk. This will cause the Hyper-V Manager to launch the New Virtual Hard Disk Wizard. Click Next to bypass the wizard’s Welcome screen, and you will be taken to the Disk Format screen. As you can see in the figure below, this screen contains an option to create a VHD set. Simply select this option, and then complete the wizard’s remaining prompts just like you would to create any other type of virtual hard disk.
What about existing guest clusters?
As you can see, creating a VHD set for a new guest cluster couldn’t be easier. But what if you have an existing guest cluster that is based on the old VHDX shared disk type? Although I have not been able to locate any documentation stating that the process is officially supported, you can use the Convert-VHD utility to convert a shared VHDX file to a VHD set.
The nice thing about the Convert-VHD utility is that it leaves your original virtual hard disk file intact. That means that there is no risk of damaging your shared VHDX file during the conversion process. It is worth noting that the conversion does require you to take the guest cluster offline. You will also need enough free physical disk to accommodate a full copy of the virtual hard disk’s contents, plus a bit of room for overhead.
To create a VHD set from an existing shared VHDX file, use the following PowerShell command:
Convert-VHD -Path <path and filename of the shared VHDX file> -DestinationPath <path and filename for the VHD set>
There are two things that you need to know about the conversion process. First, the syntax that I outlined above is for a basic conversion. You can specify additional parameters that change other aspects of the virtual hard disk during the conversion. For example, you can specify that you want the new VHD set to be a fixed length virtual hard disk.
The other thing to know is that you must specify file extensions for the virtual hard disk files. The Convert-VHD utility uses the specified file extension to figure out what type of conversion to perform.
To give you a more concrete example, I performed a conversion by using this PowerShell command:
Convert-VHD -Path F:\VMs\Shared.vhdx -DestinationPath F:\VMs\Shared.VHDS
You can see what this looks like below:
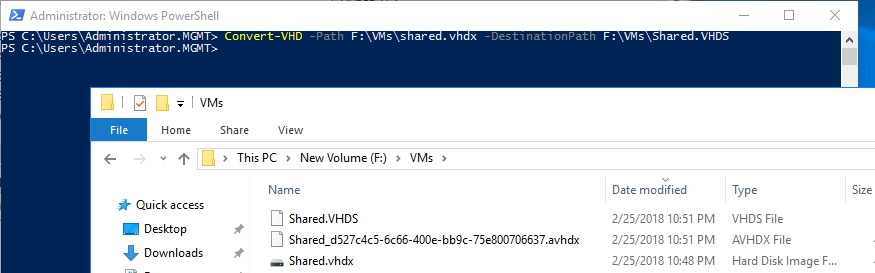
Incidentally, you will notice that a VHD set uses the .VHDS file extension. It is worth noting that a VHD set is actually made up of two different files. The .VHDS file is the file that you connect to, but the actual data resides in an .AVHDX file, which is essentially just a checkpoint file.
VHD sets solve many of the problems of creating guest clusters on Hyper-V. If you have made the transition to Windows Server 2016 in your organization, then you may find it beneficial to move away from using shared VHDX files in favor of using VHD sets instead.


