If you would like to read the other parts in this article series please go to:
Introduction
Microsoft products are evolving and part of this process is to enhance remote management capabilities. Exchange Server 2010 introduced Remote PowerShell capabilities but also the ability to manage several components through a web interface using ECP (Exchange Control Panel). With ECP we can manage mailboxes, Distribution Groups, Contacts at mailbox level and several other objects at Organization level, such as Journaling, Transport Rules, Delivery Reports and so forth.
In this article series I will be discussing all options available through the ECP and in this first article I’ll start with the User and Mailbox section covering mailbox, contacts and distribution group management.
The ECP authentication by default follows the Outlook Web App settings but we can manage that separately on the Client Access Server, Exchange Control Panel tab as shown in Figure 01.

Figure 01
So, if you have already configured your Outlook Web App and it is working like a charm, let’s try the https://yourdomain.com/ECP and here you will get access to the management stuff using the same authentication process that we would use to access Outlook Web App. The main page is similar to the one shown in Figure 02, where we have four categories: Users & Groups, Roles & Auditing, Mail Control, Phone & Voice and each one of them has sub categories.

Figure 02
If you are already logged on in Outlook Web App, you can click Options and then See all Options, and then click on the option Manage Myself and change to My Organization. All areas that the current user has access will be available to be managed through the web interface.
Managing Mailboxes
On the first page we can solve one of the most asked questions around Exchange Control Panel which is the ability to create new Mailboxes, the answer is simple: No. The feature was removed in the RTM release of the product.
A list of all mailboxes will be listed on the initial page, and we can use the Select View field which has All Mailboxes, user mailboxes, Room mailboxes or Mailboxes on litigation hold to sort the mailboxes that are being listed based on those attributes. We can also search a specific mailbox typing in the field right below Details and Refresh buttons. In the same field we can use a wildcard, for example, if you want to list all users that end with 01, just type in *01 and here you have the results (figure 03).

Figure 03
If we double click on a user or select the user and click on Details, then we will have access to configure some more attributes related to the user (not all of them), add additional e-mail addresses, mail tip, mailbox features and etc., as shown in Figure 04.

Figure 04
Managing Distribution Groups
Distribution Groups are a little bit different using ECP, in this module we can create and delete Distribution Groups using the ECP interface. Let’s click on Distribution Groups and we will notice that besides of the current groups being listed, we have more buttons on the main page. Also we can manage the Group Naming Policy for new groups, as shown in Figure 05, where we can control how the group naming convention is applied to the new groups.

Figure 05
If you want more details about this specific feature, you can go to the second article of the Managing Distribution Groups here at MSExchange.org.
In order to create a new group, just click on New Group on the main page of Distribution Groups and the New Group page requires only a few fields (Figure 06), such as Group Name and Alias. We can define if the group is going to be a security group as well (If it is a Security Group then the membership will be automatically changed to closed). We can also change the ownership of the group and initial members and finally the membership approval process (to join the group these are the available options: Open, Closed or Owner approval; to leave the group we have two options: Open or Closed).

Figure 06
All new Distribution Groups created through ECP will be created in the Users container. To delete an existent group, just select the group and click the Delete button, a dialog box will request confirmation before deleting the group.
As soon as the new group is created, select it and double click to load more options, for example: Hide this group from the shared address book, delivery management, message moderation to the group (Message Approval section).
Managing Contacts
Another area that can be managed through ECP is External Contacts, let’s click on External Contacts and all current contacts will be listed and get the option to create new contacts through the New… button. Let’s click on it and a simple web page will be displayed. We can fill out the basic information for a new contact, as shown in Figure 07.
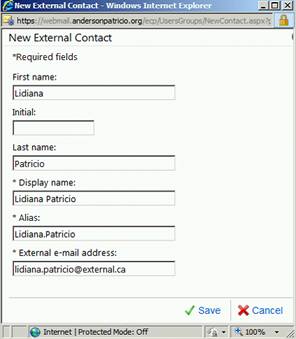
Figure 07
The new contact will be located in the Users container of your domain, and it can also be seen in the Exchange Management Console (Figure 08). The page to create a new contact is really simple, after creating a new contact, select it and a double click will load more options, such as: General information, Contact Information, Organization, MailTip and e-mail options.

Figure 08
Conclusion
In this first article we went through the Exchange Control Panel and we checked all the available options to manage Mailboxes, Distribution Groups and Contacts using just the web browser interface. Using the RBAC flexibility we can leverage the web interface capabilities and delegate easy tasks such as, basic user management to non-IT departments such HR for example.
If you would like to read the other parts in this article series please go to:


great tips!!!
thanks!