When developing your PowerShell scripts or trying to find the shortest path to complete a task in the console or your code, the use of background execution saves time. In this article, we are going over the PowerShell jobs feature using Azure cmdlets and see scenarios where we can start a job from scratch or use built-in switches in existing cmdlets.
Using -AsJob and -NoWait
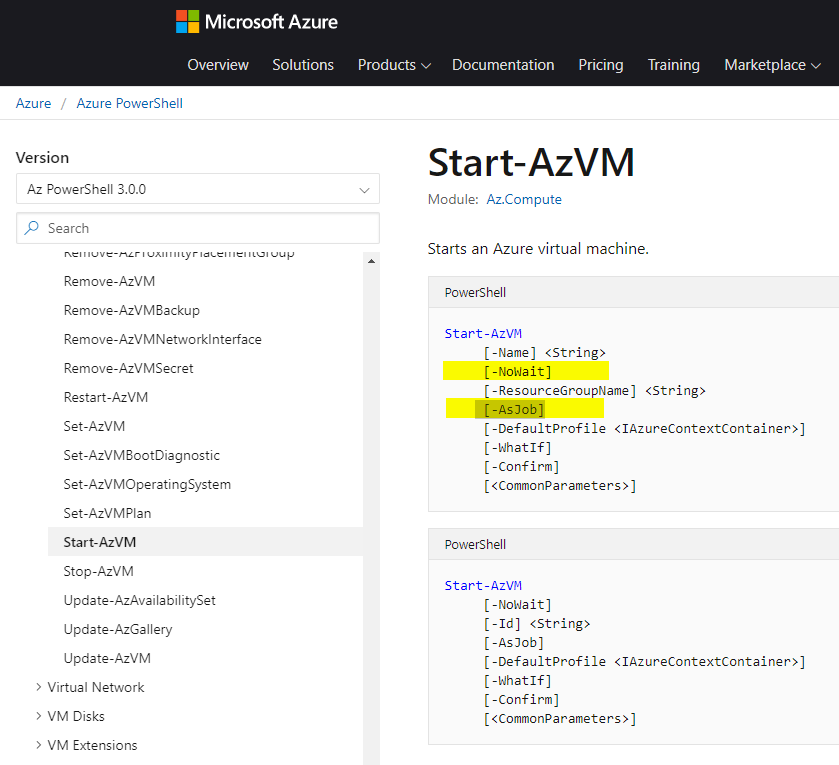
When using scripts or just cmdlets in the console, the administrator always can take advantage of both switches -AsJob and -NoWait instead of waiting for a command to execute. The first step before using them is to find out if the cmdlet that you are planning to use supports it. The best way to find that out is by searching Microsoft documentation. In the example below, we can see that both AsJob and NoWait are supported parameters to the Start-AzVM cmdlet.
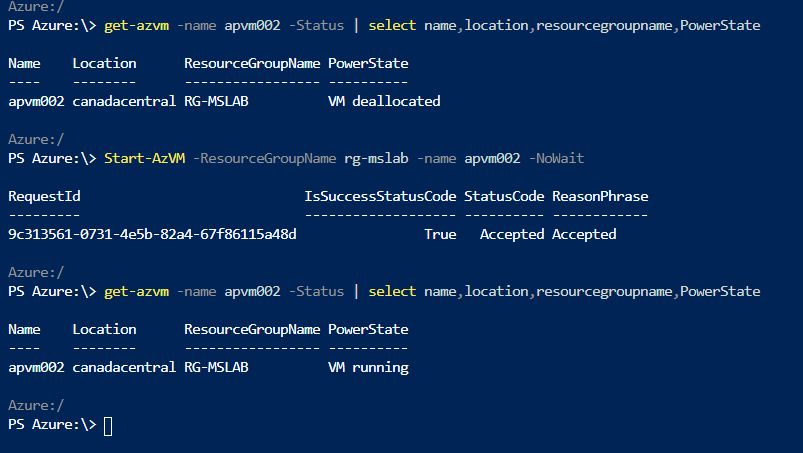
When using -NoWait (code below), the cmdlet does not wait to provide you with an answer and releases the console/script to execute other commands. The execution will happen in the background, but we cannot interact with that command any longer.
In this scenario, we should check the status of the VM to validate if the cmdlet worked as expected (shown in the third line below).
Get-AzVM -Name apvm002 -Status | Select name,location,resourcegroupname,PowerState
Start-AzVM -ResourceGroupName rg-mslab -Name apvm002 -NoWait
Get-AzVM -Name apvm002 -Status | Select name,location,resourcegroupname,PowerState
When using -AsJob, a new background job is created by the cmdlet. We can manage jobs using a variety of *-Job cmdlets. In the example below, we stop the VM and then we check the status of the jobs.
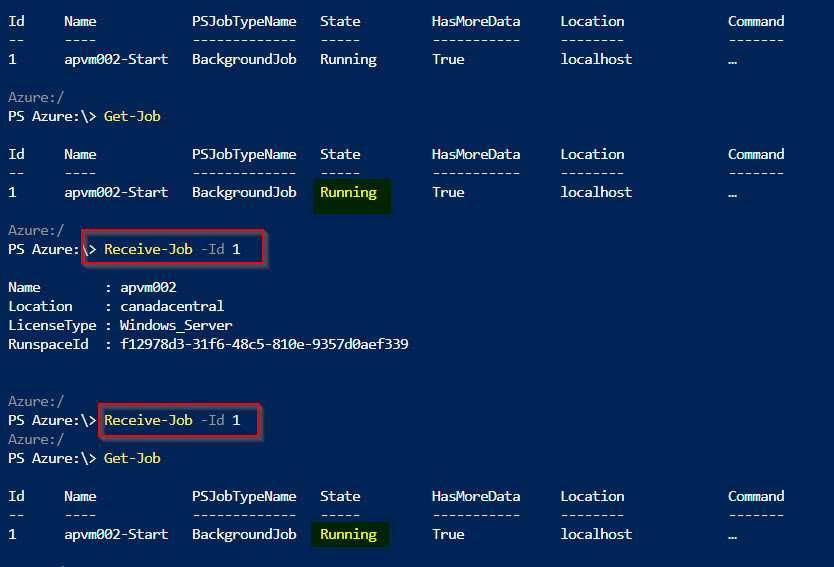
The output of the cmdlet was the Job ID, which can be used to retrieve information about the job. We can list all current jobs in the current session by executing Get-Job, and it will provide a list with job ID, name, state, and so forth.
You may have noticed that the PowerShell job that we trigger is with the blocked state. If we want to see what is going on in any given PowerShell job, we can always use Receive-Job <ID>, and by doing that we found out that the job is asking for confirmation, as soon as you provide the job will keep running.

The -AsJob is a nice one to use when you need to run something in the background and release your script/console to perform other activities at the same time. However, if you need more control such as creating a job name associated with the VM name or run a block of commands, we need to step up our game and use the job feature in its entirety.
A small note: Even if the cmdlet does not support -AsJob natively, we can always send a cmdlet to be executed in the background with PowerShell. Make sure to add an “&” at the end of your command, and that will create a job automatically.

Getting more professional: Creating PowerShell jobs
Using Start-Job cmdlet allows better control of the flow. For starters, we can assign a name to a job and reference the job by its name.
Start-Job -Name <JobName> -InitializationScript {<code>} -ScriptBlock {<code>}
There are some caveats when using Start-Job. The first one is that variables created outside of the ScriptBlock are not allowed using traditional methods. We have to use $using:<variable-name> to use variables that were created outside of the ScriptBlock.
In the following code, we can see the proper way to use variables created outside of the ScriptBlock. The code below starts the Azure VM and releases (finishes the job) when the VM achieves the “VM Running” status.
$vmname = "apvm002"
$ResourceGroupName ="RG-MSLAB"
Start-Job -Name ($vmname + "-Start") -ScriptBlock {
Get-azvm -Name $using:vmname -ResourceGroupName $using:ResourceGroupName | select Name,Location,LicenseType
Start-AzVM -Name $using:vmname -ResourceGroupName $using:ResourceGroupName
$vStatus = $False
while ($vStatus -eq $False) {
$temp = Get-AzVM -Name $using:VMName -Status | Where-Object { $_.PowerState -eq "VM Running"}
If ($temp){
Write-Output ("The VM " + $using:VMName + " is running!!")
$vStatus = $True
} Else {
Write-Output ("The VM " + $using:VMName + " is not compliant. Waiting the VM to be turned " + $Status + ".")
}
}
}
The same holds for functions and modules. If we need something to be available for the ScriptBlock. We can add that piece of code within the ScriptBlock or use the InitializationScript to run some code to prepare the requirements and allow the ScriptBlock to run.
Managing PowerShell jobs
We have seen that in the last section, that using Get-Job is the primary cmdlet of the *-job family where we can retrieve all jobs that were triggered in the current session. We can use that to have a high-level overview of the jobs. Note: All jobs are related to your current session. A good example: If you are using Cloud Shell and open a new session or reconnect to the existing session, you will have an empty list of jobs.
To receive the output that is being generated by the job triggered, we can use Receive-Job -ID <IDNumber>. By default, the output of any given job is shown only once, if you want to see the output of a job on its entirety, we need to use Receive-Job -ID <IDNumber> -Keep. When we don’t use -keep, the default behavior will be similar to the image below. The second Receive-Job did not have anything to show at that time, although the job was still running.
The Receive-Job has some interesting switches, for example: -Wait and -AutoRemoveJob. In my opinion, the -Wait defeats the purpose of having a job because the console/code will not be released, but it can be useful during a troubleshooting process. The -AutoRemoveJob is helpful because it cleans up the job list.

If you have a long list of jobs and want to remove them, you can pipe cmdlets, as shown in the first line below. If you still have noncompleted jobs and even want to stop them and remove them from the list, we can always use the -force (second line).
Get-Job | Remove-Job
Get-Job | Remove-Job -Force
Featured image: Freepik


