Hyper-V has always been at least a little bit finicky when it comes to the use of DVD drives. Generation 2 virtual machines, for example, cannot use physical DVD drives at all. You can emulate a DVD drive within a Generation 2 VM by mapping the VM’s SCSI controller to an ISO file, but you cannot link the virtual machine to a physical DVD drive.
Generation 1 VMs are a different story. You can configure a Generation 1 virtual machine to use a physical DVD drive, but there is one big catch to doing so. Only one virtual machine can use the DVD drive at a time.
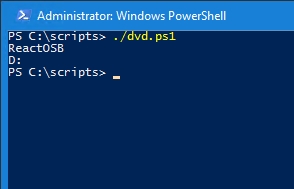
Which virtual machine is linked?
Now, normally this isn’t exactly a problem. After all, a VM would typically only need to capture a DVD drive for just long enough to install a piece of software from a DVD. The problem is, however, that once a VM captures a DVD drive, that DVD drive remains captured (and therefore inaccessible to other VMs) until it is released. Unfortunately, Hyper-V Manager does not simply tell you which VM is currently using the DVD drive. If you accidentally forget to release a DVD drive from a virtual machine, you may have to go through each VM, one at a time, until you figure out which one is occupying the DVD drive.
Thankfully, there is an easier way to figure out which VM is currently using a DVD drive. PowerShell gives us everything that we need.
For the sake of demonstration, I have captured a physical DVD drive to a VM named ReactOSB. Now, I am going to use the Get-VM PowerShell cmdlet, along with Select-Object * to display all of that virtual machine’s properties, which you can see in the screenshot below.

As you look at the screen capture above, there are two things to pay attention to. First, there is very limited information provided about the VM’s DVD drive. We can tell that it is on IDE controller number 1 at location 0, but that’s about it.
The other thing to notice is that some of the VM’s properties are encased in brackets, while others are not. Any time you see a property that is enclosed in brackets, that means that the property can be expanded to reveal more detail. In the screen capture above, the DVDDrives property contains a result that is enclosed in brackets, hence additional information is available about the VM’s DVD usage.
The way that we view the additional detail is by using the -ExpandProperty parameter along with the name of the property that needs to be expanded. In this case, that property is called DVDDrives. Hence, if we wanted to see detailed information about the ReactOSB VM’s DVD drive usage, we could use this command:
Get-VM ReactOSB | Select-Object -ExpandProperty DVDDrives
As you can see in the screenshot below, this command reveals that the controller type is IDE and that the DVD drive is mapped to controller number 1, location 0. We can also see that this is a pass-through DVD mapping and that the VM is using a physical DVD drive with the drive letter of D:

One small problem
OK, that’s all good and well, but there is a small problem. We started out knowing that this VM is mapped to the server’s physical DVD drive. The problem that I originally posed was that one of the VM’s has the physical DVD drive tied up, and we don’t know which one.
To be completely honest with you, there are about a zillion different ways that we could use PowerShell to figure out which VM is mapped to the DVD drive. I decided to use a relatively simple ForEach loop. Here is the script that I came up with:
$Servers = Get-VM
ForEach ($Server in $Servers) {
$DVD = $Server | Select-Object -ExpandProperty DVDDrives
If ($DVD.path -eq ‘D:’) {$Server.Name, $DVD.path}
}
The first line of the script creates a variable named $Servers, and maps that variable to the Get-VM cmdlet. Next, we launch into a ForEach loop that allows us to examine each of the VMs individually.
The third line of the script creates a variable named $DVD. The loop looks at each VM one at a time, and the $DVD variable gets mapped to the DVD information for the VM that is currently being examined. Finally, the script performs a check to see if the DVD drive’s path is equal to D:. If the path is mapped to D:, then the script displays the name of the virtual machine and the DVD’s path. If the path is not equal to D:, then the script simply ignores the VM and begins checking the next VM. You can see the script’s output below.
As I said a moment ago, there are many different ways that I could have written this script. In fact, we can simplify the script a bit. I chose to initially write the script in this way so that I could show you where the DVD mapping information comes from, but now I want to show you a shortcut.
As mentioned earlier, you can display the DVD mapping information for a VM by using this command:
Get-VM ReactOSB | Select-Object -ExpandProperty DVDDrives
As a shortcut, however, you could get the same result by typing:
Get-VMDVDDrive -VMName ReactOSB
You can see a comparison of the two commands in the figure below.

So with that in mind, the script can be simplified as follows:
$Servers = Get-VMDVDDrive *
ForEach ($Server in $Servers) {
If ($Server.path -eq ‘D:’) {$Server.VMName, $Server.Path}
}
As you can see, using the Get-VMDVDDrive cmdlet allowed me to shorten the script to only four lines of code.
Less common, still useful
As time goes on, it will become less and less common for VMs to be mapped to physical DVD drives. In the meantime though, it can be handy to have a simple script that can tell you which virtual machine is currently using the DVD drive.
Featured image: Wikimedia


