In the Cloud Era, we should not be attached to the servers and names like we are in the datacenter. We are starting to see that provisioning new virtual machines regularly is better than keeping the virtual machines in production for long periods. If we are going to use IaaS (infrastructure-as-a-service), the use of up-to-date virtual machine images makes the deployment of new VMs a more straightforward process than it already is. In this article, we are going over the process to create a new VM template, and we’ll show you several methods to deploy it.
If you are studying for Azure certifications, make sure that you understand the process to create virtual machine images, especially on the exam AZ 300: Microsoft Azure Architect Technologies.
Preparing the virtual machine images
The first step is to provision a VM that will be used to be our image. I want to highlight some hints that can be useful to you when creating your image, as follows:
- Make sure that you have all updates applied to the VM.
- Make sure all registry and folder settings defined.
- Remove the machine from the domain.
- Avoid installing agents, rely on Azure Automation to install AV and any other agent that you may have as corporate standard on your future VMs.
- Clear all Event Viewer channels and logs in general.
- Remove and clean any unnecessary files and folders in the operating system.
- Install any application that is not specific to the VM, and where there is a value to have such applications installed on the VMs that will consume this image.
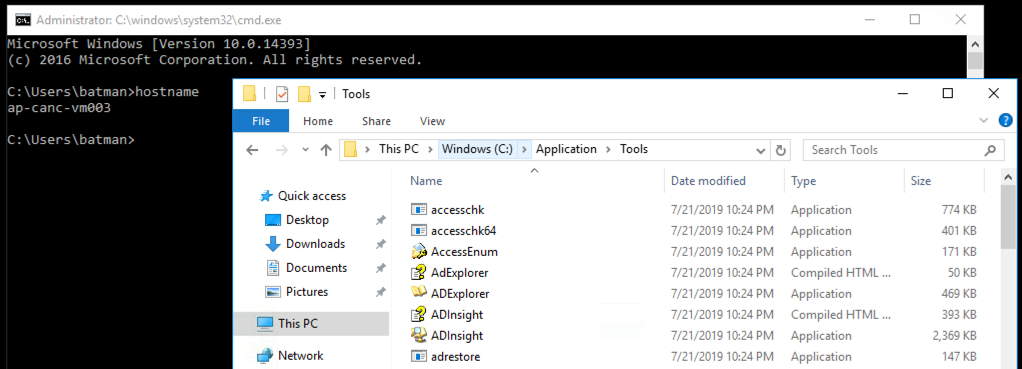
- Leave any critical files/scripts that can be used (in our case we left the SysInternal Suite on the folder C:\Application\Tools).
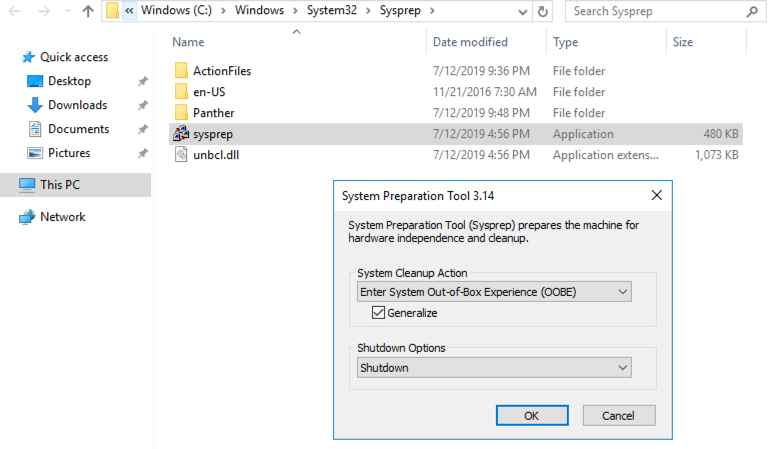
After that, I recommend restarting the machine before running the sysprep. The sysprep will reset all the unique information of that VM. Thus it will be in a perfect state to be an image. The sysprep tool can be found at C:\Windows\system32\sysprep. Double-click on Sysprep, select Enter System Out-of-Box Experience (OOBE) and Generalize. Make sure that shutdown is selected. Click OK and wait for the process to finish.
Creating a VM from the image using Azure Portal
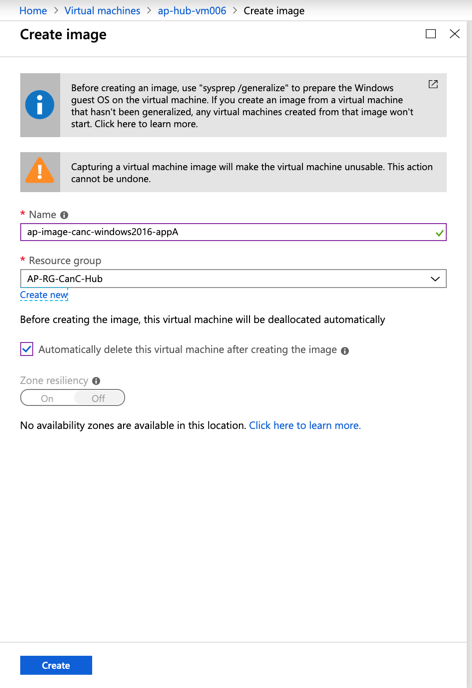
The sysprep process will shut down the VM automatically. Wait for the machine to show as Stopped in the Azure Portal.
To create a new template, click on Capture to start the process.

A new blade to create the image will be displayed, and we need to assign a name and a Resource Group to this new image. There is an option that I highly recommend you to use, which is Automatically delete this virtual machine after creating the image.
If the region that your VM is located in supports Zone resiliency, you can turn it on and pick which zones you want that image to be hosted. This feature uses availability zones, which protects your workloads from a datacenter failure within a single region (each zone has independent power, cooling, and network). To start the image process, click on Create.
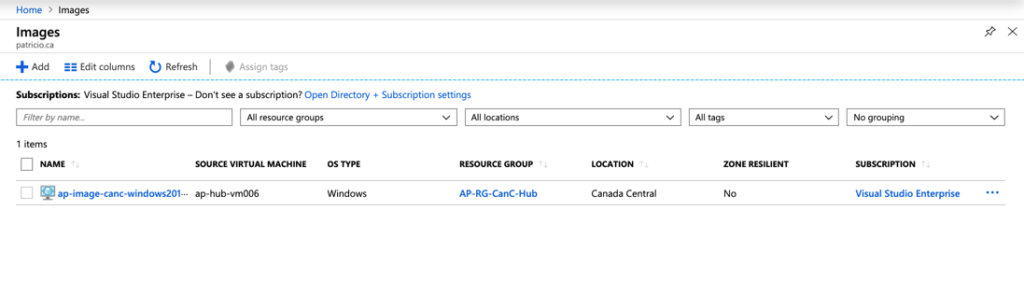
The result will be a new image resource available at the Resource Group level and also in the Images location.
Creating a new VM from the image using Azure Portal
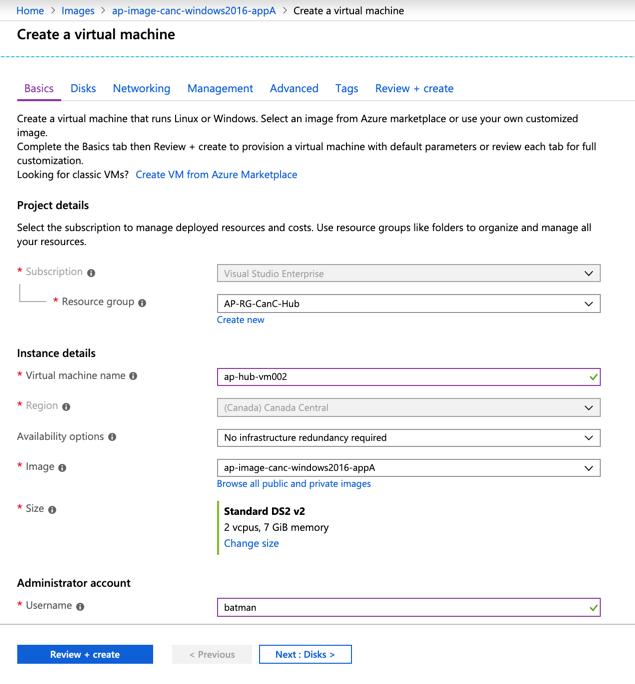
This process is straightforward. First search and open Images in the Azure Portal. A list of all images in the current subscription will be listed. Click on the desired image from the list.
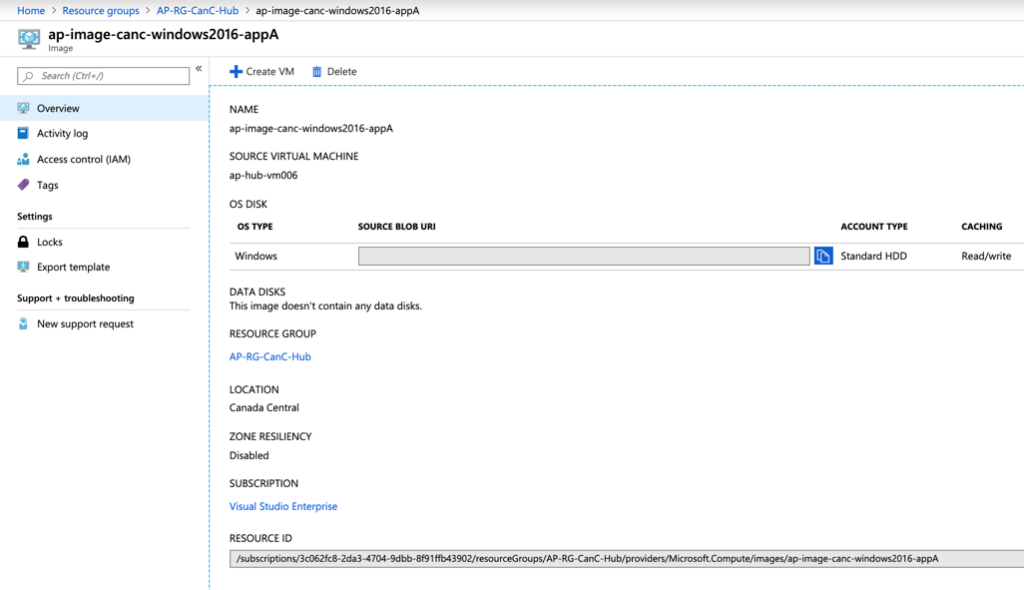
Every image has its blade with additional information, including the source virtual machine. To create a VM from this image, click on the Create VM button.
The wizard will be almost the same as when we provision a new VM. However, there are two places where you can see reference to an image. The first one is on the first page where the Image field is already filled out.
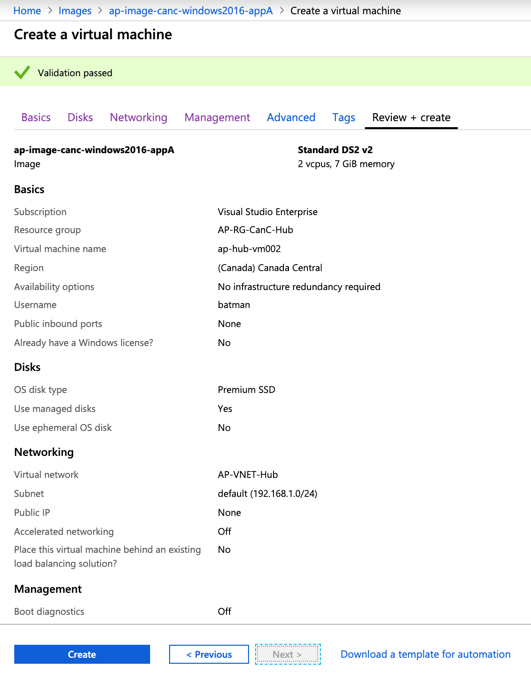
The second one is on the very last page, and the image information will be displayed at the top.
Creating a new VM from the image using PowerShell
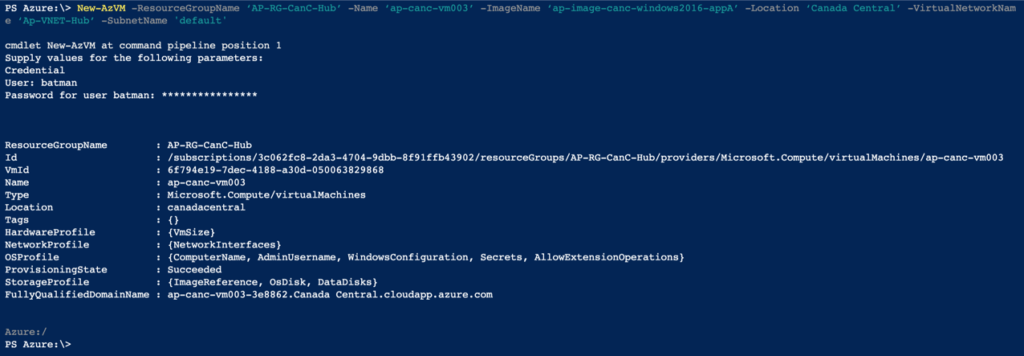
If you are more of a PowerShell type of a person, then we can use the New-AzVM cmdlet to provision a new VM. We need to make sure that we add the parameter ImageName. A simple syntax of the required parameters is listed below. Bear in mind that credentials will be requested to configure on the new provisioned VM.
New-AzVM -ResourceGroupName ‘Resource-Group-Name’ -Name ‘New-VM-Name’ -ImageName ‘Image-Name’ -Location ‘Region-Name’ -VirtualNetworkName ‘VNET-Name’ -SubnetName ‘Subnet-Name’
There are a few cmdlets that are required to retrieve all the information required for the New-AZVM cmdlet, as follows:
- Virtual network name: We can use Get-AZVirtualNetwork
- Subnet name: We can use Get-AzureRmVirtualNetworkSubnetConfig. It is easier to use that after Get-AZVirtualNetwork, for example, get-azvirtualnetwork -Name <VNET-Name> | Get-AzVirtualNetworkSubnetConfig
- Image name: We can use Get-AzImage
Provision the new VM from the image using ARM Templates
If you are using ARM Templates to deploy your infrastructure, you need to change a single line of code (in bold, below) to consume an image instead of a regular Marketplace image. When using our own images, we need to reference the Resource Id of the desired image as shown in the ARM Template below.
{
"name": "[parameters(‘virtualMachineName’)]",
"type": "Microsoft.Compute/virtualMachines",
"apiVersion": "2018-10-01",
"location": "[parameters(‘location’)]",
"dependsOn": [
"[concat(‘Microsoft.Network/networkInterfaces/’, parameters(‘networkInterfaceName’))]"
],
"properties": {
"hardwareProfile": {
"vmSize": "[parameters(‘virtualMachineSize’)]"
},
"storageProfile": {
"osDisk": {
"createOption": "fromImage",
"managedDisk": {
"storageAccountType": "[parameters(‘osDiskType’)]"
}
},
"imageReference": {
"id": "/subscriptions/3c062fc8-2da3-4704-9dbb-8f91ffb43902/resourceGroups/AP-RG-CanC-Hub/providers/Microsoft.Compute/images/ap-image-canc-windows2016-appA"
 }
},
"networkProfile": {
"networkInterfaces": [
{
"id": "[resourceId(‘Microsoft.Network/networkInterfaces’, parameters(‘networkInterfaceName’))]"
}
]
},
"osProfile": {
"computerName": "[parameters(‘virtualMachineName’)]",
"adminUsername": "[parameters(‘adminUsername’)]",
"adminPassword": "[parameters(‘adminPassword’)]",
"windowsConfiguration": {
"enableAutomaticUpdates": true,
"provisionVmAgent": true
}
}
}
}
Validating the new VM created from the image
If you follow the steps that we have just gone through, you shouldn’t have any surprises. Any new VM created from that image will have all the structure that we configured.
In this article, we have just created a folder called Application, with a subfolder called Tools, and inside we placed all the SysInternals Suite on it. We can see that the new VM based on the image has the same information.
Featured image: Shutterstock


