Protecting business-critical services like email is essential in the “wild, wild west” of today’s global online environment. Every day, more than 100 billion email messages are exchanged between corporations and their customers, so investing in email security is a must if you want your business to survive.
Cisco is one popular vendor of solutions in this area with their Cisco C-Series Email Security Appliances (ESAs), and you have the option of either running them as physical or virtual appliances depending on your organization’s infrastructure and needs. One systems administrator who has chosen to follow the virtual route is Andrew Perchaluk, a Senior Systems Administrator at the University of Manitoba in Winnipeg, Canada, who migrated his organization’s physical appliances to virtual ones.
I asked Andrew to walk him through his reasoning for doing this and how he performed the migration so our TechGenix readers facing similar challenges can learn from his experience and insights. If you’d like to contact Andrew or learn more about him you can see his LinkedIn profile or follow him on Twitter.
Evaluating the benefits of migration
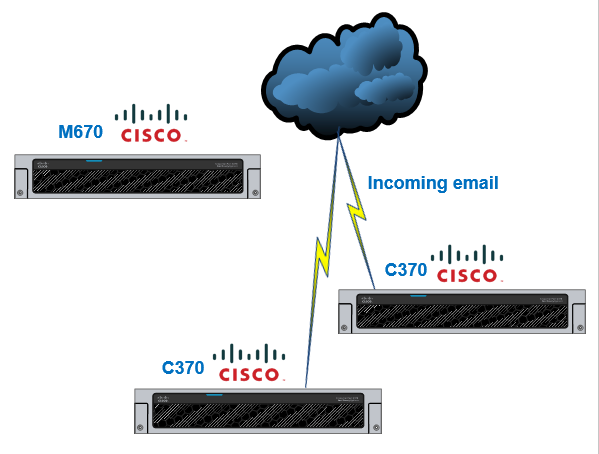
I recently finished a migration of our Cisco Email Security appliances from physical servers to virtual appliances (running on VMWare). In our environment, we went from 2 of the C370s (ESA), plus 1 M670 (Management) to 3 C600V (ESA) and 1 M600V (Management). I decided to go the virtual route for a number of reasons:
- Better performance: The C370 (8 CPU cores, 8GB Meminory) physical appliances could process 3-5 incoming messages per second and the C600V (8 CPU cores, 8GB Memory) virtual appliances could handle 12-15 incoming messages per second.
- Upgrade viability: The hardware limitation was preventing me from upgrading to a newer version of the Cisco Async OS that will offer a better feature set and more efficient handling of incoming spam and malicious email.
- Lower support costs: Cisco charges you annually for support on physical hardware, but with virtual appliances, you only need to pay the licensing costs (which you had to pay with the hardware too), and there is no additional charge to run the virtual appliances.
- End of Life hardware: The C370 appliances we were running are end of life and after next year purchasing support for them won’t be an option. With the virtual appliances, there is no longer an existing dependenc because you abstract the hardware layer.
The first diagram illustrates the configuration before the migration:
The second diagram illustrates the configuration after the migration:

Considerations before migrating
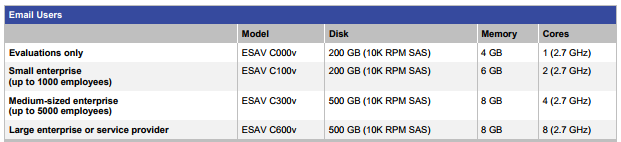
Look at Cisco’s virtual appliance options and pick the right one for your mail flow. The appliances require you to reserve the CPU and memory assigned to them:
If you have more than one in your environment, I highly recommend you set up clustering. It isn’t that difficult to do and it will save you quite a bit of time down the road. With Cisco clustering enabled, you only need to make a change (i.e. content filters, mail policies, etc.) to one device and it replicates to all devices in the cluster. For more about clustering, refer to this article. You will also need to contact Cisco support to reissue your ESA and Management licenses so that you will be able to license the virtual ESAs you set up. You can access the Cisco License Portal from here.
I also recommend reusing the existing IP addresses and FQDN (fully qualified domain name) from your physical ESA and Management systems. If you do this you’ll save a lot of time with:
- Firewall rules that won’t have to be adjusted
- MX and SPF records that won’t need updating
- SSL certificates that won’t need updating
- Administrative and Management web URL’s that won’t need to be changed or communicated
- No changes to SMTP will be required
- No changes to Exchange smart hosts required
Note: Be cautious of using Chrome for ESA GUI interface administration as you may experience issues.
Preparing to migrate
The first thing you’ll want to do is download the virtual ESA software you’ll be using from Cisco’s website and then create the VM by importing it into either your VMWare or Hyper-V environment. Make sure to place the VM’s network interfaces on the correct virtual networks that correspond to the physical ESAs interfaces:

I recommend reusing the IP and FQDN from your physical ESA, however, make sure you have a temporary IP available to use for the setup (the reuse of IP and FQDN won’t occur until the time of cutover).
Power on the virtual ESA and then go the console and login default user=admin, password=ironman. You will start by adding and configuring the Management network. Note that name the networks you set up should be the same as what they are on the physical ESA you will be cutting over. Proceed as follows:
- At the console (use Putty or preferred app to connect), type
[code gutter=”0″]interfaceconfig[/code]
- Follow the instructions to set up the management interface.
- This is where you will put in your temporary IP address.
- After completing the management setup, run the command
[code gutter=”0″]setgateway[/code]
and configure the default gateway.
- Once completed, type
[code gutter=”0″]commit[/code]
to activate the changes.
Add the license to the virtual ESA following these steps:
- Before this, highlight everything in your new XML license file you received from Cisco and choose Copy.
- At the console (use Putty or preferred app to connect) type
[code gutter=”0″]loadlicense[/code]
- You will get a warning. Type “yes.”
- Choose #1.
- Right-click in Putty to paste the copied license.
- Hit enter to move to a new line at the end of the file.
- Press CTRL-D.
I have noticed with the virtual appliances that at after this initial setup, they cannot download updates. Verify if your devices are receiving updates. If not, perform the following steps to update the dynamichost URL:
- From the CLI on the Virtual ESA type
[code gutter=”0″]updateconfig[/code]
then subcommand
[code gutter=”0″]dynamichost[/code]
- Enter new manifest hostname : port and change it to
[code gutter=”0″]update-manifests.sco.cisco.com:443[/code]
- Commit your changes.
Perform these same steps for the virtual management appliance as well to get it ready.
Migrating the ESAs
Now, you’re ready to migrate your physical ESA(s) to virtual. If applicable remove the physical ESA from the cluster. At the CLI type
[code gutter=”0″]clusterconfig[/code]
then
[code gutter=”0″]removemachine[/code]
From the GUI interface of the physical ESA, go to System Administration –> Configuration File, save the configuration file to your local desktop, and uncheck the “Mask Password” box. Review and Edit the config file if required to make sure the interfaces match. Use Notepad++ and compare the config of the physical ESA with that of the virtual ESA. Typically, you may have to remove any additional network interfaces from the config file of the physical ESA as they may have more NICs than the virtual ESA.
At this point, power-off the physical ESA. Load the config from the physical ESA into the virtual ESA System Administration –> Configuration File –> Load configuration file from local computer, commit changes, and review. If you are using clustering, then SSH to the virtual ESA and type
[code gutter=”0″]clusterconfig[/code]
–> join existing cluster –> enter the IP of existing member –> follow prompts. Review the virtual ESA configuration and check if it’s receiving updates. Test the mail flow and verify the management system (if you are using a management appliance) is receiving mail logs.
Repeat all of the above steps with any additional physical ESAs you are migrating.
Migrating the SMA
The SMA of management appliance can now be migrated. Start by making sure the M600V (or model of your choice) is online, with a different IP as the physical M670. Be sure to get the M600V to the same version as the physical M670.
This next step is optional but I recommend it: run a
[code gutter=”0″]backupconfig[/code]
on the physical M670. This will copy everything from M670 to M600V including tracking, reporting, and quarantine data. This will can take a few hours depending on how much data there is.
Now, from the GUI interface of the physical SMA, go to System Administration –> Configuration File, save the configuration file to your local desktop, and uncheck the “Mask Password” box. Review and Edit the config file if required to make sure the interfaces match. Use NotePad++ and compare the config of the physical ESA with that of the virtual ESA. Typically you may have to remove any additional network interfaces from the config file of the physical ESA as they may have more NICs then the virtual ESA.
At this point, power-off the physical SMA. Load the config from the physical SMA into the virtual SMA System Administration –> Configuration File –> Load configuration file from local computer. Note that if you experience any issues you may need to contact Cisco to assist with the import as there may be some edits required in the configuration file before importing.
Now, commit the changes and review your virtual SMA now has all data from the physical SMA. At this point, double-check that ESA appliances are reporting correctly to your virtual SMA. If not, go in and reconfigure them:
Additional information
The following are some Cisco Support docs you might find helpful for reference purposes:
- http://www.cisco.com/c/dam/en/us/td/docs/security/content_security/virtual_appliances/Cisco_Content_Security_Virtual_Appliance_Install_Guide.pdf
- http://www.cisco.com/c/en/us/support/docs/security/email-security-appliance/118065-maintainandoperate-esa-00.html
- http://www.cisco.com/c/en/us/support/docs/security/content-security-management-appliance/118459-technote-sma-oo.html
- http://www.cisco.com/c/en/us/support/docs/security/content-security-management-appliance/118441-technote-sma-00.html
Photo credit: Bing Images. License = All Creative Commons


