If you would like to read the next part in this article series please go to Windows Longhorn: Using Group Policy to Control Device Management (Part 2).
One particularly challenging aspect of Windows security has always been controlling the user’s access to the hardware on their workstation. Years ago, some of the more security conscious companies were removing CD-ROM and floppy drives from workstations. Today though, USB ports are an even more serious threat. Most electronics stores sell USB adapters for hard drives that allow the drives to be used externally. What this means is that it is easy for any user to plug in an external hard drive and copy all of the data that they have access to. I have known of companies to fill workstation USB ports with epoxy in an effort to prevent such intrusions.
If you don’t like the idea of permanently damaging workstation hardware, then there are a variety of third party products that are designed to help to restrict the user’s access to a workstation’s hardware. For example, GFI makes a product called GFI End Point Security (http://www.gfi.com/endpointsecurity/) that is designed to regulate which types of USB devices users are allowed to use. In Longhorn Server though, you will be able to regulate device management via group policy.
The Available Group Policy Settings
Longhorn Server offers several different group policy settings that can be configured in an effort to control device usage on workstations. If you open the Group Policy Editor, you can find the device installation related settings at Computer Configuration | Administrative Templates | System | Device Installation | Device Installation Restrictions. Figure A shows the group policy settings that are available. Before I talk about the individual group policy settings though, I should mention that these settings are only effective on computers running Windows Vista or Longhorn Server. They can not be used to lock down devices on computers running Windows XP.
Figure A: These are the available device installation related group policy settings
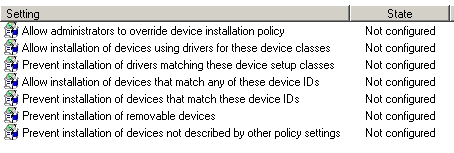
Now that you know which policy settings are available, I want to take a moment and talk about what each of the settings are used for. The first policy setting on the list is fairly self explanatory. The Allow Administrators to Override Device Installation Policy setting makes anyone who is a member of the Local Administrators group exempt from any device installation policies that you might establish.
The next policy setting on the list is Allow Installation of Devices Using Drivers for These Device Classes. This is just a complicated way of saying “restrict device by category”. A device class is nothing more than a device category. If you have ever opened the Device Manager, you probably noticed that devices are grouped by category, as shown in Figure B.
Figure B: The Device Manager groups devices by category

This grouping by category is more significant than you might at first realize. Each device class is a grouping of devices that are installed and configured in an identical manner. Devices within a class use the same co-installer when installed.
The reason why this is significant is because each device has its own Globally Unique Identifier (GUID) that identifies the device to the rest of the system. In addition, each device also has a GUID that corresponds to its class. This GUID lets Windows know what the device is so that the operating system knows how to interact with the device. If you can figure out a device’s GUID, then you can restrict or allow the uses of devices within that device class.
Of course the real trick is determining a device class’s GUID. To do so, open the Device Manager and right click on a device within the class that you want to obtain the GUID for. Select the Properties command from the resulting shortcut menu and you will see the device’s properties sheet. Now get to the properties sheet’s Details tab and select the Device Class GUID option from the Property drop down list, as shown in Figure C.
Figure C: You can get a class’s GUID from a device’s properties sheet

Now, go back to the Group Policy Editor and double click on the Allow Installation of Devices Using Drivers for These Device Classes setting. When you do, you will see the dialog box that’s shown in Figure D.
Figure D: This dialog box contains a Show button that you can use to show which device classes are allowed

This particular setting assumes that you have implemented a general block on device installations, but that you want to allow installations for one or more specific device classes. If you click the Show button, you will see a list of device classes that are currently exempt from the installation restrictions. Of course, no devices should be listed by default. Therefore, click the Add button and you will have the opportunity to enter the GUID for the device class of your choice. Click OK three times to close the various open dialog boxes and you are all set.
I just showed you how to allow device installations based on class. However, you can also do the opposite. The next group policy setting on the list is Prevent Installation of Drivers Matching these Device Setup Classes. This group policy setting works in exactly the same manner as the one that I just showed you, except that you use it to prevent the installation of devices within a class rather than allowing class based installations.
The next two available group policy settings are Allow (or prevent) Installation of Devices that Match any of these Device IDs. When we were working with device classes, we had to rely on the use of GUIDs. Although there are device level GUIDs, for some reason these particular group policy settings do not use them. Instead, they use the device’s plug and play ID.
You can find a device’s plug and play ID by right clicking on the device within the Device Manager and then selecting the Properties command from the resulting shortcut menu to reveal the device’s properties sheet. Next, select the properties sheet’s Details tab and then select the Hardware IDs option from the Property drop down list. The Hardware IDs will look something like what is shown in Figure E.
Figure E: You can use the Device Manager to gain access to a device’s hardware ID

As you can see in the figure, it is common for a device to have multiple hardware IDs. Furthermore, sometimes a single physical device will be listed as multiple logical devices. Sound cards are a classic example of such a device. The sound card itself will have its own hardware IDs, but so will the various logical devices listed under the sound card. Whether you are allowing or preventing a device, it is important to list all of the device’s hardware IDs.
As for the process of actually allowing or restricting a device, simply double click on the appropriate group policy setting, and you will see a dialog box similar to the one that’s shown in Figure F. As you can see in the figure, this dialog box is identical to the one that you saw when we were talking about device classes except that the example has changed to show you how you are supposed to enter a device’s hardware ID.
Figure F: This is the dialog box associated with entering hardware IDs

Conclusion
As you can see, the new device installation related group policy settings are very powerful. In Part 2, I will discuss the remaining policy settings as well as show you how to apply a blanket installation lockdown.
If you would like to read the next part in this article series please go to Windows Longhorn: Using Group Policy to Control Device Management (Part 2).


