Windows Server 2016 Essentials is a server edition for small businesses, typically those with a maximum of 25 users and 50 devices.
This cloud-connected server edition is ideal for those who’re currently using the Windows server 2012 foundation edition. Since 2016 doesn’t have a foundation edition, this is the best choice.
What’s new in Windows Server 2016 Essentials?
Windows Server 2016 Essentials comes with many new features that greatly enhance the server capabilities for small businesses. Here’s a look at some of these new features.
Integration with Azure Site Recovery Services
Azure Site Recovery Services replicates your virtual machines in real time. This way, when your server or your protected virtual machine goes down, you can failover with Azure Site Recovery. Obviously, this gives you better business continuity until the server is repaired and available again.
Integration with Azure Virtual network
When you’re migrating to the cloud, you tend to do it in small steps. Rarely, an organization migrates all its resources to the cloud in one go. Azure Virtual Network provides the network infrastructure to make the migration process seamless and manageable.
It comes as a part of Microsoft Azure and helps organizations create a point-to-point or site-to-site virtual network to access resources. This way, the resources running on Azure appear as though they’re running on the local computer for a seamless access.
Support for large deployments
Some small businesses need more functionality and capacity to deploy their applications. Windows Server 2016 Essentials supports such large deployments with multiple domains and domain controllers.
With these new features, Windows Server 2016 Essentials is sure to be a great addition to your business. Next, let’s see how you can install and configure this server.
How to install and configure Windows Server 2016 Essentials

Here is a step-by-step guide to installing Windows Server 2016 Essentials.
Pre-essentials for installation
Before installing Windows Server 2016 Essentials, check if you have the following system requirements:
- CPU — The minimum is 1.4GHz for single core and 1.3GHz for multicore processors while the recommended is 3.1GHz.
- Memory — The minimum you need is 2GB, or 4GB if you plan to use Windows Server 2016 Essentials as a virtual server. The recommended is 16GB while the maximum you can use is 64GB.
- Hard disks — The minimum you need is a 160GB hard disk with a 60GB system partition.
Besides system requirements, you also need the following components:
- Network adapter
- Internet
- Supported client operating systems such as Windows 8.1, Windows 8, Windows 7, Macintosh OS X version 10.5 to 10.8. Some features may also need professional or full editions.
- A router that supports IPv6 or IPv4 NAT
With all the system requirements in place, verify if your router is configured to suit Windows Server 2016 Essentials:
- Check if the UPnP framework is enabled.
- Dynamic Host Configuration Protocol (DHCP) can be enabled or disabled because Windows Server 2016 Essentials ensures that DHCP is not running on both server and the router. So, if it’s enabled on one, it will be disabled on the other.
- Ensure that username and password are configured on your router, even if the device supports UPnP framework.
- The router is connected to the LAN and through it to the Internet.
- If you have to manually configure the router, make sure it’s set to port 80 for HTTP traffic and port 443 for HTTPS web traffic.
- Finally, check if the router is working fine.
Installation
Once you have the pre-essentials ready, start the installation process. It’ll take anywhere around 30 minutes for the installation, though the exact time depends on the underlying hardware.
- As a first step, connect your computer to your network and make sure you don’t disconnect it until the installation is complete.
- Next, turn on your computer and insert the Windows Server DVD.
- Restart your computer. You’ll get this message — “press any key to boot from CD or DVD,” and press any key when you see this message.
- Next, choose the language, time and date format, input method, and other options.
- Click the “install now” button.
- Enter the product key when you get a prompt for it.
- Accept the terms and conditions, and click “next.”
- Then, choose the custom installation option, and also select the hard drive where you want to install the server. It’s a good idea to check the availability of hard drives before selection. A note here — you need a minimum of 60GB on your hard drive. It’s best to partition your hard drive and install it on the C: drive. Keep all your business data in the other partition.
This process will complete the installation of Windows Server 2016 Essentials.
Configuration
After you install, you can start configuring your server. It’ll take about approximately 30 minutes to complete this process.
- As a first step, check if the local network adapter is connected to a router, and make sure everything is working fine.
- When you start configuring, the first page prompts you to verify the date and time settings. In general, choose the settings that are used by the host operating system. This is important because the installation may fail if the time zone settings are different. When you’re done, click the “next” button.
- The configuration wizard will take you to “choose server installation mode” page. On this page, select the “clean install” option if you want to install a new version. Choose “server migration” if you want to join this server to an existing domain.
- The next one is “personalize your server page.” Enter your organization’s name, an internal domain name, and the server name. Make sure the server name is unique. Also, you can’t change the server or internal domain name after you complete this step.
- When you click “next,” the configuration wizard will take you to “provide your administrator account information” page. Here, enter the details for a new administrator account. Never use “administrator” or “network administrator” as the name on the account because these names are reserved for system use.
- In the next page, enter the details for a new standard user account.
- Next, the wizard will take you to “keep your server up-to-date automatically” page, where you can choose how to get Windows Updates for your server.
- Next, the “updating and preparing your server page” shows the progress of the installation process. During this time, your computer will restart a few times, and that’s perfectly fine.
- When the configuration is done, you’ll see a “your server is ready to be used” page.
- Finally, go to the “set up my server” tasks on the server’s home page. All the listed tasks have to be completed immediately after the Windows Server installation is finished.
With this, you’re all set to use your server.
Your dashboard looks like this.
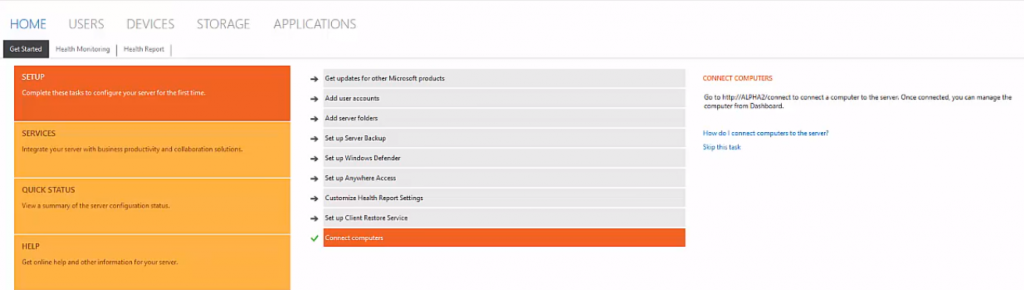
You can now customize your server the way you want.
Overall, Windows Server 2016 Essentials is a great tool for small businesses as it is designed to suit a small number of users and devices. At the same, it supports large deployments to help the business to expand beyond their initial capacity. The easy installation, configuration, and usage also make it ideal for users of all technical knowledge.
Have you used Windows Server 2016 Essentials? Please share your experience with us in the comments section.


Did I miss something, Windows 10 is not supported as a client OS?
Stephen, yes they are supported. You need to join them to the domain first.
One catch is if you use Windows 10 Home edition. This edition does not support the “domain join” function. You can still use it and need the connector.exe tool to connect it. You will however be logging in using the local SAM account database instead of Active Directory. If this is the case you should really upgrade to get the best benefit from WSE 2016.
Cheers,
Mikel
I just followed this exact process, but at configuration step 3, there is no “choose server installation mode” page and there is no “migration mode” option. Are there any extra steps that you took to get that page?