Introduction
We all need proper DNS resolution for our network applications. Let’s face it, when DNS resolution is not working, using anything on your computer that has to do with networking is painful because there is good chance it will not work. DNS really is not a “nice feature” of a network, it is a requirement. As a network admin, I have heard the alarming cry of end users moaning that the network is down, when it would be the cause of the DNS servers. In these cases I assure them that the network is up and running fine but it is the DNS servers that are down! As you can imagine, that does not go over very well with them because to an end user, it is all the same thing. DNS is “the network” (not that they know what DNS is anyway).
So how do you troubleshoot this critical network infrastructure service when you are on an end user PC (or your PC) and DNS is not resolving a DNS name? Here are the 10 tips and tricks that I recommend you try to get DNS working again…
1. Check for network connectivity
Many times, if you open your web browser, go to a URL, and that URL fails to bring up a website, you might erroneously blame DNS. In reality, the issue is much more likely to be caused by your network connectivity. This is especially true if you are using wireless networking on a laptop. With wireless security protocols, the key will be periodically renegotiated or the signal strength will fade, causing a loss of network connectivity. Of course, you can lose network connectivity on any type of network.
In other words, before blaming DNS for your problems, start troubleshooting by checking “OSI Layer 1 – Physical” first and then check your network connectivity. Here you should find a wireless connection with a valid Internet connection.
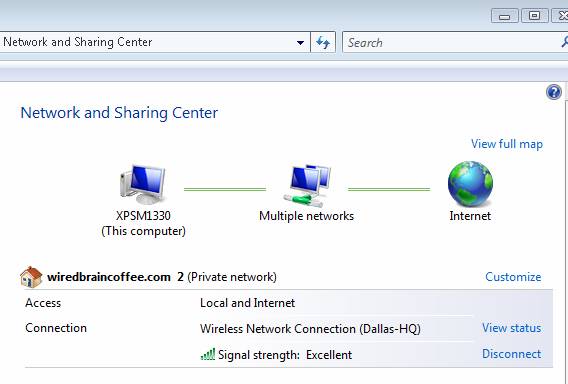
Figure 1: Good Wireless Network Connection
Notice how the Access is Local and Internet. If it just said “Local” then you do not have a valid network address (you only have a private APIPA that starts with 169.x.x.x).
This brings me to my next point. Make sure that you have a valid IP address on your network. You can check this out by going to View Status on the screen above and then to Details, you can check your IP address and verify your DNS Server IP addresses. Again, if you have a 169.x.x.x IP address you will never get to the Internet. Here is what it looks like:
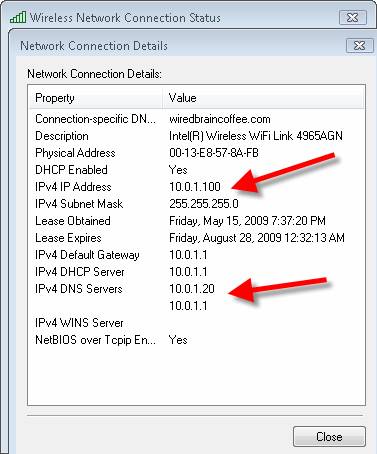
Figure 2: Verifying your IP address and DNS Server IP addresses
2. Verify your DNS server IP addresses are correct and in order
Once you know that you have network connectivity and a valid IP address, let us move on to digging deeper into DNS by verifying that your DNS Server IP addresses are correct and are in the right order.
If you look at Figure 2 above, you can see the IPv4 DNS Server IP addresses. Notice that these are both on my local LAN / subnet so that I can access them even if my default gateway is down. This is how it works on most enterprise networks. However, your DNS servers do not always have to be on your subnet. In fact, with most ISPs, the DNS Server IPs would not even be on the same subnet as the default gateway.
In most home/SMB router configurations, they do not have their own DNS servers and the SMB router is proxying DNS to the real DNS Servers. In that case, your DNS Server IP address may be the same as your router.
Finally, make sure that your DNS Servers are in the right order. In my case, with the graphic in Figure 2, my local DNS Server is 10.0.1.20. It is configured to forward any names that it cannot resolve to 10.0.1.1, my local router. That router is proxying DNS to my ISP’s DNS Servers. I can look up those DNS Servers on my router, shown below in Figure 3.
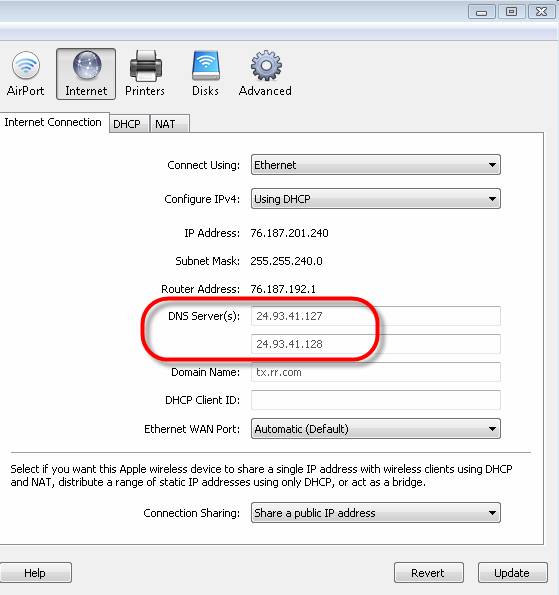
Figure 3: My local DNS Servers, received from my ISP via DHCP
That brings me to two more points. First, make sure that your DNS Servers are in the right order. If you have a local DNS Server, like I do, and you are looking up a local DNS name, you want your PC client to lookup that local DNS name in the local DNS Server FIRST, before the Internet DNS Server. Thus, your local DNS server needs to be first in your DNS settings as these DNS Server IPs are in the order that they will be used.
Secondly, you should be able to ping the IP address of your ISP’s DNS Servers. So, just as my DNS servers are listed above on my router, I can verify that I can ping them even from my local PC:

Figure 4: Pinging my ISP’s DNS Server
Notice how the response time from the ping to my ISP’s DNS Server is horrible. This could cause slow DNS lookups or even failure if it takes too long for the DNS server to respond.
3. Ping the IP address of the host you are trying to get to (if it is known)
A quick way to prove that it is a DNS issue and not a network issue is to ping the IP address of the host that you are trying to get to. If the connection to the DNS name fails but the connection to the IP address succeeds, then you know that your issue has to do with DNS.
I know that if your DNS Server is not functioning then it could be hard to figure out what the IP address is that you want to connect to. Thus, to carry out this test, you would have to have a network diagram or, like many network admins do, just have the IP address of a common host memorized.
If this works, until the DNS server is available again, you could manually put an entry in your hosts file to map the IP to the hostname.
4. Find out what DNS server is being used with nslookup
You can use the nslookup command to find out a ton of information about your DNS resolution. One of the simple things to do is to use it to see what DNS server is providing you an answer and which DNS server is NOT. Here is my nslookup of www.WindowsNetworking.com
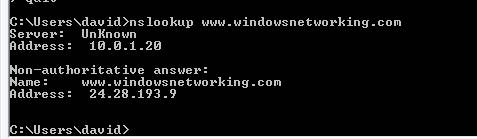
Figure 5: nslookup output
Notice, in Figure 5, how my local DNS server failed to respond but my ISP’s DNS server did provide me a “non-authoritative answer”, meaning that it does not host the domain but can provide a response.
You can also use nslookup to compare the responses from different DNS servers by manually telling it which DNS server to use.
5. Check your DNS suffix
If you are looking up a local host on a DNS server that your PC is a member of, you might be connecting to a host and not using the FQDN (fully qualified DNS name) and counting on the DNS suffix to help out. For example, if I were to connect to “server1”, the DNS server could have multiple entries for that DNS name. You should have your network adaptor configured with the connection specific DNS suffix, as shown on the first line on the graphic above, labeled Figure 1. Notice how in that graphic my DNS suffix is wiredbraincoffee.com. Whenever I enter just a DNS name like server1, the DNS suffix will be added on the end of it to make it server1.wiredbraincoffee.com.
You should verify that your DNS suffix is correct.
6. Make sure that your DNS settings are configured to pull the DNS IP from the DHCP server
It is likely that you would want your network adaptor to obtain DNS Server IP addresses from the DHCP Server. If you look at the graphic below, this adaptor has manually specified DNS Server IP addresses.
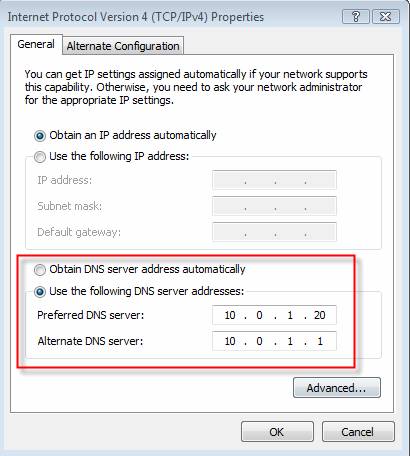
Figure 6: Verify DNS Server Settings
You may need to change to “Obtain DNS server address automatically” in order to get a new DNS server IP. To do this, open the Properties tab of your network adaptor and then click on Internet Protocol Version 4 (TCP/IPv4).
7. Release and renew your DHCP Server IP address (and DNS information)
Even if your adaptor is set to pull DNS information from DHCP, It is possible that you have an IP address conflict or old DNS server information. After choosing to obtain the IP and DNS info automatically, I like to release my IP address and renew it.
While you can do this with a Windows Diagnosis in your network configuration, I like to do it in the command prompt. If you have UAC enabled, make sure you run the Windows cmd prompt as administrator then do:
IPCONFIG /RELEASE
IPCONFIG /RENEW
Then, do an IPCONFIG /ALL to see what your new IP and DNS Server info looks like.
8. Check the DNS Server and restart services or reboot if necessary
Of course, if the DNS server is really hung, or down, or incorrectly configured, you are not going to be able to fix that at the client side. You may be able to bypass the down server somehow, but not fix it.
Thus, it is very likely that you, or the admin responsible for the DNS server, need to check the DNS Server status and configuration to resolve your DNS issue.
9. Reboot your small office / home DNS router
As I mentioned above in #2 and showed in Figure 3, on home and small office routers, the DNS server settings are typically handed out via DHCP with the DNS server set to the IP of the router and the router will proxy the DNS to the ISP’s DNS server.
Just as it is possible that your local PC has network info (including DNS server IP Addresses), it is also possible that your router has bad info. To ensure that your router has the latest DNS server information, you may want to do a DHCP release and renew on the router’s WAN interface with the ISP. Or, the easier option may be just to reboot the router to get the latest info.
10. Contact your ISP
We all know how painful it can be to contact an ISP and try to resolve a network issue. Still, if your PC is ultimately getting DNS resolution from your ISP’s DNS servers, you may need to contact the ISP, as a last resort.
Summary
DNS resolution is a critical piece of our network infrastructure and it must work properly for our network applications to function. In this article, I have given you 10 different ways to troubleshoot DNS resolutions issues, hope they are useful!


This is very helpful and educating
Still a bit confused on method #5. The rest were pretty clear and concise. Can anyone else dumb it down a bit for me? 🙂
open command prompt as admin and execute ipconfig/flushdns command to flush dns. Also change the dns to open dns or google dns. It will fix the issue.
Thanks it is very useful……
This is an odd one, and I am not sure if what I read will find my problem.
Problem:
Two computers on the same wireless network.
One comp. is WIN 10 the other is WIN 7.
The WIN 7 machine looses internet connectivity seemingly at random.
The “Status” of the network on the WIN 7 system says everything is fine, but web pages will not load.
Running diagnosis using the diagnose button in the connection properties dialog produces the result that says there is a problem with the DNS server.
From the above steps I would expect BOTH computers to lose their internet connectivity. But, that is not the case. Only the WIN 7 machine loses connectivity.
Thus, I am at a loss as to how to diagnose and fix the problem.
ALSO NOTE: None of the command line ipconfig commands work to restore the connection. The only thing that resolves the issue is a reboot of the system.
try cloudflare 1.1.1.1 dns or google public dns
@Andrew,
I am seeing the exact same symptoms as you! I’m reluctant to change the DNS servers to Cloudflare’s or Google’s because a Windows 10 laptop in my network isn’t having this issue.
or… @Sawai,
Do you know if there’s a reason why the Windows 7 machines need to be pointed to a third-party DNS server?
Thanks for the write-up as it helped me solve my problem where Win10 stopped resolving addresses but Mac had no problem. flushdns was no help. release/renew fixed the problem. Still not clear why Win10 is losing the DNS resolution after some number of hours but not the Mac.
Help me to reset my DNS RESULTS, my phone is telling me DNS RESULTS
Nice article, but there are other fixes as well that help you to reset the DNS issues on Windows 10.
that’s helpful, thanks
Did not work at all
Try changing your DNS setting in your router to a static DNS like Google (8.8.8.8 and 8.8.4.4) – this fixed my DNS problems.
Try cloud flare, one of the best way to resolve troubleshoot issues.