Publishing OWA Sites with a Unihomed ISA Firewall (2004) in Web Proxy Mode:
Placing the Web Proxy ISA Firewall in a DMZ Segment
By Thomas W Shinder, MD, MVP
Got questions? Discuss this article over at
http://forums.isaserver.org/ultimatebb.cgi?ubb=get_topic;f=23;t=000130
A number of organizations want to take advantage of the strong stateful application layer inspection mechanisms included with the ISA firewall (ISA 2004). These organizations may also have an existing firewall infrastructure. For those organizations that have an existing firewall infrastructure, I always recommend that they place their current stateful packet filtering firewall in front of the ISA firewall in a back to back firewall configuration. This provides the firewall administrator better firewall protection, as they can leverage the high-speed stateful packet filtering features of the traditional hardware firewall and the powerful firewall protection provided by the ISA firewall’s stateful application layer inspection.

The problem for many of these firewall administrators is that they cannot place the ISA firewall in-line with the stateful filtering firewall. There are a number reasons for this:
- Fear of the unknown
The ISA firewall is new product and many firewall administrators are concerned that the ISA firewall might not be as secure as the firewall they already have in place. They’ve been deluged with industry reports regarding Microsoft security issues over the years and they’re nervous about putting an ISA firewall inline. Never mind the fact there are weekly reports on security flaws in the two most popular firewalls on the market today.
This is a big problem and one of the main reasons why an organization cannot put the ISA firewall in-line with their current firewall infrastructure. I encountered a fairly large organization recently who wanted to put the ISA firewall in-line with their current firewalls so that they could benefit from the strong outbound access control and reporting/logging features provided by the ISA firewall’s Firewall Client configuration. However, we had to scuttle the project because this organization was also planning a SIP VoIP rollout and the lack of a SIP application layer gateway for the ISA firewall was a show stopper.
Many organizations have understaffed and overworked firewall administrators. The last thing they want to do is reconfigure the settings on their upstream firewalls to support placing the ISA firewalls on the back end. While the administrative overhead is minimal, the fact is that these harried and exhausted network administrators just don’t have the cycles available to make the necessary changes in their current firewall and network infrastructure to support placing the ISA firewalls behind their current firewall setup.
This is the one that drives me nuts. Many firewall and network administrators have had it pounded into their heads for so long that so-called “hardware firewalls” are more secure than a “software firewall” and that the ISA firewall could never be secured because it runs on a Windows OS. This drives me to distraction because this entire concept is based on hardware firewall vendor hype and misinformation. The fact is that the ISA firewall is as secure, or more secure, than any hardware firewall. We’re not aware of a single incident where the ISA firewall was successful attacked and “owned” by a criminal hacker. For more information on this issue, check out my article ISA Firewall Fairy Tales – What Hardware Firewall Vendors Don’t Want You to Know at http://isaserver.org/articles/2004tales.html
Whatever the reason, there are times when the ISA firewall needs to be “dumbed down” and made into a basic Web Proxy server. The ISA Server 2000 firewall had the installation option to install it in Cache Mode. The caching only mode ISA Server 2000 firewall had a single network interface card and was used only for forward and reverse caching. The forward caching feature allowed to be a Web proxy server for internal network clients and the reverse caching feature allowed it to act as a reverse Web proxy to publish Web sites on the internal network.
The ISA firewall does not have a caching only installation option. However, you can still easily configure the ISA firewall as a Web Proxy server by installing the ISA firewall software onto a machine that has a single network interface. The ISA firewall’s installation routine recognizes that the machine has only a single NIC and automatically configures the ISA firewall to act in Web Proxy mode only.
The Web Proxy mode only ISA firewall is a single NIC machine that provides both forward and reverse caching and proxy for internal and external hosts. You can use this configuration to publish OWA, OMA, and RPC over HTTP sites. In fact, you can publish any type of Web site using this configuration. The primary benefit gained by using the ISA firewall in Web caching mode over another Web Proxy solution is that you benefit from the strong stateful application layer inspection provided by the ISA firewall’s HTTP security filter.
To demonstrate how you would configure such as solution using the ISA firewall in Web Proxy mode and a third party packet filter firewall, we’ll set up the network and configure the Firewalls based on the figure below.

We can follow the path of the communications by looking at the numbered steps in the figure:
- The external client sends a request for http://owa.msfirewall.org/exchange/
- The packet filtering firewall is configured to NAT incoming connections on its external interface for TCP 80/443 to the unihomed ISA firewall in a DMZ segment and forwards the connection to the unihomed ISA firewall in the DMZ
- The ISA firewall has a Web Publishing Rule configured on it that tells it forward incoming requests for http://owa.msfirewall.org/exchange/ to the OWA server on the internal network. The packet filtering firewall is configured to NAT connections between the DMZ and the Internal network, so the unihomed ISA firewall forwards the connection to the DMZ interface of the packet filtering firewall. The unihomed ISA firewall in Web Proxy mode is configured with a HOSTS file entry mapping www.msfirewall.org to the IP address on the packet filtering firewall’s DMZ interface
- The packet filtering firewall is configured to NAT connections from the DMZ to the Internal network, and forward incoming connections for TCP 80/443 on the DMZ interface to the OWA server on the Internal network.
- The OWA server returns the response to the unihomed ISA firewall through the packet filtering firewall’s internal interface.
- The unihomed ISA firewall receives the response from the OWA server on the Internal network.
- The ISA firewall is configured with a default gateway that is the IP address of the DMZ interface of the packet filtering firewall, so it knows to send the response to the DMZ interface. This is required if the packet filtering firewall did not replace the source IP address in the incoming request with its own IP address. The ISA firewall forwards the response to the packet filtering firewall’s DMZ interface
- The packet filtering firewall forwards the response to the external host that initiated the connection.
Our sample network is configured with the IP address information included in the figure above. We will use a trihomed ISA firewall to simulate a non-ISA simple stateful filtering firewall, similar to popular “hardware” firewalls.
In order to simulate the unsophisticated approach to firewalling these “hardware” firewalls provide, we will create on the trihomed ISA firewall Server Publishing Rules for the HTTP connections from the external network to the DMZ and from the DMZ to the Internal network.
In this discussion I won’t go into the details of PKI and certificate assignment, as I’ve covered those in detail in many articles on this site and also in the ISA 2004 Exchange Kit. If you don’t have the ISA 2004 Exchange Kit docs, please write to me at [email protected] and I’ll point you in the right direction.
We will go into detail on how you can configure the trihomed ISA firewall to behave more like a traditional stateful filtering firewall, so that you can replicate the configuration in the figure above. You can then extrapolate the principles and procedures discussed in this article and apply them to the packet filtering firewall currently in use in your organization.
We will go through the following procedures in this article:
- Create the DMZ network on the trihomed ISA firewall
- Create the Network Rule that NATs traffic from the DMZ network to the External Network
- Create the Network Rule that NATs traffic from the Internal network to the DMZ network
- Create the Server Publishing Rule that forwards incoming connections to TCP 80 on the external interface of the trihomed ISA firewall to the unihomed ISA firewall on the DMZ
- Create the Server Publishing Rule on the trihomed ISA firewall that forwards incoming connections on the DMZ interface to TCP 80 to the OWA site on the Internal network
- Install the ISA firewall software on the unihomed ISA firewall on the DMZ segment
- Create the Web Publishing Rule on the unihomed ISA firewall that publishes the OWA site on the Internal network
- Create a HOSTS file entry on the unihomed ISA firewall on the DMZ segment that maps the FQDN of the OWA site to the IP address of the trihomed ISA firewall’s DMZ interface
- Make the connection from an external client
I will assume you have already installed the ISA firewall software on the trihomed machine that we’ll use to simulate the conventional stateful filtering firewall. In this example, there are no other rules on trihomed machine, and we will make no other rules on the unihomed ISA firewall. This isn’t a requirement, however. You can create whatever rules you like on your production machines.
Create the DMZ network on the trihomed ISA firewall
The Internal network is created when you installed the trihomed ISA firewall. If you want to configure other networks, you need to do this after the ISA firewall software is installed. The trihomed machine running the ISA firewall software has three NICs and one of the NICs is connected to a DMZ segment. We will create the Network Object on the trihomed ISA firewall so that we can create Access Rules controlling traffic moving into and out of the DMZ network.
Perform the following steps to create the Network:
- Open the Microsoft Internet Security and Acceleration Server 2004 management console and expand the server name. Expand the Configuration node and then click the Networks node.
- Click the Networks tab in the Details pane of the console. Click the Tasks tab in the Task Pane and then click the Create a New Network link.
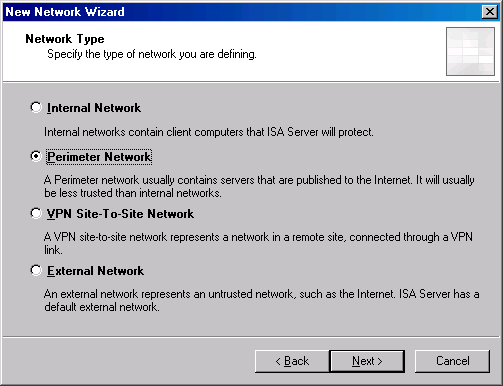
- On the Welcome to the New Network Wizard page, enter a name for the network in the Network name text box. In this example, we’ll name the network DMZ. Click Next.
- On the Network Type page, select the Perimeter network option. Click Next.
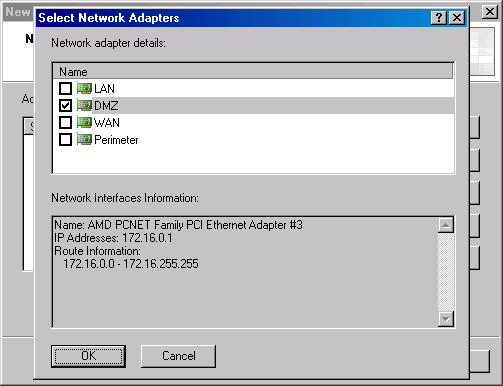
- On the Address Ranges page, click the Add Adapter button.
- In the Select Network Adapter dialog box, put a checkmark in the checkbox next to the DMZ interface. In this example, we have renamed the interface using the name DMZ. We will put a checkmark into that checkbox. Note the Network Interfaces Information that appears in the lower part of the dialog box. Click OK. (Note that in this scenario we have not configured a fourth adapter, although there is one that appears in the figure; the Perimeter adapter will not be used in this scenario).
- Click Next on the Network Addresses page.

- Click Finish on the Completing the New Network Wizard page.
- The new Network appears in the list of Networks on the Networks tab.

Create the Network Rule that NATs traffic from the DMZ network to the External Network
We will NAT traffic moving between the DMZ network and the External network. This allows us to hide the addresses of the servers on the DMZ segment. Because we are using NAT between the DMZ segment and the External network, we will need to use Server Publishing Rules to simulate the simple stateful filtering firewall’s capabilities.
Perform the following steps to create the NAT relationship between the DMZ Network and the External Network:
- While still on the Networks node, click the Network Rules tab in the Details pane.
- Click the Tasks tab in the Task Pane and click Create a New Network Rule.
- On the Welcome to the New Network Rule Wizard page, enter name for the Network Rule in the Network rule name text box. In this example we will name the rule DMZ -> External. Click Next.
- On the Network Traffic Sources page, click the Add button.
- In the Add Network Entities dialog box, click the Networks folder and then double click the DMZ entry. Click Close.
- Click Next on the Network Traffic Sources page.
- On the Network Traffic Destinations page, click the Add button.
- In the Add Network Entities dialog box, click the Networks folder and double click the External entry. Click Close.
- Click Next on the Network Traffic Destinations page.
- On the Network Relationship page, select the Network Address Translation option. Click Next.
- Click Finish on the Completing the New Network Rule Wizard page.
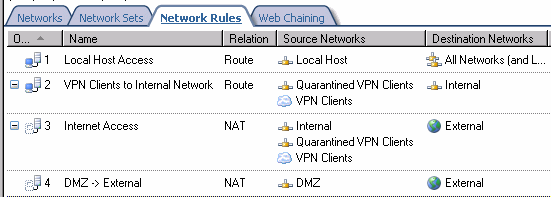
- Your Network Rule should look like the one in the figure below.
Create the Network Rule that NATs traffic from the Internal network to the DMZ network
The second Network Rule sets a NAT relationship between the Internal network and the DMZ segment. This allows us to hide the addresses of hosts on the Internal network from hosts on the DMZ segment.
Perform the following steps to create the Network Rule:
- While still on the Networks node, click the Network Rules tab in the Details pane.
- Click the Tasks tab in the Task Pane and click Create a New Network Rule.
- On the Welcome to the New Network Rule Wizard page, enter name for the Network Rule in the Network rule name text box. In this example we will name the rule Internal -> DMZ. Click Next.
- On the Network Traffic Sources page, click the Add button.
- In the Add Network Entities dialog box, click the Networks folder and then double click the Internal entry. Click Close.
- Click Next on the Network Traffic Sources page.
- On the Network Traffic Destinations page, click the Add button.
- In the Add Network Entities dialog box, click the Networks folder and double click the DMZ entry. Click Close.
- Click Next on the Network Traffic Destinations page.
- On the Network Relationship page, select the Network Address Translation option. Click Next.
- Click Finish on the Completing the New Network Rule Wizard page.
- Your Network Rule should look like the one in the figure below.

Create the Server Publishing Rule that Forwards Incoming Connections to TCP 80 on the external interface to the unihomed ISA firewall on the DMZ
Because we are simulating a simple stateful filtering firewall, we will use a Server Publishing Rule instead of a Web Publishing Rule to allow incoming connections to TCP port 80 to the unihomed ISA firewall on the DMZ network.
When we use a Server Publishing Rule in this scenario, we allow the trihomed ISA firewall to perform stateful filtering, but remove the stateful application layer inspection the ISA firewall could otherwise provide. This will effectively simulate the level of firewall protection performed by a typical “hardware” firewall.
Perform the following steps to create the Server Publishing Rule that allows incoming connections to TCP port 80 on the external interface of the ISA firewall to be forwarded to the unihomed ISA firewall on the DMZ segment:
- In the Microsoft Internet Security and Acceleration Server 2004 management console, expand the server name in the left pane of the console and click the Firewall Policy node. Click the Tasks tab in the Task Pane and click the Create a New Server Publishing Rule.
- On the Welcome to the New Server Publishing Rule Wizard page, enter a name for the rule in the Server publishing rule name text box. We will enter Publish ISA Web Proxy and click Next.
- On the Select Server page, enter the IP address of the server in the Server IP address text box. In this scenario the unihomed ISA firewall has the IP address 172.16.0.2, so we enter that into the text box. Click Next.
- On the Select Protocol page, click the New button.
- On the Welcome to the New Protocol Definition Wizard page, enter the name of the new protocol in the Protocol definition name text box. We will call it HTTP Server. Click Next.
- On the Primary Connection Information page, click the New button.
- In the New/Edit Protocol Connection dialog box, select TCP as the Protocol type. Set the Direction as Inbound. Set the From and To ports as 80. Click OK.

- Click Next on the Primary Connection Information page.
- Click Next on the Secondary Connections page.
- Click Finish on the Completing the New Protocol Definition Wizard page.
- Click Next on the Select Protocol page.

- On the IP Addresses page, put a checkmark in the External checkbox and click Next.
- Click Finish on the Completing the New Server Publishing Rule Wizard page.
- Your Firewall Policy should look like the figure below.

Create the Server Publishing Rule on the Trihomed ISA Firewall Forwards Incoming Connections on the DMZ Interface to TCP 80 at the OWA site on the Internal Network
The next step is to create the Server Publishing Rule that the unihomed ISA firewall will use to forward the connection to the OWA site on the Internal network. This server publishing rule will forward the OWA requests from the DMZ network to the Internal network OWA server.
Like the Server Publishing Rule we created to allow External hosts access to the unihomed ISA firewall on the DMZ segment, this Server Publishing Rule simulates the basic stateful filtering provided by a conventional “hardware” firewall and doesn’t expose the connection to the ISA firewall’s advanced stateful application layer inspection mechanisms.
Perform the following steps to create the Server Publishing Rule:
- In the Microsoft Internet Security and Acceleration Server 2004 management console, expand the server name in the left pane of the console and click the Firewall Policy node. Click the Tasks tab in the Task Pane and click the Create a New Server Publishing Rule.
- On the Welcome to the New Server Publishing Rule Wizard page, enter a name for the rule in the Server publishing rule name text box. We will enter Publish OWA Site click Next.
- On the Select Protocol page, select the HTTP Server protocol from the Selected protocols list. Click Next.

- On the IP Addresses page, put a checkmark in the DMZ checkbox and click Next.
- Click Finish on the Completing the New Server Publishing Rule Wizard page.
- Click Apply to save the changes and update the firewall policy
- Click OK in the Apply New Configuration dialog box.
- Your Firewall Policy should look like the figure below.

Install the ISA Firewall Software on the Unihomed ISA Firewall on the DMZ Segment
We’ll now move our attention to the unihomed ISA firewall on the DMZ segment. First, we need to install the ISA firewall software onto the machine that will be our unihomed ISA firewall.
Perform the following steps to install the ISA firewall software on the unihomed machine:
- Double click the ISAAutorun.exe file in the root of the ISA Server 2004 CD-ROM.
- Click the Install ISA Server 2004 link on the autorun page.
- Click Next on the Welcome to the Installation Wizard for Microsoft ISA Server 2004 page.
- Select the I accept the terms in the license agreement option on the License Agreement page. Click Next.
- Enter your User name, Organization and Product Serial Number on the Customer Information page. Click Next.
- Select the Typical option on the Setup Type page. Click Next.
- On the Internal Network page, click the Add button.
- On the internal network address range page, click the Select Network Adapter button.
- On the Select Network Adapter page, remove the checkmark from the Add the following private ranges checkbox. Put a checkmark in the Add address ranges based on the Windows Routing Table checkbox and put a checkmark in the checkbox next to the network interface in the unihomed ISA firewall. Click OK.

- Click OK on the Setup Message dialog box informing you that the routing table should be correctly configured.
- Notice that all IP addresses are considered internal when you configure the unihomed ISA firewall.Click OK in the internal address range dialog box.

- Click Next on the Internal Network page.

- Click Next on the Firewall Client Connection Settings page.
- Click Next on the Services page.
- Click Install on the Ready to Install the Program page.
- Click Finish on the Installation Wizard Complete page.
- If this is the first time the ISA firewall software is installed on the machine, you will be asked to restart. Allow the restart and log on as Administrator.
Create the Web Publishing Rule that Publishes the OWA Site on the Internal network
Now we can get to some real firewall configuration.
The unihomed ISA firewall on the DMZ segment will use a Web Publishing Rule to accept the incoming connection requests for the OWA site on the Internal network and forward then to the OWA server. Unlike the stateful filtering “hardware” firewalls, the unihomed ISA firewall on the DMZ segment exposes the connections both to stateful filtering and stateful application layer inspection. The HTTP Security filter performs the stateful application layer inspection for the OWA publishing rule.
Perform the following steps to create the OWA Web Publishing Rule:
- Open the Microsoft Internet Security and Acceleration Server 2004 management console and expand the server name. Click on the Firewall Policy node. On the Firewall Policy node click the Tasks tab in the Task Pane. Click the Publish a Mail Server link.
- On the Welcome to the New Mail Server Publishing Rule Wizard page, enter a name for the rule in the Mail Server Publishing Rule name text box. We will call this rule Web Publish OWA. Click Next.
- On the Select Access Type page, select the Web client access: Outlook Web Access (OWA), Outlook Mobile Access, Exchange Server ActiveSync option. Click Next.
- On the Select Services page, select only the Outlook Web Access option and click Next. (leave the default setting for Enable high bit characters used by non-English sets option enabled).

- On the Bridging Mode page, select the Standard connections only option. Note that we use this option only for this demonstration because I’m too lazy to assign the certificates required on the OWA site and ISA firewall. In a production network, you should always use SSL to SSL bridging to protect the connection from end to end. You can check the unihomed Web Proxy configuration article in the ISA 2004 Exchange Kit for details on generating and binding the certificates. Click Next.
- On the Specify the Web Mail Server page, you enter information about the server you are publishing in the Web mail server text box. In this example, we want to use the same FQDN from end to end. That is to say, the external users will use the name owa.msfirewall.org to reach the unihomed ISA firewall on the DMZ segment and the unihomed ISA firewall will redirect to the OWA site on the Internal network using the same name, owa.msfirewall.org. This is the best and most efficient method of doing the redirect from the unihomed ISA firewall to the OWA site on the Internal network. Note that the name you put in the Web mail server text box must resolve to an IP address that can reach the OWA site. If the network relationship between the DMZ and the Internal network were a route relationship, the name would need to resolve to the actual IP address of the OWA server. However, in our current example, we have a NAT relationship between the Internal and DMZ network, so we have published the OWA site and this name must resolve to the IP address on the DMZ interface. We will later create a HOSTS file to support resolving this name to the correct address. Click Next.

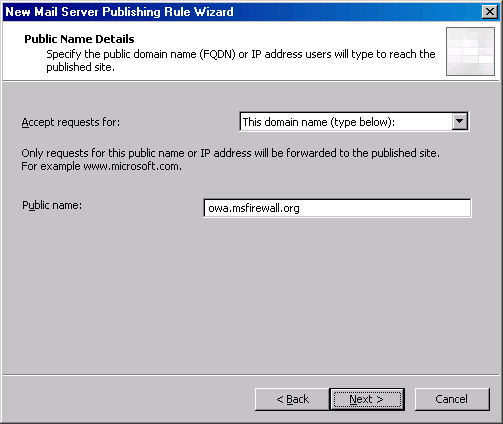
- On the Public Name Details page, enter the name the external users will use to access the OWA site. Since we always prefer to use the same name from end to end, we will enter owa.msfirewall.org in the Public Name text box. Make sure that the Accept requests for has This domain name (type below) selected. Click Next.
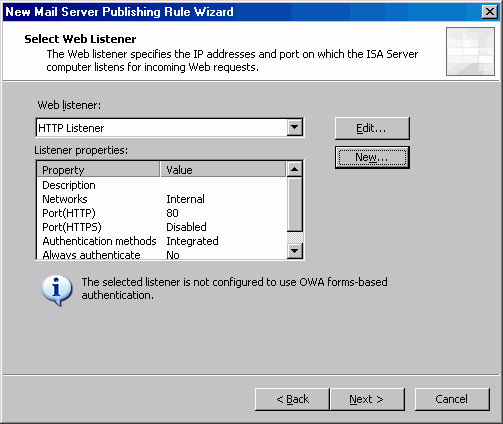
- On the Select Web Listener page, click the New button.
- On the Welcome to the New Web Listener Wizard page, enter HTTP Listener in the Web Listener name text box. Click Next.
- On the IP Addresses page, select the Internal network by putting a checkmark in the checkbox for Internal. Click Next.
- On the Port Specification page, confirm that there is a checkmark in the Enable HTTP checkbox and that the HTTP port is 80. Do not put a checkmark in the Enable SSL checkbox. If this were a production network, we would create an SSL listener for the OWA publishing rule. Check out the ISA 2004/Exchange Kit for details on how to create the SSL listener and how to bind the Web site certificate to the ISA firewall’s Web listener. Click Next.
- Click Finish on the Completing the New Web Listener Wizard page.
- Click Next on the Select Web Listener page.
- Click Next on the User Sets page.
- Click Finish on the Completing the New Mail Server Publishing Rule Wizard page.
- Click Apply to save the changes and update the firewall policy.
- Click OK in the Apply New Configuration dialog box.
- Your Firewall Policy should look like the figure below.

Create a HOSTS File Entry on the Unihomed ISA Firewall on the DMZ segment that Maps the FQDN of the OWA Site to the IP address of the Trihomed ISA Firewall’s DMZ Interface
We need to create a HOSTS file entry on the unihomed ISA firewall so that it resolves the name owa.msfirewall.org to the IP address on the DMZ interface. Remember, we do this because we have a NAT relationship between the Internal network and the DMZ network and have created a Server Publishing Rule to allow inbound access to TCP port 80 from the DMZ network to the Internal network. If you had a route relationship between the DMZ segment and the Internal network, then you would enter the actual IP address of the OWA server in the HOSTS file.
You can find the HOSTS file at:
\WINDOWS\system32\drivers\etc
Add a line that maps the FQDN of OWA site to the IP address of the DMZ interface:
172.16.0.1 owa.msfirewall.org
You can see the line in the figure below. Close the HOSTS file and save the changes.

The entry made to the HOSTS file will be place in the DNS cache immediately. You can ping owa.msfirewall.org and the IP address you entered into the HOSTS file will appear. However, the ping will fail because there is no rule allowing inbound ICMP query requests from the DMZ network to the Internal network.
Make the Connection from an External Client
Now we’re ready for the grand finale! However, before we try the connection, we need to make sure that the Windows XP client on the external network can correctly resolve the name by using a HOSTS file entry. In a production network, we would create a split DNS infrastructure so that the external clients can properly resolve the FQDN to the correct IP address.
The address we’ll use in the HOSTS file (and the address you would use in your split DNS) is the address that allows the external hosts to reach the unihomed ISA firewall in the DMZ. Since we’re created a NAT relationship between the DMZ and the external network, the external hosts will have to reach the unihomed ISA firewall via the external address on the trihomed ISA firewall. If there were a route relationship between the DMZ and the external network, then we would use the actual address of the unihomed ISA firewall on the DMZ segment.
The figure below shows the required HOSTS file entry for our current scenario.

The log file entries below show activity on the unihomed ISA firewall. Check out the source and destination IP addresses, the Rule used, and the HTTP methods. Also, observe the Source and Destination networks for the requests. Notice that when you use Web Publishing Rules, the Web proxy has full knowledge of the URL sent to the ISA firewall and that sent from the ISA firewall to the OWA site on the Internal network.

The log file entries below show the connections made by the trihomed ISA firewall. You can see the connections from the External network host to the unihomed ISA firewall, and you can see the connections from the unihomed ISA firewall to the OWA site on the Internal network.

Test Yourself
Answer the following questions to test your understanding of the material covered in this article:
- Does the hardware firewall in front of the unihomed ISA firewall in the DMZ provide stateful application layer inspection required to protect against modern attacks against Internal network resources?
- True or False: the unihomed ISA firewall configuration is required because the ISA firewall is not suitable as a perimeter or in-line firewall
- True or False: The ISA firewall has a “caching-only” installation mode
- When do you need to configure a default gateway on the unihomed ISA firewall in the “hardware” firewall’s DMZ segment?
- Why is a HOSTS file entry required on the unihomed ISA firewall?
- True or False: You need to create an Access Rule on the unihomed ISA firewall on the DMZ segment to allow the connection from the unihomed ISA firewall to the OWA site on the Internal network
- What IP addresses are included in the Internal Network address range on the unihomed ISA firewall?
- What name should you use on the Specify the Web Mail Server page to control the redirect to the Internal OWA Web site?
Find the answers to these questions at the disucssion link for this article: http://forums.isaserver.org/ultimatebb.cgi?ubb=get_topic;f=23;t=000130
Summary
In this article we discussed the principles and procedures required to install a unihomed ISA firewall in a DMZ segment of a simple stateful filtering “hardware” firewall. The unihomed ISA firewall was installed in a single NIC Web proxy configuration and a OWA Web Publishing Rule was created to allow incoming connections to the unihomed ISA firewall access to the OWA site on the Internal network. We also discussed issues related to why the ISA firewall might be used in this way. We recommend that you always put the ISA firewall in-line or in parallel with your current firewall configuration so that you can take advantage of the ISA firewall’s advanced stateful filtering and stateful application layer inspection mechanisms.
I hope you enjoyed this article and found something in it that you can apply to your own network. If you have any questions on anything I discussed in this article, head on over to http://forums.isaserver.org/ultimatebb.cgi?ubb=get_topic;f=23;t=000130 and post a message. I’ll be informed of your post and will answer your questions ASAP. Thanks! –Tom
If you would like us to email you when Tom Shinder releases another article on ISAserver.org, subscribe to our ‘Real-Time Article Update’ by clicking here. Please note that we do NOT sell or rent the email addresses belonging to our subscribers; we respect your privacy.


