Configuring Remote Access VPN Servers in a Back to Back ISA Firewall Configuration
By Thomas W Shinder MD, MVP
Got Questions?
Discuss this article at http://forums.isaserver.org/ultimatebb.cgi?ubb=get_topic;f=30;t=000216
As I’ve noted in previous articles on the new ISA firewall (ISA Server 2004), one of the key enhancements made to the ISA firewall is its impressive VPN Server and VPN gateway. The ISA firewall’s VPN server allows to you to the following:
- Force VPN users to use only specific servers
- Force VPN users to use only allowed protocols when connecting to those specific servers
- Log user names for all VPN connections
- Along with logging the user names, protocols, and servers accessed using those protocols, you can also log applications used by the users when connecting to those servers
- VPN users can now access the Internet through the same ISA firewall to which they connect and you do not need to enable split tunneling; you can also leverage the Firewall client and Web Proxy client configuration to allow the VPN client to connect to the Internet through alternate Internet gateways on your network
- Join networks using IPSec tunnel mode, PPTP or L2TP/IPSec.
- Perform the same strong access control over remote office users connected via a site to site VPN connection as you can with remote access VPN client users
- Publish PPTP and L2TP/IPSec VPN servers when ISA firewalls are used in a back to back configuration (you can publish non-Windows VPN servers if you like, and you can publish IPSec tunnel mode servers when using a route relationship between the ISA firewalls external interface and DMZ interface)
In the back to back ISA firewall configuration, the front-end ISA firewall has a direct connection to the Internet. You can then use either a NAT or a route relationship between the Internet and the DMZ behind the front-end ISA firewall.. If you use public addresses in the DMZ, then you can use a route or NAT relationship. If you use private addresses, then you can use a NAT relationship only.

If you use a route relationship and public addresses on the DMZ segment, you can publish PPTP, L2TP/IPSec and IPSec tunnel mode VPN servers behind the front-end ISA firewall. If you use a NAT relationship, then you can publish PPTP or L2TP/IPSec VPN servers behind the front-end ISA firewall. You will not be able to publish IPSec tunnel mode VPN servers unless your VPN server supports NAT-T (the VPN server can use IETF NAT-T, like the Windows Server 2003 VPN server, or you can publish proprietary NAT-T VPN servers.
The reason why you can’t publish IPSec tunnel mode VPN servers behind the front-end ISA firewall is that NAT breaks IPSec. That’s why you can publish an IPSec tunnel mode VPN server behind the front-end ISA firewall when there is a route relationship between the Internet and the DMZ behind the front-end ISA firewall – there is no NAT to break the IPSec connection.
NAT traversal (NAT-T) allows IPSec encrypted VPN tunnels to cross NAT devices. The IPSec headers are encapsulated by a TCP or UDP header and that header has a specific destination port. The ISA firewall’s VPN server (when installed on Windows Server 2003) uses the IETF NAT-T specification, which uses a UDP header with a destination port 4500.
The Windows Server 2003/ISA firewall VPN server receives the communications on UDP port 4500 and removes the UDP header to expose the IPSec encrypted communication, which it then decrypts and passes to the destination network hosts. This is the method used by NAT-T Windows VPN clients when connecting to Windows Server 2003/ISA VPN remote access and VPN gateway servers.
Other VPN server vendors use alternate port numbers to receive encapsulated NAT-T packets. For example, Cisco uses UDP port 10000. Cisco also provides the option to use TCP instead of UDP, although this method is not as interoperable or as stable as the IETF of NAT-T. Regardless of the implementation, as long as the IPSec headers are encapsulated by a TCP or UDP header, those communications can pass through a NAT device.
One of the major improvements the new ISA firewall has over ISA Server 2000 is its ability to publish PPTP VPN servers. While PPTP does not provide the same level of security as IPSec encrypted VPN connections, the level of security provided by PPTP connections is quite secure when long passwords are used. Many large companies use only PPTP VPN connections and when combined with long and complex passwords, the level of security is virtually on par with IPSec VPNs.
NOTE:
I am aware of the security advantages of IPSec. These include protection against replay, man in the middle attacks, and non-repudiation. IPSec also requires both machine and user authentication. Even with those advantages, PPTP is perfectly acceptable for the vast majority of businesses and only very high exposure businesses with exceptional security requirements should be mandated to use L2TP/IPSec. Note that IPSec tunnel mode using pre-shared keys is NOT more secure than PPTP because of several well known and publicized attacks when IPSec with pre-shared keys is used. If you have the option, you should always use L2TP/IPSec instead of IPSec tunnel mode and you should always use certificates instead of pre-shared keys. With that said, for the sake of simplicity, in the current demonstration I will use pre-shared keys for the L2TP/IPSec VPN connection. Please see the ISA 2004 VPN Deployment Kit for details on how to assign machine and user certificates for L2TP/IPSec remote access client connections.
One of the major changes in PPTP support over that seen in the ISA Server 2000 firewall is that the new ISA firewall supports publishing PPTP servers. In ISA Server 2000, the PPTP filter only worked for outbound VPN connections. The ISA firewall’s PPTP filter now supports both inbound and outbound VPN connections. The inbound PPTP connections are from external PPTP VPN clients.
Publishing a PPTP VPN server only requires that you create a Server Publishing Rule using the PPTP Server Protocol Definition. Publishing an L2TP/IPSec VPN server requires that you publish IKE (UDP 500), L2TP (UDP 1701) and NAT-T (UDP 4500). If you are using NAT-T, then you don’t need to publish the L2TP protocol, because the L2TP header is encapsulated in the NAT-T UDP header.
To publish an ISA firewall/VPN server located behind a front-end ISA firewall, you’ll need to perform the following steps:
- Install and configure the front-end ISA firewall
- Install and configure the back-end ISA firewall
- Configure the back-end ISA firewall as a PPTP and L2TP/IPSec VPN server
- Configure the front-end ISA firewall to publish the back-end ISA firewall’s VPN server
- Make the remote access connection
Install and Configure the Front-end ISA Firewall
We install the front-end ISA firewall so that it has an interface on the public network and an interface on the DMZ segment between the front-end and the back-end ISA firewall. The front-end ISA firewall is not a member of the domain because it doesn’t need to be. While you could make the front-end ISA firewall a member of the domain, there are reasons why you wouldn’t want to allow the intradomain protocols open allowed from the DMZ segment to the Internal network.
In this example the external interface of the front-end ISA firewall has the IP address 192.168.1.71 and the internal interface is 10.0.1.1. The external interface of the front-end ISA firewall is configured a default gateway allowing it access to the Internet. We will create an access rule allowing the external interface of the back-end ISA firewall full access to the Internet. This allows the VPN client connecting to the back-end ISA firewall to access the Internet through the VPN connection made to the back-end ISA firewall. In order to create the Access Rule, you need to know that the IP address on the external interface of the back-end ISA firewall is 10.0.1.2. This Access Rule also allows the Internal network DNS server to resolve Internet host names.
I will assume that you already know how to install the ISA firewall software and configure the network interfaces on the front-end firewall. Perform the following steps to create the Access Rule:
- In the Microsoft Internet Security and Acceleration Server 2004 management console, expand the server name and then click the Firewall Policy node. In the Task Pane, click the Tasks tab and click the Create a New Access Rule link.
- In the Welcome to the New Access Rule Wizard enter a name for the rule in the Access Rule name text box. In this example we will use All Open from Back-end Firewall. Click Next.
- On the Rule Action page, select the Allow option and click Next.
- On the Protocols page, select the All outbound traffic option from the This rule applies to drop down list. Click Next.
- On the Access Rule Sources page, click the Add button.
- In the Add Network Entities dialog box, click the New menu and then click Computer.
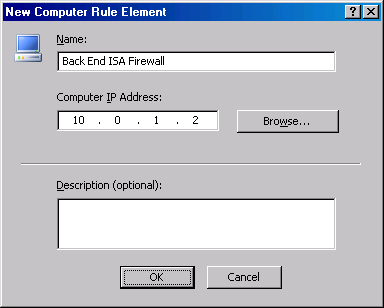
- In the New Computer Rule Element dialog box, enter a name for the Computer object in the Name text box. We’ll use the name Back End ISA Firewall. In the Computer IP Address text box, enter the IP address on the external interface of the back-end ISA firewall. In this example we’ll use 10.0.1.2. Click OK.
- In the Add Network Entities dialog box, click on the Computers folder and then double click on the Back End ISA Firewall entry. Click Close.

- Click Next on the Access Rule Sources page.
- On the Access Rule Destinations page, click Add.
- In the Add Network Entities dialog box, click the Networks folder and then double click the External entry. Click Close.
- Click Next on the Access Rule Destinations page.
- Accept the default setting on the User Sets page and click Next.
- Click Finish on the Completing the New Access Rule Wizard page.
- Click Apply to save the changes and update the firewall policy.
- Click OK in the Apply New Configuration dialog box.
Note that this rule allows all traffic from the external interface of the back-end ISA firewall, but does not allow traffic outbound from any other host on the DMZ segment. You’ll have to create separate rules to allow other hosts you have on the DMZ segment to access the Internet through the front-end ISA firewall.
Install and Configure the Back-end ISA Firewall
The back-end ISA firewall will be the termination point for the VPN connection. The remote access VPN user will connect to the back-end ISA firewall/VPN server by going through the front-end ISA firewall. The back-end ISA firewall has an interface on the DMZ segment between the front-end and the back-end ISA firewall and an interface on the Internal network. The back-end ISA firewall is also a member of the Internal network domain. This allows the back-end ISA firewall to use Windows authentication to authenticate users against the Internal network domain’s user database.
We need to create an Access Rule allowing VPN clients access to the Internet and the Internal network. Unlike the 2000 ISA firewall, where only Web Proxy and Firewall clients could access the Internet via the same ISA firewall they connect to, the 2004 ISA firewall allows non-Firewall and non-Web Proxy clients to connect to the Internet via the same machine to which they connect. In effect, the VPN clients are SecureNAT clients of the ISA firewall to which they connect. The new ISA firewall allows VPN SecureNAT clients to connect to the Internet.
NOTE:
The ISA firewall allows you to perform very strong access control over VPN clients. For the sake of simplicity in this demonstration, we will create unrealistically loose firewall policies. In your production environment you would lock down VPN users to access only the servers and protocols you wish them to use when connecting to those servers.
We will also create an Access Rule allowing the Internal network DNS server to resolve Internet host names. I assume most organizations use an Internal DNS server, and the internal DNS server is configured to resolve Internet host names by performing recursion. You have many options when it comes to DNS name resolution for Internet host names but the most compelling option is to use an internal DNS server.
I will assume that you know how to install the ISA firewall software and know how to configure the network interfaces with the proper IP addressing information. Perform the following steps to create the Access Rules:
- In the Microsoft Internet Security and Acceleration Server 2004 management console, expand the server name and then click the Firewall Policy node. In the Task Pane, click the Tasks tab and click the Create a New Access Rule link.
- In the Welcome to the New Access Rule Wizard enter a name for the rule in the Access Rule name text box. In this example we will use All Open to Internet and Internal – VPN Clients. Click Next.
- On the Rule Action page, select the Allow option and click Next.
- On the Protocols page, select the All outbound traffic option from the This rule applies to drop down list. Click Next.
- On the Access Rule Sources page, click the Add button.
- In the Add Network Entities dialog box, click the Networks folder and then double click the VPN Clients entry. Click Close.
- Click Next on the Access Rule Sources page.
- On the Access Rule Destinations page, click Add.
- In the Add Network Entities dialog box, click the Networks folder and then double click the External entry and the Internal entry. Click Close.
- Click Next on the Access Rule Destinations page.

- Accept the default setting on the User Sets page and click Next.
- Click Finish on the Completing the New Access Rule Wizard page.
- Click Apply to save the changes and update the firewall policy.
- Click OK in the Apply New Configuration dialog box.
Now we’ll create a rule allowing the DNS server on the Internal network to connect to Internet DNS servers. We’ll use a different approach when creating this rule, as you’ll see when performing the following steps:
- Right click on the All Open to Internal and Internet – VPN Clients rule in the Firewall Policy node and click Copy.
- Right click the rule again and click Paste.
- Double click the All Open to Internal and Internet – VPN Clients (1) rule to open the Properties dialog box for that rule.
- On the General tab, rename the rule to Outbound DNS for DNS Server and click Apply.
- Click the Protocols tab. On the Protocols tab, select the Selected protocols option from the This rule applies to list. Click Add.
- In the Add Protocols dialog box, click the Common Protocols folder and double click DNS. Click Close.
- Click Apply.

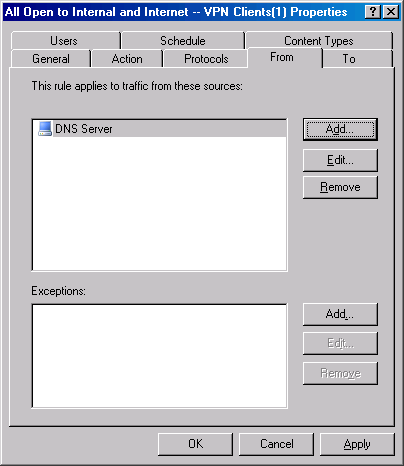
- Click the From tab. On the From tab, click the VPN Clients entry and click Remove. Click Add.
- In the Add Network Entities dialog box, click the New menu and click Computer.
- In the New Computer Rule Element dialog box, enter DNS Server in the Name text box. Enter the IP address of the DNS server in the Computer IP Address text box. In this example, the DNS server on the Internal network uses the address 10.0.0.2. Click OK.
- In the Add Network Entities dialog box, click the Computers folder and double click the DNS Server entry. Click Close.
- Click Apply.
- Click the To tab. On the To tab, click the Internal entry and click Remove.
- Click Apply and then click OK.
- Click Apply to save the changes and update the firewall policy.
- Click OK in the Apply New Configuration dialog box.
Configure the Back-end ISA Firewall as a PPTP and L2TP/IPSec VPN Server
Now that we have the Access Rules in place we can get to the job of configuring the VPN server component on the back-end ISA firewall. We have a DHCP server installed on the Internal network, so we will use the default settings where the VPN server uses DHCP to obtain addresses for the DHCP clients.
Keep in mind that VPN clients never directly communicate with the DHCP server. If you want to assign DHCP options, you must configure a DHCP Relay Agent on the ISA firewall. You will also need a DHCP Relay Agent if the DHCP server is remote network segment.
Perform the following steps to enable and configure the VPN server component on the back-end ISA firewall:
- In the Microsoft Internet Security and Acceleration Server 2004 management console, expand the server name and click the Virtual Private Networks (VPN) node in the left pane of the console.
- In the Task Pane, click the Configure VPN Client Access link on the Tasks tab.
- In the VPN Clients Properties dialog box, put a checkmark in the Enable VPN client access checkbox. Notice the default number of connections is set to 5. You can increase this value to 1000 in the Standard Edition of the ISA firewall (you can have an unlimited number on the Enterprise version). We’ll use the default value in this example. Remember to include enough addresses in your DHCP scope to support the number you configure here.
- Click the Protocols tab. Place a checkmark in both the Enable PPTP and Enable L2TP/IPSec checkboxes.
- Click Apply and then click OK.
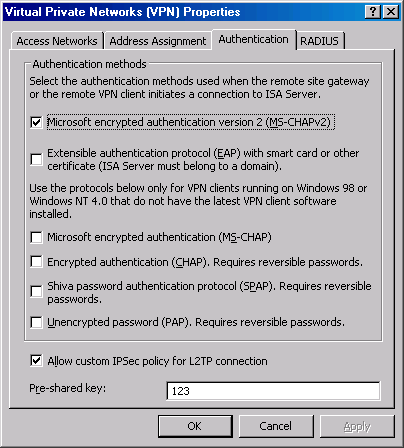
- Click the Select Authentication Methods link in the Task Pane.
- In Virtual Private Network (VPN) Properties dialog box, click the Authentication tab. Put a checkmark in the Pre-shared key checkbox. This option allows you to use a pre-shared key for L2TP/IPSec remote access client and gateway to gateway connections. I definitely do not encourage the use of pre-shared keys in a production environment. Using pre-shared keys drops the level of security on your VPN connections down to what you would get with non-ISA firewall/VPN servers. The entire reason we’re using the ISA firewall is to obtain superior security. However, in this example we’ll use a pre-shared key for demonstration purposes only. I’ll use the key 123. We’ll later configure the VPN client to use this same key.
- Click Apply and then click OK.
- Click Apply to save the changes and update the firewall policy.
- Click OK in the Apply New Configuration dialog box.
- Restart the ISA firewall machine.
The back-end ISA firewall is ready to accept incoming PPTP and L2TP/IPSec connections after it restarts.
Configure the Front-end ISA Firewall to Publish the Back-end ISA Firewall’s VPN Server
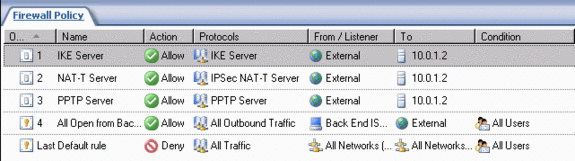
We need to create three Server Publishing Rules to publish the VPN server on the back-end ISA firewall. These are:
- IPSec NAT-T Server Publishing Rule
- IKE Server Publishing Rule
- PPTP Server Publishing Rule
We use an IPSec NAT-T Server Publishing Rule to support publishing the L2TP/IPSec protocol. L2TP/IPSec also requires that you publish the IKE protocol. The PPTP Server Publishing Rule invokes the PPTP filter that processes the incoming PPTP connections.
Perform the following steps to create the PPTP Server Publishing Rule on the front-end ISA firewall:
- In the Microsoft Internet Security and Acceleration Server 2004 management console, expand the server name and then click the Firewall Policy node. In the Task Pane, click the Tasks tab. On the Tasks tab, click the Create New Server Publishing Rule link.
- On the Welcome to the New Server Publishing Rule page, enter PPTP Server in the Server Publishing Rule name text box and click Next.
- On the Select Server page, enter the IP address on the external interface of the back-end ISA firewall. In this example we’ll enter 10.0.1.2. Click Next.
- On the Select Protocol page, select the PPTP Server protocol from the Selected protocol list and click Next.
- On the IP Addresses page, put a checkmark in the External checkbox. Click Next.
- Click Finish on the Completing the New Server Publishing Rule Wizard page.
Perform the following steps on the front-end ISA firewall to create the IPSec NAT-T Server Publishing Rule:
- In the Microsoft Internet Security and Acceleration Server 2004 management console, expand the server name and then click the Firewall Policy node. In the Task Pane, click the Tasks tab. On the Tasks tab, click the Create New Server Publishing Rule link.
- On the Welcome to the New Server Publishing Rule page, enter NAT-T Server in the Server Publishing Rule name text box and click Next.
- On the Select Server page, enter the IP address on the external interface of the back-end ISA firewall. In this example we’ll enter 10.0.1.2. Click Next.
- On the Select Protocol page, select the IPSec NAT-T Server protocol from the Selected protocol list and click Next.
- On the IP Addresses page, put a checkmark in the External checkbox. Click Next.
- Click Finish on the Completing the New Server Publishing Rule Wizard page.
Perform the following steps on the front-end ISA firewall to create the IKE Server Publishing Rule:
- In the Microsoft Internet Security and Acceleration Server 2004 management console, expand the server name and then click the Firewall Policy node. In the Task Pane, click the Tasks tab. On the Tasks tab, click the Create New Server Publishing Rule link.
- On the Welcome to the New Server Publishing Rule page, enter IKE Server in the Server Publishing Rule name text box and click Next.
- On the Select Server page, enter the IP address on the external interface of the back-end ISA firewall. In this example we’ll enter 10.0.1.2. Click Next.
- On the Select Protocol page, select the IPSec NAT-T Server protocol from the Selected protocol list and click Next.

- On the IP Addresses page, put a checkmark in the External checkbox. Click Next.
- Click Finish on the Completing the New Server Publishing Rule Wizard page.
Your firewall policy should look like the figure below.
Make the Remote Access Connection
In order to support VPN connections from external VPN clients, you will need to configure the client to use the correct protocols. If you want to use PPTP, then you’re ready. The Windows VPN client will connect using PPTP by default. PPTP uses 128-bit encryption and is quite secure. If you use complex passwords or user certificates for authentication, then PPTP is all you need.
If you’re running a high security site where someone is willing to apply supercomputer technology to break your VPN encryption and authentication scheme, then you should consider using L2TP/IPSec. You will need to download and install the IPSec NAT-T VPN client since we’re using a NAT relationship between the Internet and the DMZ segment between the front-end and back-end ISA firewalls. You can get information about this client and instructions on how to download an install it at http://support.microsoft.com/default.aspx?scid=kb;en-us;818043
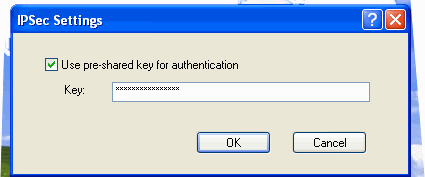
You need to configure the L2TP/IPSec VPN NAT-T VPN client to use the same pre-shared key you configured on the back-end ISA firewall. Create the VPN connectoid and then right click it and click Properties. On the Security tab, click the IPSec Settings button.

Enter the pre-shared key in the IPSec Settings dialog box.
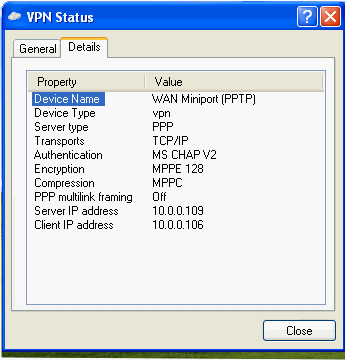
You can now establish the connection. The default settings create a PPTP connection, as seen in the figure below.
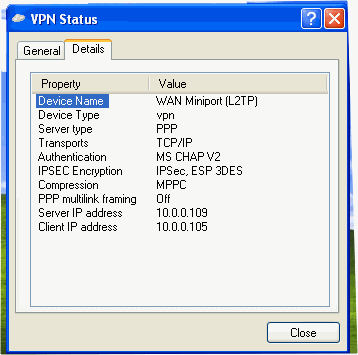
After making the PPTP connection, disconnect it. Then go to the Properties of the VPN connectoid and click the Networking tab. On the Networking tab, select the L2TP IPSec VPN option and click OK. Establish the VPN Link again and you’ll see something like this:
If you look at the log viewer on the back-end ISA firewall you will see the VPN connection being established. You can see the IKE (Destination Port 500) and the NAT-T (Destination Port 4500) negotiations in the figure below.

Try to access a Web site from the VPN client machine. You’ll see in the log viewer on the back-end ISA firewall that the user is connecting from the VPN Clients network to the External network. The connection is forwarded from the back-end ISA firewall to the front-end ISA firewall.

Test Yourself
Answer these questions to see if you understand the concepts discussed in this article:
- What VPN protocols does the ISA firewall support for remote access connections?
- What VPN protocols does the ISA firewall support for site to site VPN connections?
- What route relationship is required to publish non-NAT-T IPSec tunnel mode connections?
- What port number is used by IETF IPSec NAT-T?
- Which is more secure? PPTP with complex passwords and or IPSec tunnel mode with pre-shared keys?
- Which protocols must you publish to allow connections to a back-end ISA firewall/VPN server when the route relationship between the external interface and the DMZ network on the front-end ISA firewall is set to NAT?
Find the answers to these questions at the discussion link at http://forums.isaserver.org/ultimatebb.cgi?ubb=get_topic;f=30;t=000216#000000
For More Information
The Cable Guy on NAT-T
http://www.microsoft.com/technet/community/columns/cableguy/cg0802.mspx
Virtual Private Networks for Windows Server 2003
http://www.microsoft.com/windowsserver2003/technologies/networking/vpn/default.mspx
Publishing a VPN Server using ISA Server 2004
http://www.microsoft.com/technet/prodtechnol/isa/2004/plan/publishingVPNservers.mspx
Summary
In this article we examined the methods used to publish both PPTP and L2TP/IPSec protocols on a front-end ISA firewall to allow incoming VPN connections to a back-end ISA firewall/VPN server. We installed and configured the front-end ISA firewall so that allow protocols were allowed outbound from the back-end ISA firewall. The back-end ISA firewall was installed and configured to allow VPN clients access to the Internet and the Internal network. Liberal Access Rules were configured for this demo. In a production environment you would always create a restricted Access Policy for VPN clients to that they can connect to only the servers they require and using only the protocols need they need to use when connecting to the server.
I hope you enjoyed this article and found something in it that you can apply to your own network. If you have any questions on anything I discussed in this article, head on over to http://forums.isaserver.org/ultimatebb.cgi?ubb=get_topic;f=30;t=000216 and post a message. I’ll be informed of your post and will answer your questions ASAP. Thanks! –Tom
If you would like us to email you when Tom Shinder releases another article on ISAserver.org, subscribe to our ‘Real-Time Article Update’ by clicking here. Please note that we do NOT sell or rent the email addresses belonging to our subscribers; we respect your privacy.


