Enabling Internet Access for VPN Clients Connected to an ISA Firewall (v 1.1)
(Updated 05/22/2005)
By Thomas W Shinder MD, MVP
|
Have Questions about the article? |
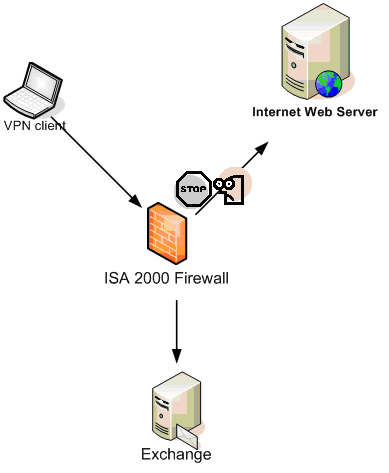
A problematic situation with the ISA Server 2000 firewall was that once a VPN client connected to the ISA Server 2000 firewall, they could not connect to the Internet using their default SecureNAT client configuration.
The reason for this is that unless the VPN client was configured as a Web proxy or Firewall client of the ISA Server 2000 firewall to which they established the VPN link, the VPN client would not be able to access the Internet using their SecureNAT client connection to the ISA Server 2000 firewall/VPN server (when not configured as a Firewall or Web proxy client of the ISA Server 2000 firewall/VPN server, they’re by default SecureNAT clients).
This created a potential security issue because many ISA Server 2000 firewall admins tried to get around this limitation by enabling split tunneling on the VPN clients. The default setting on the Windows VPN client software is to use default gateway on remote network. This means connections to any non-local network will automatically be forwarded to through the VPN interface.
WARNING:
Do not allow split tunneling. Never enable split tunneling. You put yourself and your network at unacceptable risk when allowing split tunneling, so never enable or allow split tunneling for your VPN clients. Get it? Don’t claim you haven’t been warned.
Since the Internet is a non-local network, all traffic to the Internet is forwarded through the VPN connection and the connection attempts failed because the ISA Server 2000 firewall would not allow VPN client’s SecureNAT client connection to “loop back” through the ISA Server 2000 firewall that the client established by VPN link.
For companies who sought my assistance on this issue, I configured their clients as Firewall and Web proxy clients of the ISA Server 2000 firewall to which the VPN clients connected. The Firewall and Web proxy client configurations were set to use the IP address on the internal interface of the ISA Server 2000 firewall, and autodiscovery wpad entries were configured in the DNS to support this setup.
This worked great and we also benefited from the enhanced security provided by the Firewall and Web proxy client configurations. The downside was that there is some administrative overhead, and users had to learn to disable the Firewall client under certain circumstances and then re-enable the Firewall client once the VPN link was established.

That was then.
With the new ISA firewall (ISA Server 2004), we don’t have to worry about these issues. While I still recommend that my customers always use the Firewall and Web proxy client configurations on the VPN clients, this is no longer a requirement. The new ISA firewall supports SecureNAT client connections to the Internet through the same ISA firewall to which the VPN clients connect.

(NOTE: the figure above shows an ISA 2000 firewall. It should be an ISA 2004 firewall. Thanks! –Tom)
I’ll show you how to enhance security for your VPN client connections by leveraging the Firewall and Web proxy client configurations in a future article. In this article I show you how easy it is to get the VPN clients that are lowly SecureNAT clients connected to the Internet through the same ISA firewall to which they establish the VPN link, and not require that break your VPN security by disabling the use default gateway on remote network setting.

You’ll need to do the following:
Enable and Configure the ISA Firewall’s VPN Server
The first step is to enable the VPN Server on the ISA firewall. While enabling the VPN server component is easy, the devil is in the details. I don’t want to get into the intricacies of the ISA firewall’s VPN server components in this article. However, there is one piece of the puzzle that is worth going over here, and that’s the address assignment issue.
You essentially have two options for address assignment in ISA Server 2004 SE:
I prefer to use DHCP because this allows you to assign VPN clients on-subnet addresses without generating errors in the ISA firewall logs. If you use a static address pool that includes on-subnet addresses, you’ll need to remove those addresses from the definition of any ISA firewall Network that might already be using those addresses.
For example, suppose your default Internet Network (capital “I” and capital “N”) is using the address range 192.168.1.0-192.168.1.255. You want to assign VPN clients addresses using a static address pool in the range 192.168.1.50-192.168.1.80. In order to make this work, you’ll need to remove the address range 192.168.1.50-192.168.1.80 from the definition of the default Internal Network.
ATTENTION:
ISA firewall Networks are collections of IP addresses reachable from a specific interface. An ISA firewall Network is a Network Object in the ISA firewall’s configuration interface. When speaking of generic networks or networks in general, we use a lower-case “n”. When referring to ISA firewall Network Objects, in this case an ISA firewall Network, we use a capital “N”.
In this example we’ll assume that you’re using DHCP to assign addresses to the VPN clients. Perform the following steps to enable the ISA firewall’s VPN server component:
- Open the Microsoft Internet Security and Acceleration Server 2004 management console, expand the server name and then click the Virtual Private Networks (VPN) node.
- In the Task Pane, click the Tasks tab and then click the Enable VPN Client Access link.
- Click OK in the Click OK in the Apply New Configuration dialog box.
- Restart the ISA firewall device.
That’s it! The default setting is to use DHCP to assign addresses to VPN clients, so you don’t need to change anything there. Other default settings that you should be aware of (I’m assuming that you’ve joined the ISA firewall to the domain, as this is a more secure and flexible configuration):
As you can see, we have to add a Network Rule that connects the VPN Clients Network to the Internet. That’s the next step.

Create a Network Rule Connecting the VPN Clients Network to the Default External Network
The ISA firewall uses Network Rules to connect ISA firewall Networks to each other. If there is no Network Rule connecting ISA firewall Networks, then no traffic will bet allowed between those Networks. Network Rules can cannot ISA firewall Networks in one of two ways:
Since it’s likely that you’re not going to assign VPN clients public addresses, you’ll need to create a Network Rule connecting the VPN Clients Network to the default External Network using NAT.
Perform the following steps to connect the VPN Clients Network to the default External Network using NAT:
- In the Microsoft Internet Security and Acceleration Server 2004 management console, expand the server name and then expand the Configuration node in the left pane of the console.
- Click the Networks node. In the Networks node, click the Network Rules tab in the details pane.
- Click the Tasks tab in the Task Pane and click the Create a New Network Rule link.
- On the Welcome to the New Network Rule Wizard page, enter a name for the Network Rule in the Network rule name text box. In this example we’ll use VPN Clients Network to Internet and click Next.
- On the Network Traffic Sources page, click Add. In the Add Network Entities dialog box, click the Networks folder and then double click the VPN Clients entry. Click Close.
- Click Next on the Network Traffic Sources page.

- On the Network Traffic Destinations page, click Add. In the Add Network Entities dialog box, click the Networks folder and then double click the External entry. Click Close.
- Click Next on the Network Traffic Destinations page.
- On the Network Relationship page, select the Network Address Translation (NAT) option and click Next.

- Click Finish on the Completing the New Network Rule Wizard page.

Create an Access Rule Allowing Members of the VPN Clients Network Access to the Internet
|
Have Questions about the article? |
Now that the VPN Clients Network is connected to the default External Network, we can create an Access Rule that allows VPN clients access to resources on the Internet. Since we’re working with a SecureNAT client configuration here, there are some limitations. These include:
You can get a level of user/group based access control, since connections can be controlled based on the credentials used to log onto the VPN server component.
In this example we’ll allow access to only the HTTP protocol. We won’t allow access to the HTTPS (SSL) protocol because outbound SSL connections cannot be exposed the ISA firewall’s stateful application layer inspection mechanisms because the information is hidden in the SSL tunnel. In the future you might want to allow SSL connections to a specific subset of high trusted sites, but you should never allow SSL access to all sites. Doing so would make the ISA firewall as unsecure as a typically stateful packet inspection firewall.
Perform the following steps to create the Access Rule:
- In the Microsoft Internet Security and Acceleration Server 2004 management console, expand the server name and then click the Firewall Policy node.
- On the Firewall Policy node, click the Tasks tab in the Task Pane and then click the Create New Access Rule link.
- On the Welcome to the New Access Rule Wizard page, enter a name for the rule in the Access Rule name text box. In this example, we’ll name the rule VPN Clients to Internet. Click Next.
- On the Rule Action page, select the Allow option and click Next.
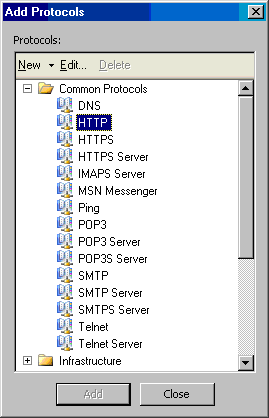
- On the Protocols page, select the Selected protocols option from the This rule applies to list. Click Add.
- In the Add Protocols dialog box, click the Common Protocols folder and then double click the HTTP protocol. Click Close.
- Click Next on the Protocols page.
- On the Access Rule Sources page, click the Add button. In the Add Network Entities dialog box, click the Networks folder and then double click the VPN Clients entry. Click Close.
- Click Next on the Access Rule Sources page.
- On the Access Rule Destinations page, click the Add button. In the Add Network Entities dialog box, click the Networks folder and then double click the External entry. Click Close.
- Click Next on the Access Rule Destinations page.
- On the User Sets page, accept the default entry, All Users, and click Next.
- Click Finish on the Completing the New Access Rule Wizard page.
- Click Apply to save the changes and update the firewall policy.

- Click OK in the Apply New Configuration dialog box.
Configure the VPN Client Software to Connect to the ISA Firewall
The VPN client software configuration will depend on the version of Windows you’re running. Just about all versions of Windows in use today include a VPN client that allows PPTP and L2TP/IPSec connections. In this example we have not configured the ISA firewall to accept L2TP/IPSec connections, so we’ll have to use PPTP.
Just a quick note on PPTP connections. In the past I was a big proponent of PPTP and thought that it provided a reasonable level of security for most organizations. I still think that PPTP is a viable VPN protocol. However, I will no longer use PPTP unless I’m using very complex passwords (such as 21+ characters with a mix of upper and lower case letter, numbers and non-alphanumeric characters).
The reason for this is that new rainbow table cracking technology can make short-shrift of NTLM hashes for simple passwords (14 characters or less). In fact, for networks I manage, I require user certificate authentication or other EAP user authentication methods because its just a matter of time and horsepower where NTLM auth will be completely unsafe on unmanaged networks (for example, wireless LAN at airports).
Check out http://www.antsight.com/zsl/rainbowcrack/ for more information on this issue.
When configuring the VPN client software, you can use IP address or FQDN for the destination. I prefer to use FQDN, since the IP address of the VPN servers will change from time to time, and it’s a lot easier to make a DNS server update than it is to reconfigure hundreds of VPN clients.

Make the Connection
|
Have Questions about the article? |
Now let’s make the connection and see what happens. Fire up the VPN client connection to the ISA firewall. In this example we’ll connect using the local administrator account on the ISA firewall to log on via the VPN link. Make sure the account you use to log into the ISA firewall’s VPN has dial-in permissions.
After establishing the VPN client connection to the ISA firewall, open the Microsoft Internet Security and Acceleration Server 2004 management console and click on the Monitoring node, then click on the Sessions tab. You’ll see that the VPN client is listed as both a SecureNAT and VPN Client. The IP address assigned to the VPN client appears in the Client IP tab, and the actual IP address of the VPN client machine is listed in the Client Host Name column.

You can then go to the ISA firewall’s real-time log monitor and filter for connections from the VPN Clients Network. Use the Web browser on the VPN client to visit some sites. You’ll see the connections appear in the real-time log monitor.
Note that even though we haven’t required authentication on the rule, the user name still appears in the logs. Nice! This is one of the special features with VPN client connections – the user name is reported to the ISA firewall even though the VPN client machine is not configured as a Web proxy or Firewall client.

However, the bloom does come off the rose a bit, as you’ll only see the user name from the logged on VPN user for Web proxy filter mediated connections.

Summary
In this article we demonstrated that VPN remote access clients can access the Internet through the same ISA firewall to which they establish the VPN link. This is in contrast to the to the ISA Server 2000 firewall, where the remote access VPN clients had to be configured as Firewall and/or Web proxy clients to access the Internet through the same ISA firewall with which they established the VPN link. We also saw an added benefit where the user name of the VPN user is logged when making the connections to Internet resources (although this only appears to be the case with Web proxy filter mediated connections).
I hope you enjoyed this article and found something in it that you can apply to your own network. If you have any questions on anything I discussed in this article, check here http://forums.isaserver.org/ultimatebb.cgi?ubb=get_topic;f=30;t=000753 where you can post a message. I’ll be informed of your post and will answer your questions ASAP. Thanks! –Tom
If you would like us to email you when Tom Shinder releases another article on ISAserver.org, subscribe to our ”Real-Time Article Update” by clicking here. Please note that we do NOT sell or rent the email addresses belonging to our subscribers; we respect your privacy.


I Wan to allow vpn client only access some website, how can i do it? Thanks!