If you would like to read the previous articles in this series please go to:
In the previous article in this series, I showed you a few techniques for fine tuning the applications that you have published. In this article, I am going to continue the discussion by talking about application groups.
Before I get into the how-to portion of this article, I want to take a step back, and talk about one of the most basic concepts in network administration; groups. As you no doubt know, groups were originally designed to simplify the process of granting users access to network resources. If you were to assign permissions to access network resources to individual user accounts, then managing the resource would become extremely tedious. For example, if someone asked you to produce a list of every user with access to the resource, you would have to check every single user account to see who has been granted access to the resource. By using groups you can simplify the process by granting access to the resource to a group, and then adding individual users to the group.
Just as groups can simplify the process of managing network resource, the same basic concept can be applied to managing hosted applications. Just as you need to control access to files and printers on your network, it is also important to control access to applications. Some applications are sensitive in nature and should only be used by a select group of people. For example, you wouldn’t want just any random employee to have access to the payroll application. Other times you may need to restrict access to applications based on how many licenses you have purchased for those applications.
Earlier in this article series, I showed you how you could grant access to hosted applications to users or to groups by using filtering. Although this technique works, it is extremely inefficient if you are in a large enterprise environment with lots of hosted applications. Just as Windows security groups make granting access to network resources more efficient, you can make application management more efficient by creating groups of applications, and then using filtering to assign users or groups of users access to all of the applications in the group. For example, in my own organization, each desktop runs Microsoft Office, Acrobat Reader, and Adobe Photoshop. Rather than granting access to each application individually, I could create a group called Standard Applications that would contain each of these applications. I could then publish the Standard Applications group and use filtering to give the Everyone security group access to it.
The technique for publishing a group of applications is fairly similar to that of publishing an individual application. Begin by opening the 2X ApplicationServer & LoadBalancer Console, and clicking the Publishing button found on the left side of the console. This will cause the console to display all of the applications that you have published so far. Now, click the Add button, and you will see a screen asking you what you would like to publish, as shown in Figure A.

Figure A: You must tell 2X ApplicationServer what you would like to publish
Select the option to publish an application group, and click Next. At this point, you will see a screen that’s similar to the one shown in Figure B. As you can see in the figure, this screen prompts you to enter a name for the group that you are creating. I also recommend entering a brief description of the group’s purpose, as I have done in the figure. This screen also gives you the option of changing the group’s default icon if you should be inclined to do so.
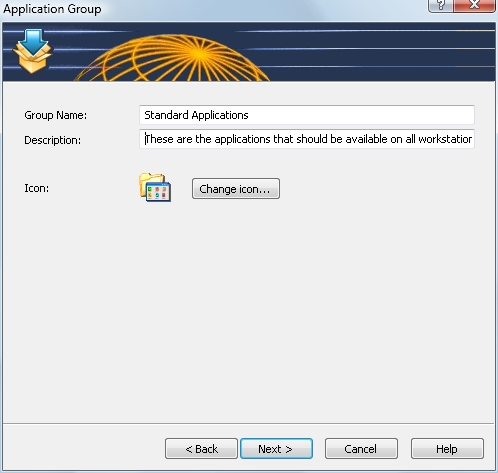
Figure B: Enter a name and a description for the group that you are creating
Click Next, and you will be taken to the Filtering screen. As you can see in the figure, the Filtering screen allows you to control who should have access to the application. If you look at Figure C, you can see that I have given access to the application group to User1, but I could have just as easily granted access to the Everyone group or to any other group. Keep in mind that you aren’t just limited to filtering by users and groups. You can also filter by client or by IP address.

Figure C: The Filtering screen allows you to control who will have access to the applications in the group
Click Finish and the group that you have created will be added to the console’s list of published resources. You probably noticed that the wizard never gave you a chance to specify which applications should be included in the group that you just created. The process of adding applications to the group is simple, but it isn’t exactly intuitive.
If you look at Figure D, you will notice that the list of published applications is hierarchical. When you publish an application, the application is placed beneath the level of the hierarchy that was selected at the time that you published the application. For example, if the Published Resources container was selected at the time that you published an application, then the application will be published at the root level of the hierarchy. Likewise, if you select an application group prior to publishing an application, then the application will become a part of that application group, as shown in Figure E.
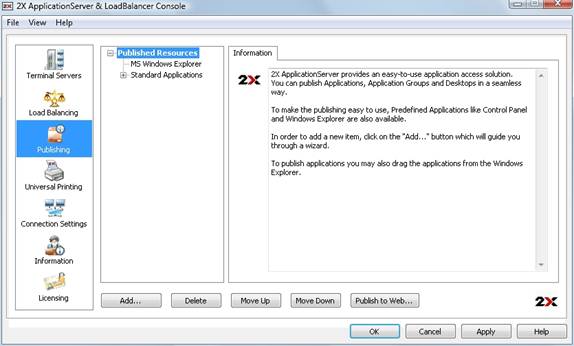
Figure D: Published resources are arranged hierarchically

Figure E: You can publish an application beneath an application group
If you have already defined a bunch of applications and you decide that you want to make them a part of a security group (or a part of a different security group) then you will be happy to know that you are not stuck using the application’s previously chosen location within the hierarchy of published resources. You can easily change an application’s group membership by selecting the application within the list of published resources and then using the Move Up and Move Down buttons to change the application’s location within the hierarchy.
Publishing a Desktop
One interesting type of resource that 2X Application Server allows you to publish is a Windows desktop. This allows you to provide users with the same type of desktop that they would receive if they made an RDP connection to a server.
To publish a desktop, click the Add button, and you will be taken to the screen shown in Figure A. This time, select the Desktop option, and click Next. When you do, you will see the screen shown in Figure F. As you can see in the figure, you are prompted to enter a name and description of the desktop that you are publishing. You also have an option for setting the desktop screen resolution, and for changing the icon that is associated with the desktop.

Figure F: You must enter a name for the desktop that you are publishing, and select a screen resolution for it
Click Next, and you will be taken to the now familiar Filtering screen. Use this screen to control who should have access to the desktop, and then click Finish to publish the desktop.
Conclusion
In this article, I have explained how to go about creating and using application groups. I then went on to show you how to publish a Windows desktop. In the next article I will conclude the series by showing you how to configure the desktop that you have just published. I will also show you how you can publish individual documents.
If you would like to read the previous articles in this series please go to:
